If you are thinking about decorating a holiday party, then you will love ideas on how to create and decorate voluminous do-it-yourself birthday numbers. According to the principle of execution, such a craft is similar to a piñata, a hollow Mexican toy filled with tinsel and scraps of paper. The piñata is an important part of any children's party in Mexico and is used in competitions and decorations. We will not fill our craft with paper tinsel, leaving it hollow, but we will definitely decorate the cardboard base with paper, napkins, ribbons.
To make a birthday number with your own hands, first you need to start making the base, and then decorate it at your discretion - with paper, corrugation, napkins, ribbons or organza. To make a simple bulk base cardboard is usually used, in this case you will need a large sheet of cardboard, you can use a cardboard box from household appliances: a refrigerator, washing machine, TV. The box needs to be taken apart into sheets and laid out on a work surface, most likely you will need to sit comfortably on the floor so that you have room to do the work.
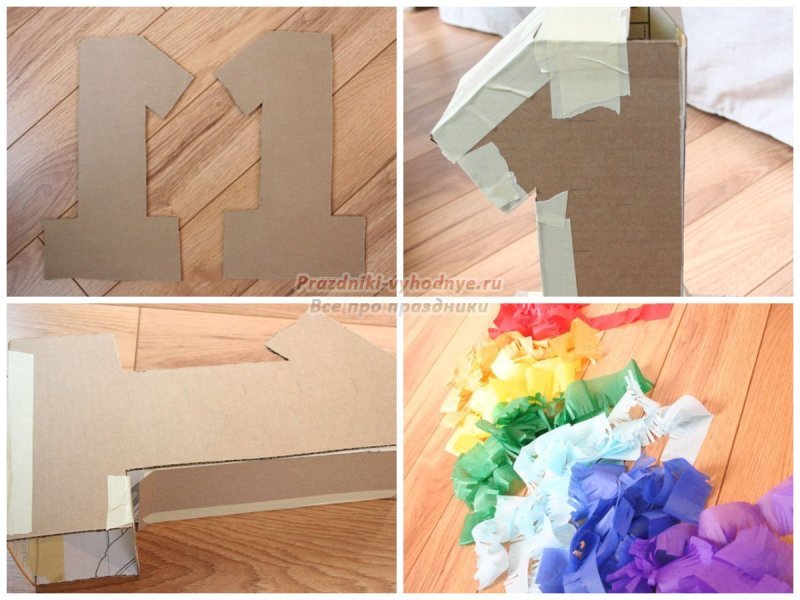
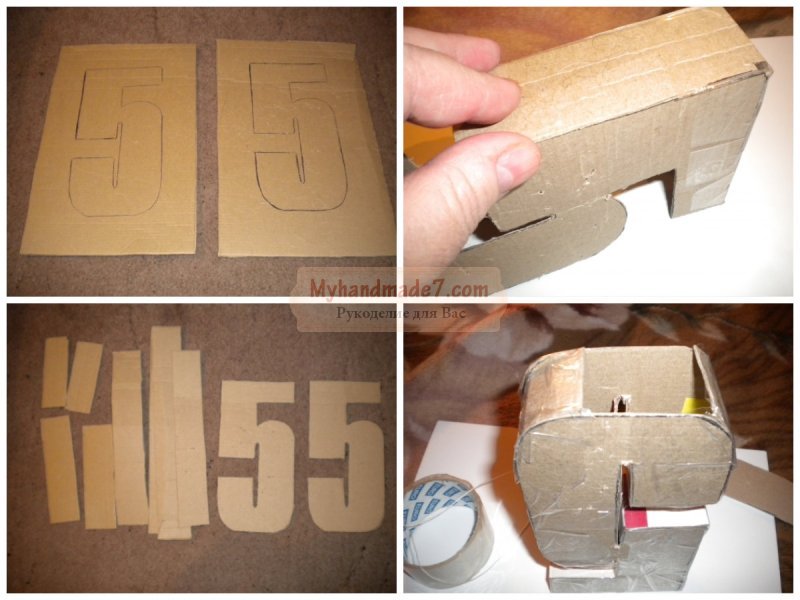
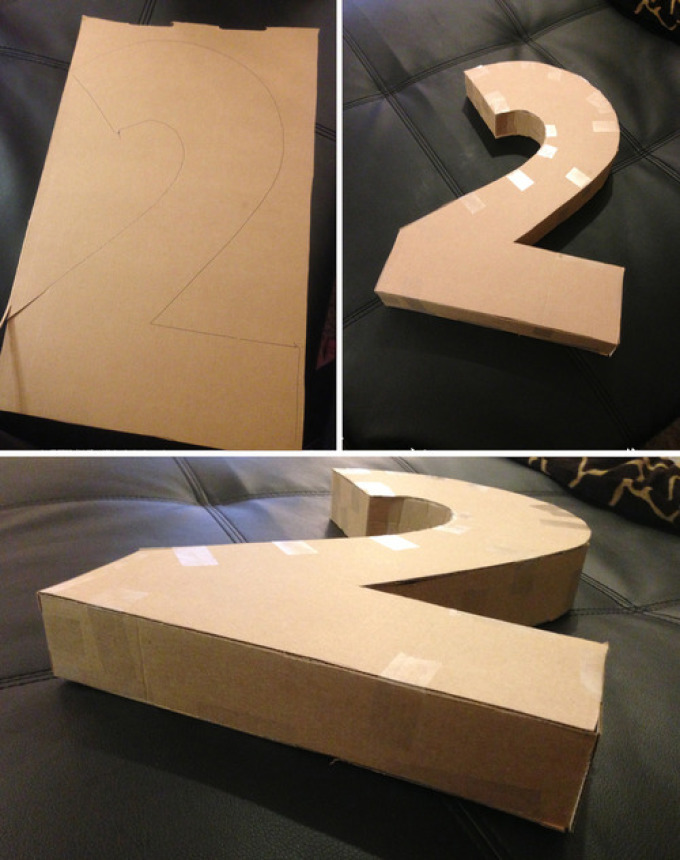
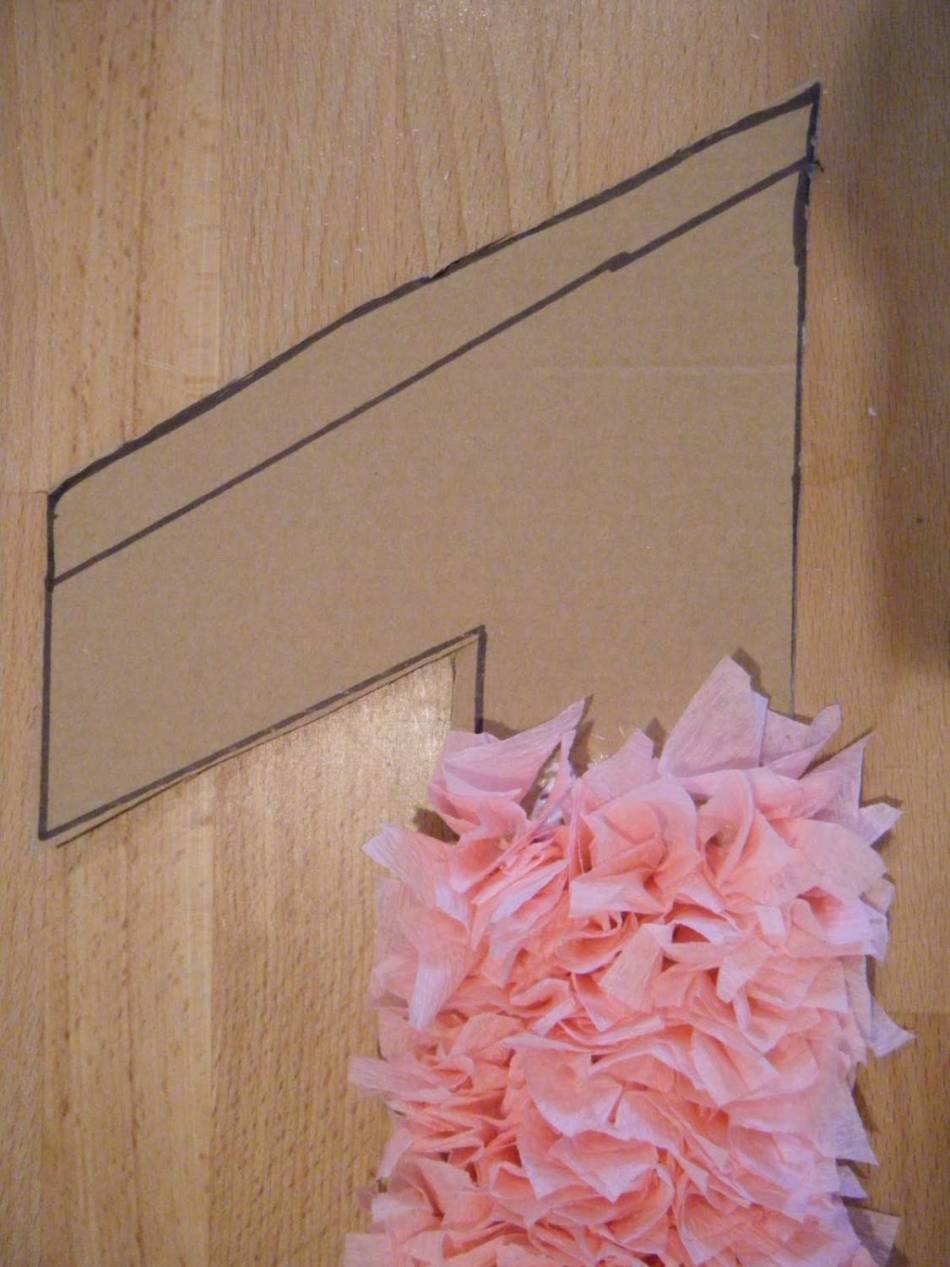
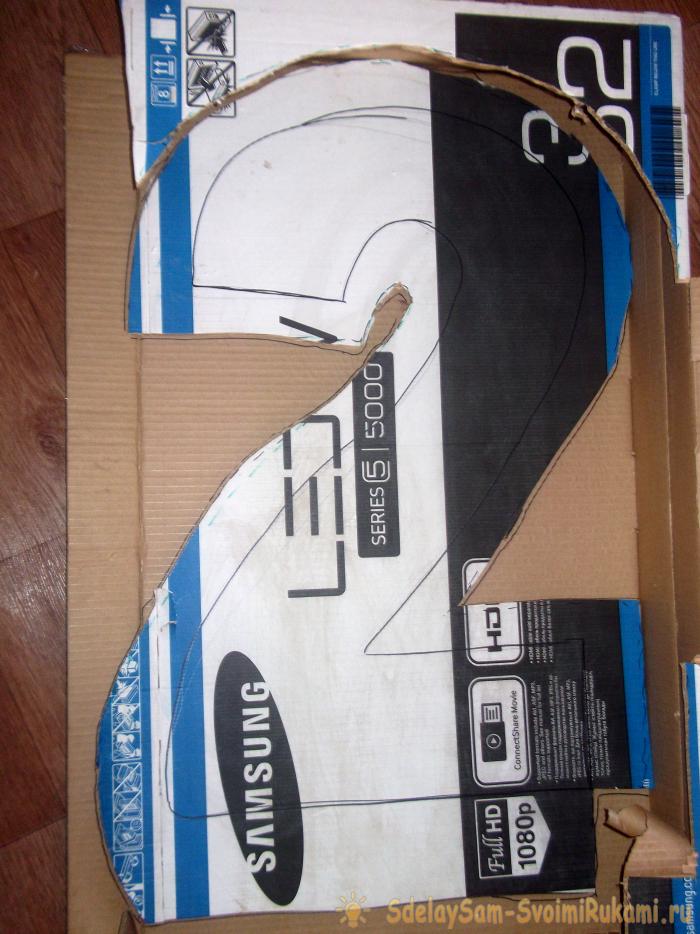
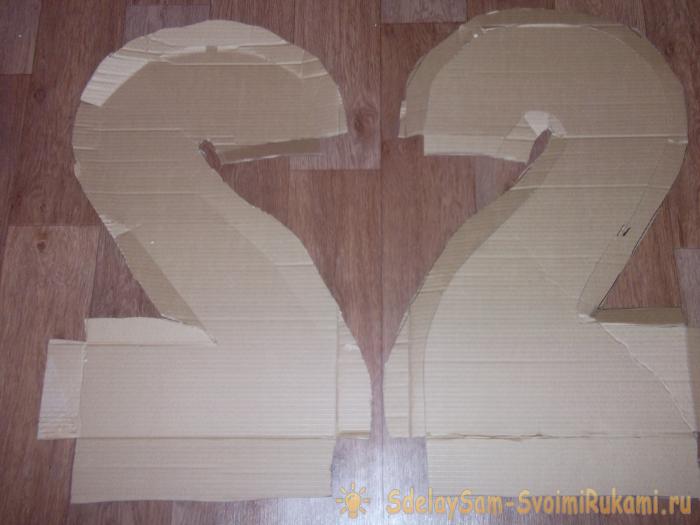
On cardboard, you need to draw the outline of the selected number, since it will be large, it is unlikely that you will be able to print the template on a printer. If you draw a high-resolution number on a computer, you can print it on several sheets of paper, and then glue and cut along the contour. Attach the resulting template to the cardboard and also circle it. You should get two identical blanks, they must be carefully cut so that the edges are even. In addition to two blanks in the form of numbers, we will also need strips of cardboard from which the side walls will be made. The size of the numbers can be whatever you want, depending on the sheet of cardboard that you have at your disposal. The sideband will determine the width of your volumetric number.
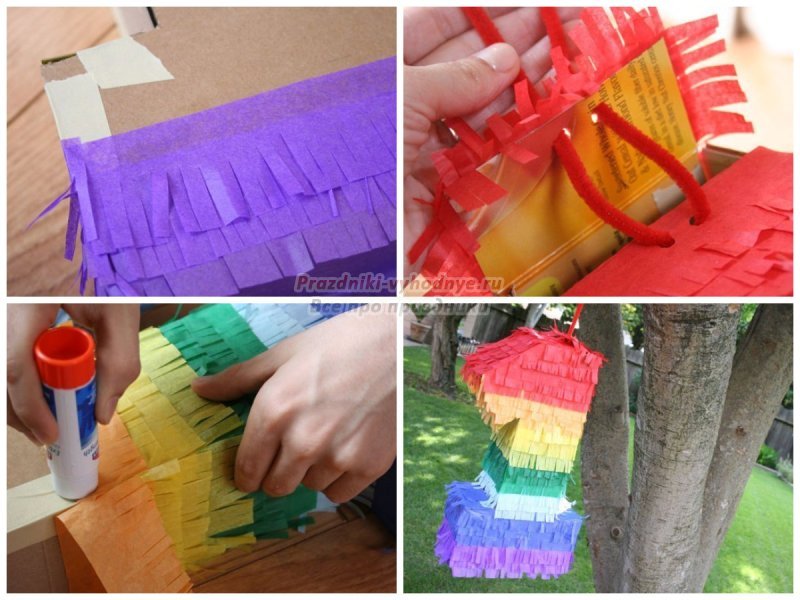
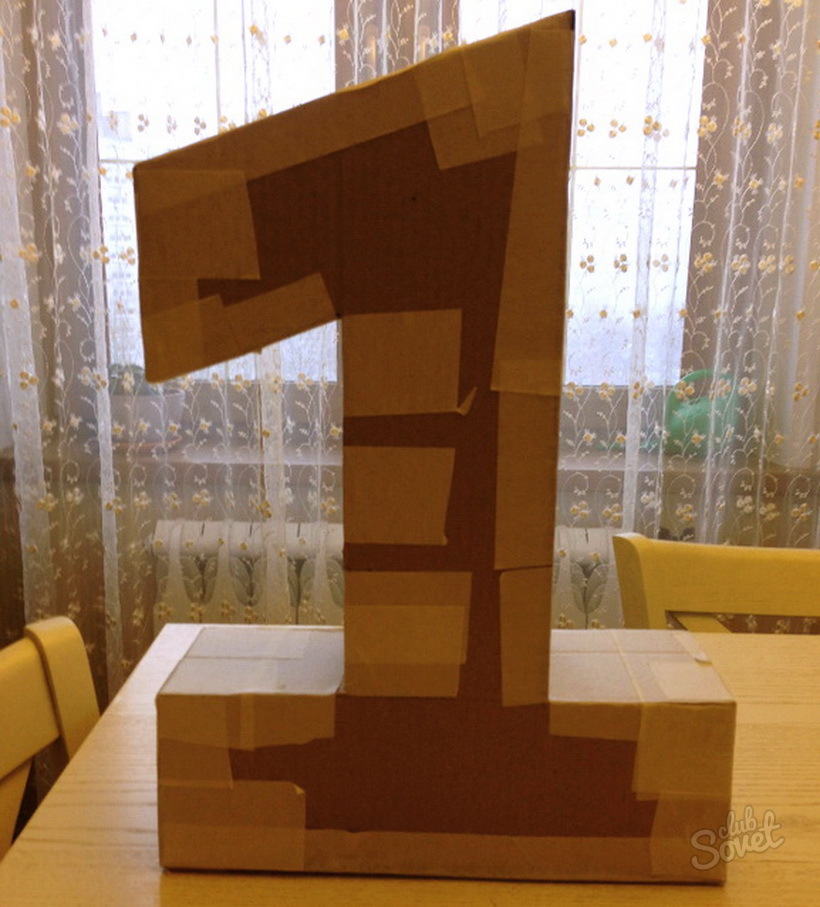
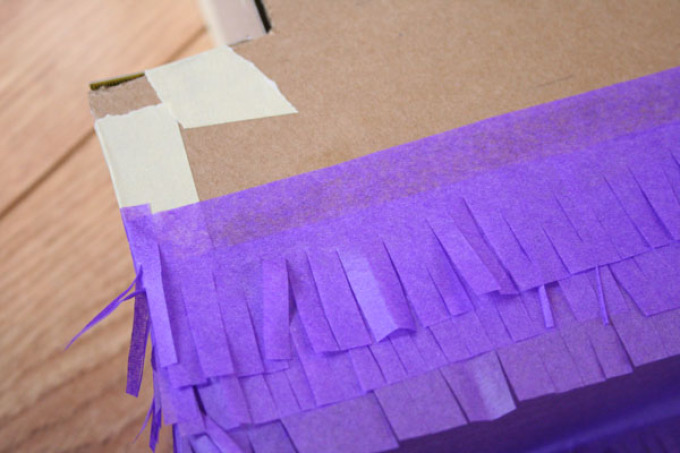
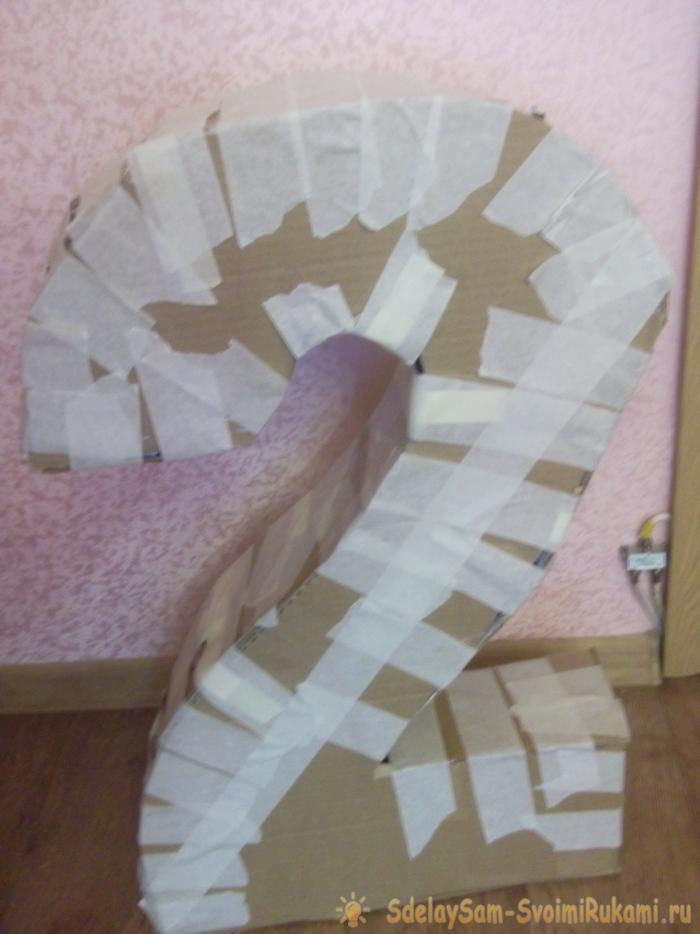
When you have all the cardboard blanks ready, you can start decorating the three-dimensional figure by gluing the edges with masking tape. To make it more durable, you can glue the entire surface with masking tape, and on top with a layer of thin paper. Sometimes a hole is left in the hollow figure from the bottom or top, and then it is filled with tinsel, like a Mexican piñata.
Thus, you can make any number, and our tips will be useful to you if you decide to make three-dimensional letters, for example, you can make a three-dimensional inscription "Love" or a heart using the same technique. The letters can be used for a wedding or romantic photo shoot.
Number 1 for a birthday with your own hands
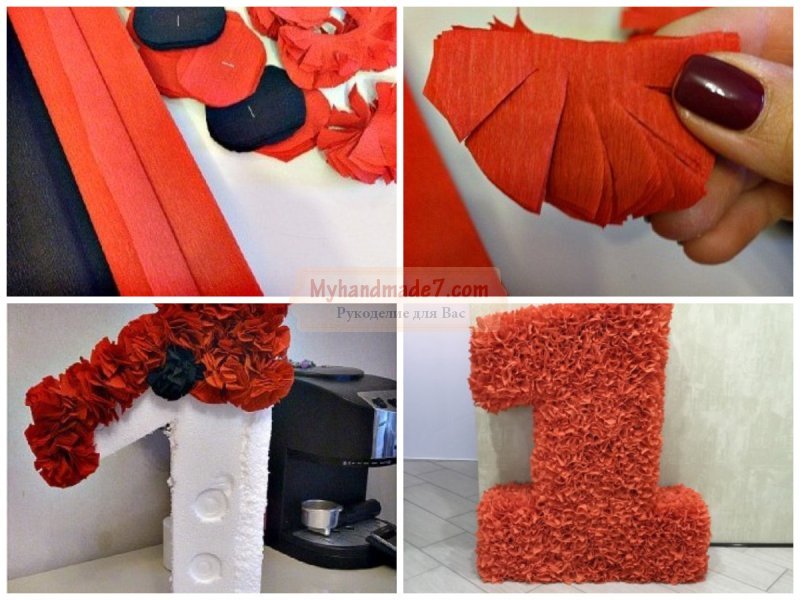
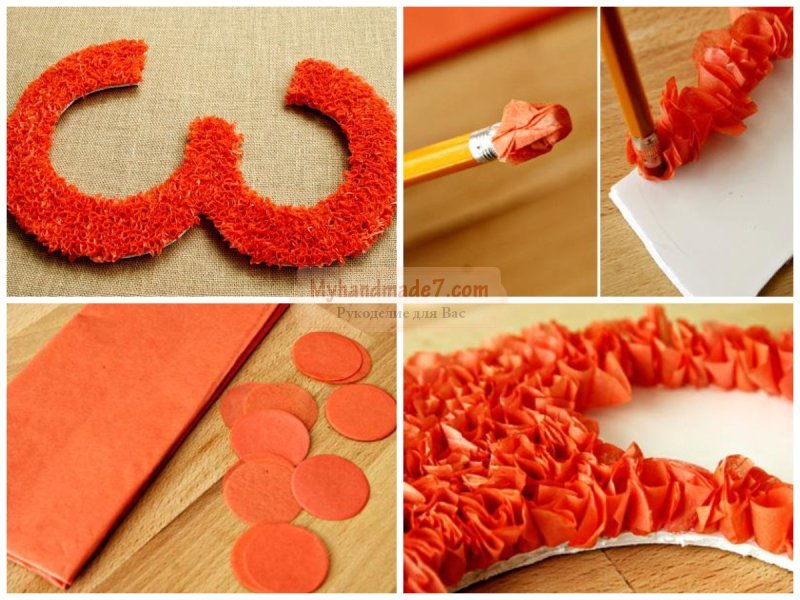
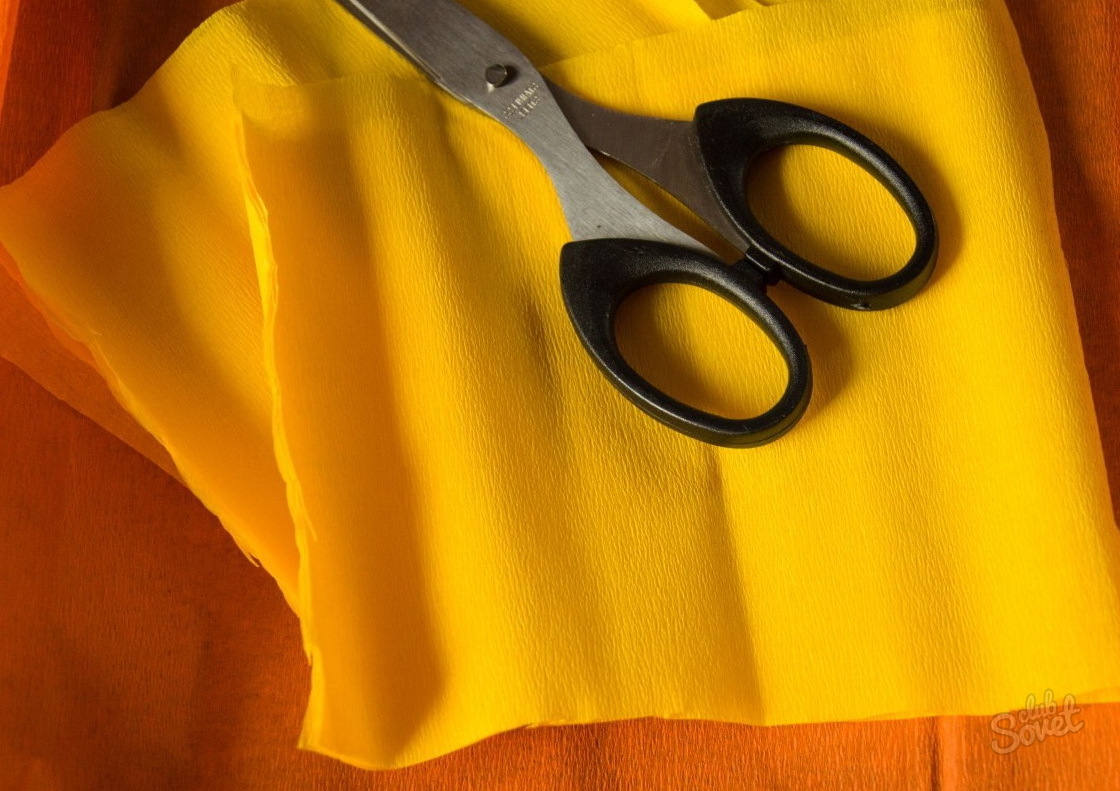
When you know how number 1 for birthday do it yourself, it remains only to choose the material and method for decorating it. The most popular material for decoration is corrugated paper, only the ways of using it differ. Another material that you will definitely need in the process of work is glue. If you decorate the number with paper, then PVA glue will provide a secure fixation, but if you decide to use satin ribbons, sisal, organza or buttons, then you can use silicone glue.The easiest way to decorate a cardboard blank is to cut the corrugation with “grass”. In this case, soft corrugation or other thin paper should be used. First, it must be cut into strips 6-7 cm wide, and then a fringe is made on each strip, cutting “grass” 0.5 cm wide. .
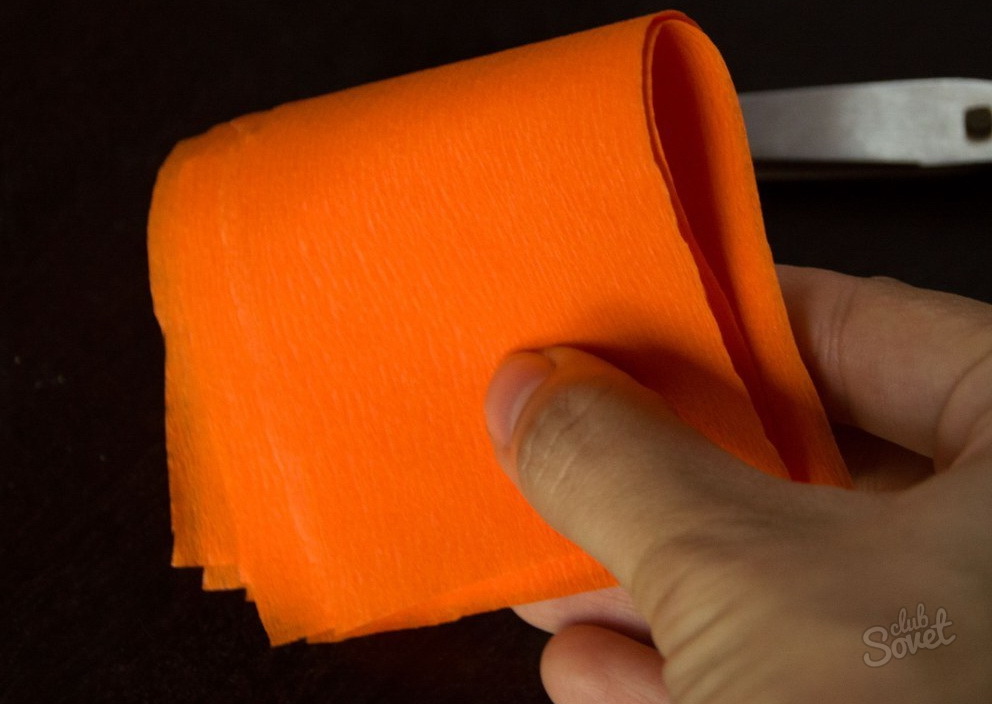
Now the finished fringe must be glued to the workpiece, starting from the bottom row. The next strip must be glued so that the fringe covers half of the previous strip. Thus, it is necessary to cover the entire surface of the figure.
In most cases, only the front and side strips are decorated if you use the craft to decorate the wall for a holiday or for a photo shoot.
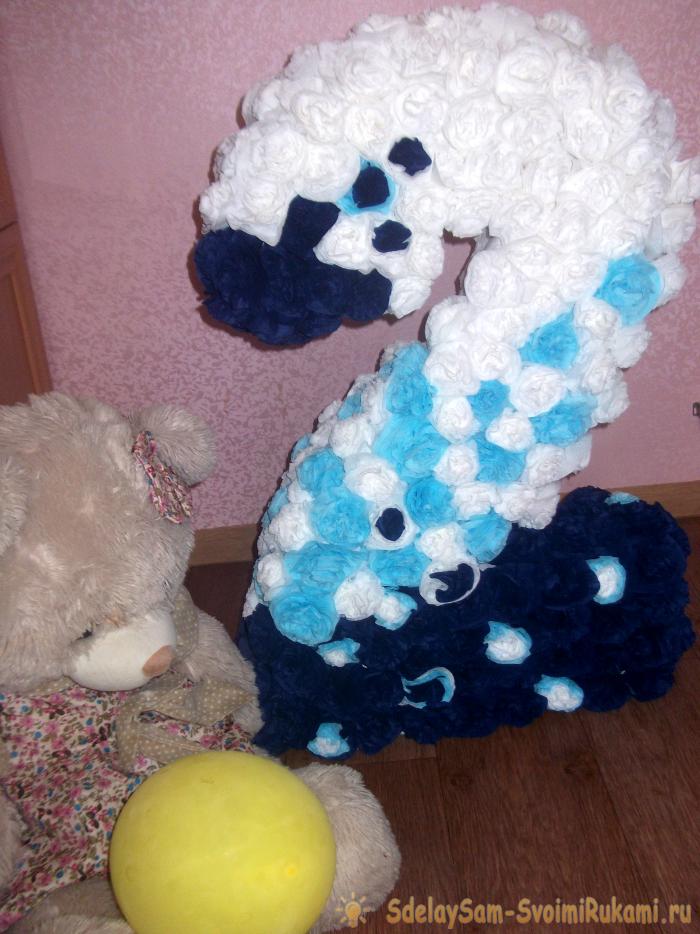
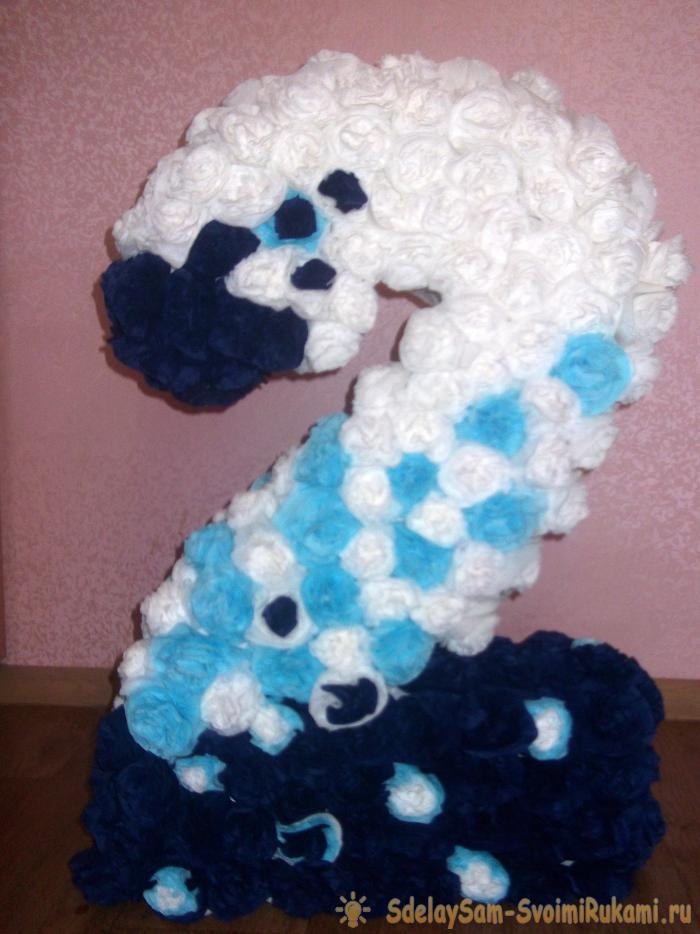
Number 2 for a birthday with your own hands
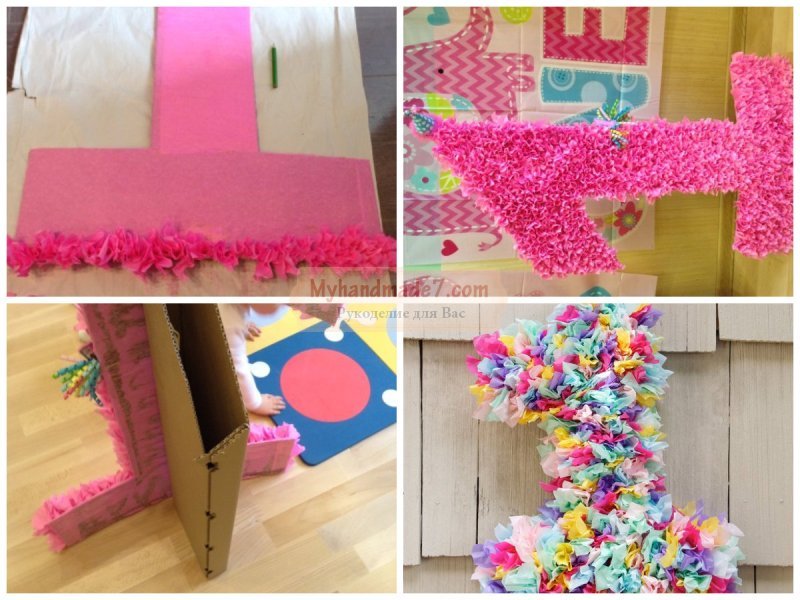
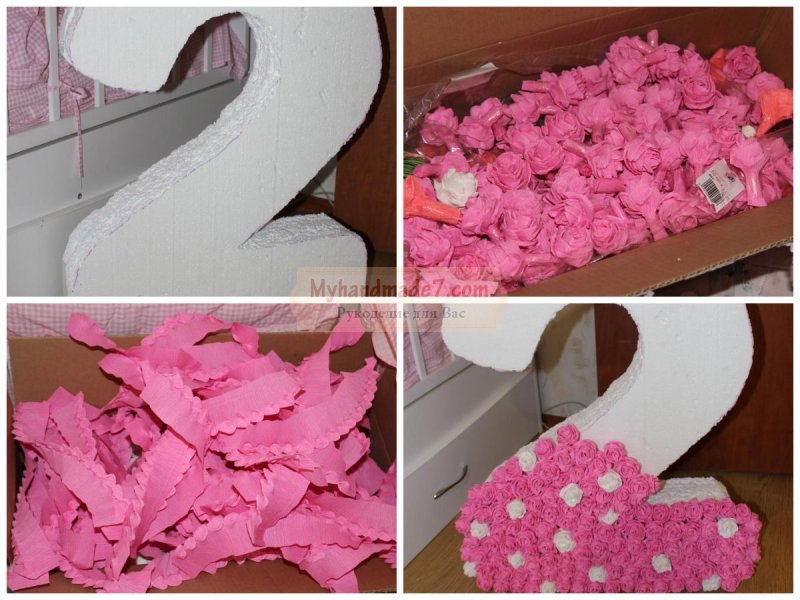
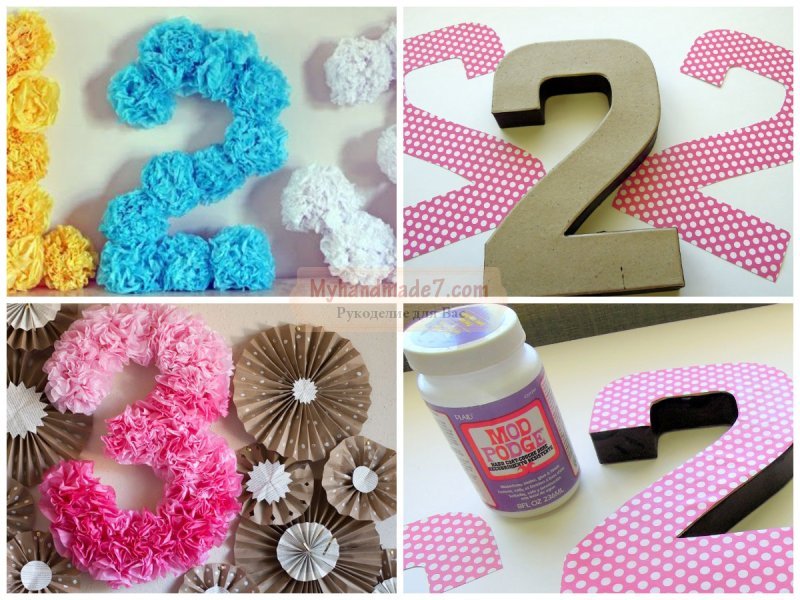
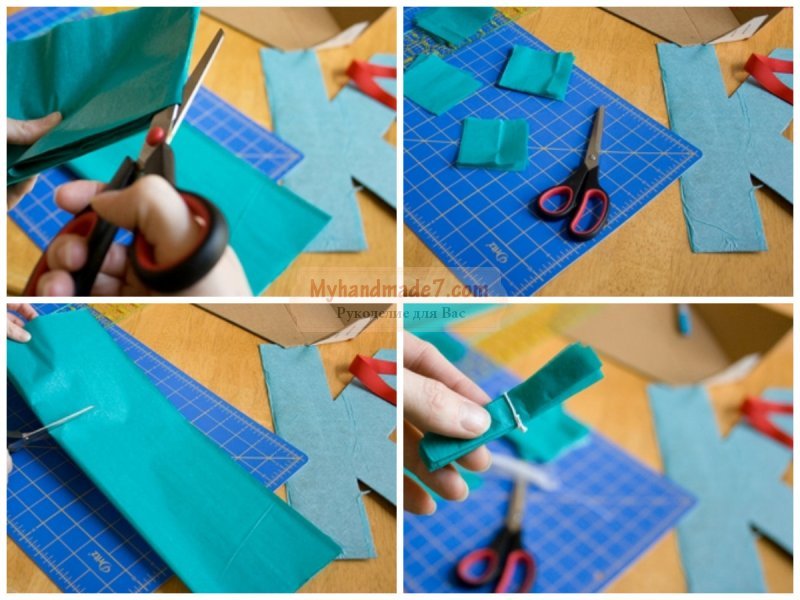
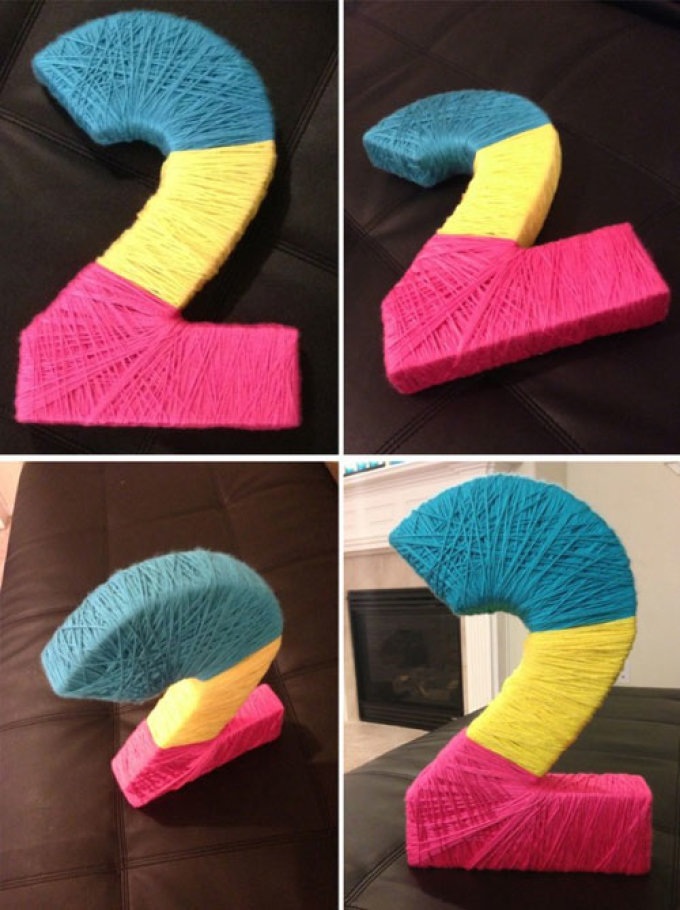
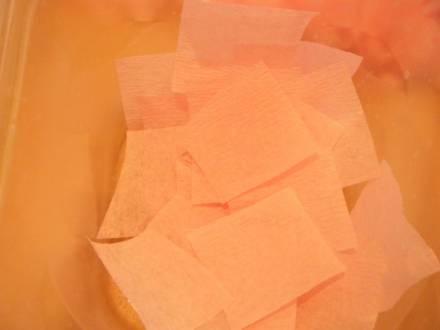
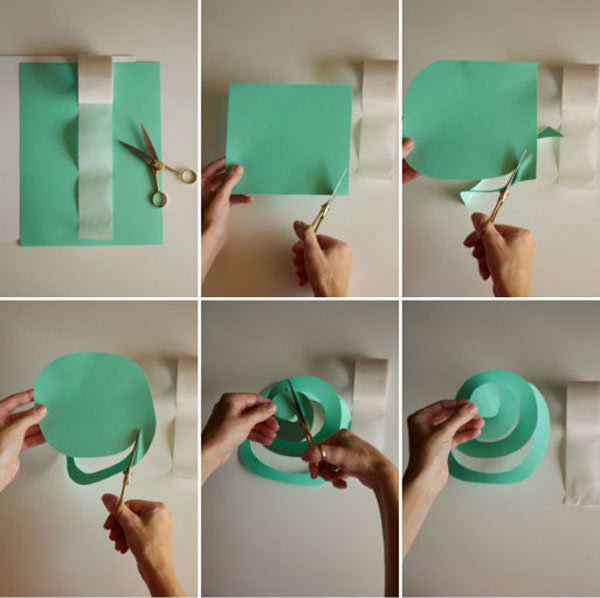
in a simple way can be made and beautiful, voluminous number 2 for birthday do it yourself. This technique resembles facing, which is well known to all children, and with its help they perform original crafts.We need to cover the finished cardboard blank with squares of corrugated paper, we will get a fluffy number that will become a real decoration of the birthday party, and all the fun will be captured in photographs, so the memories will definitely remain for a long time.
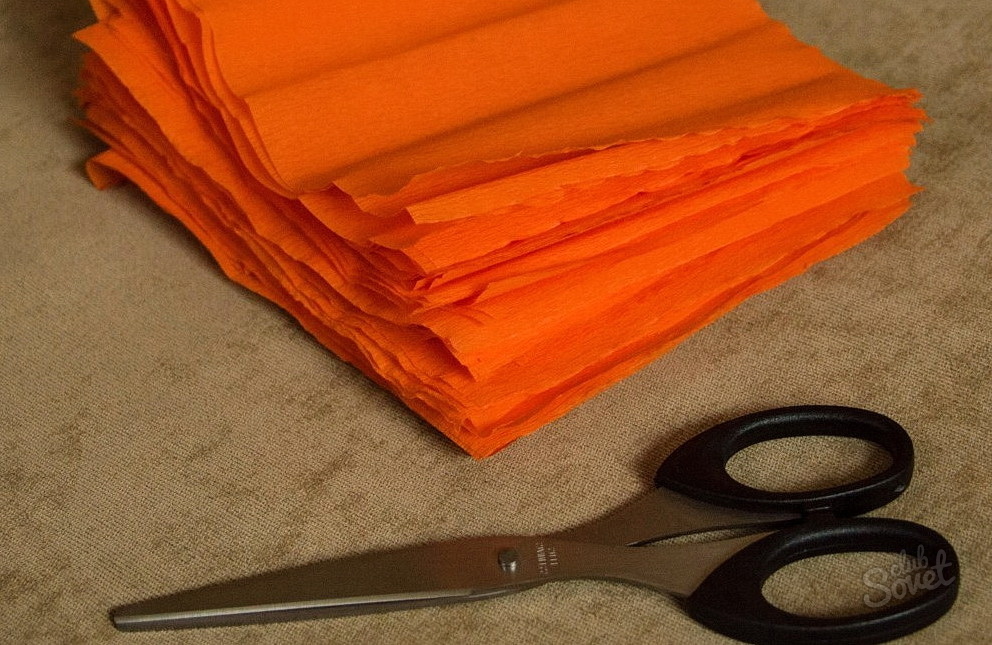
You can use one color or several colors to create a striped pattern. First, the sheets must be cut into strips 5 cm wide, then all the strips should be stacked and cut into squares with a side of 5 cm. Thus, to decorate a large figure, we will use corrugated squares 5 by 5 centimeters, however, for a smaller base, you can also reduce the size of the square : 4 by 4 cm or 3 by 3 cm.
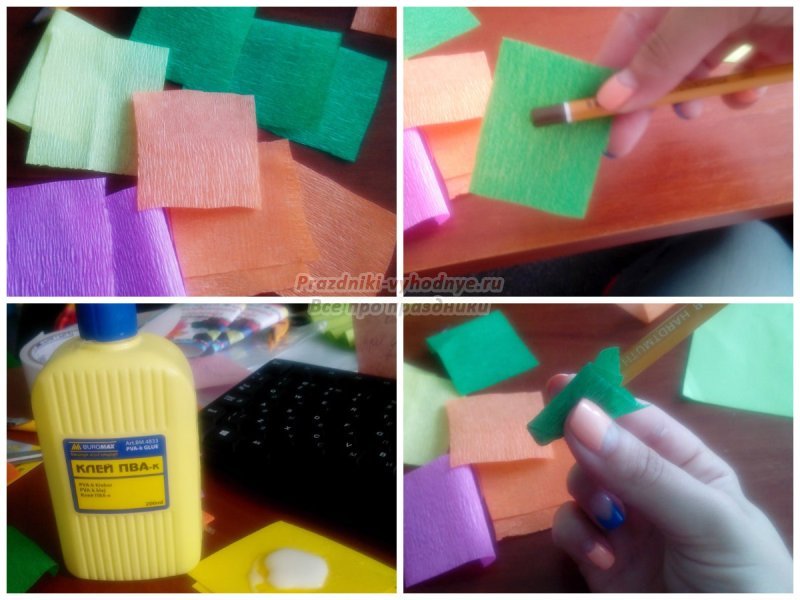
Now that we have all the square pieces of paper ready, we can start decorating. We need only one tool - a simple pencil or pen. You can use a saucer or a lid into which you need to pour PVA glue.
We take one square of corrugated paper in our hand, lean the blunt end of the pencil against its center and wrap the paper around the pencil. Holding the paper, we dip the tip of the pencil (with paper) into the glue and lean it against the cardboard blank. You don’t need to remove the pencil right away, wait for a few seconds for the corrugation to fix, and then you can carefully remove the pencil, and glue the next paper square in the same way.
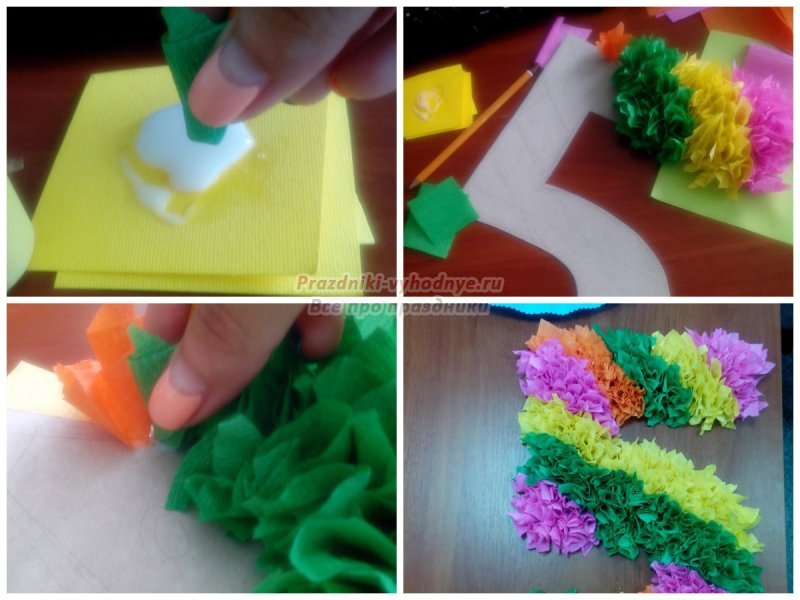
The main feature of trimming is to create a fluffy decor, so the squares should be very close to each other so that the ends of the paper stick up. Gradually, you will decorate the entire base with a corrugation of the same color or different, you can make stripes - straight or oblique. In a word, using this technique, you can decorate a cardboard base by creating a variety of patterns.
You will get a delicate decor if you use tulle or organza for decoration. The material must also be cut into squares, and then, using the facing technique, attach it to hot glue.
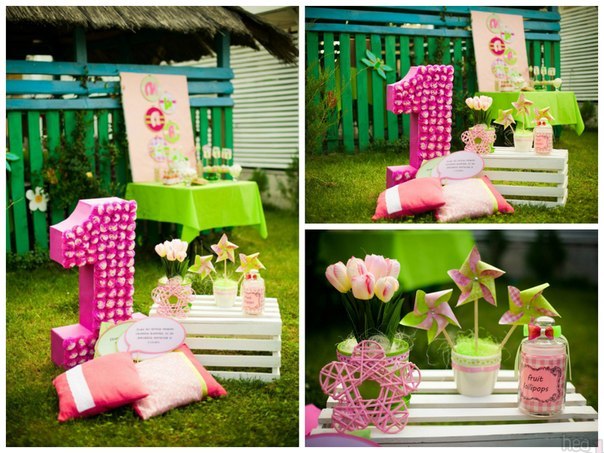
Number 3 for a birthday with your own hands
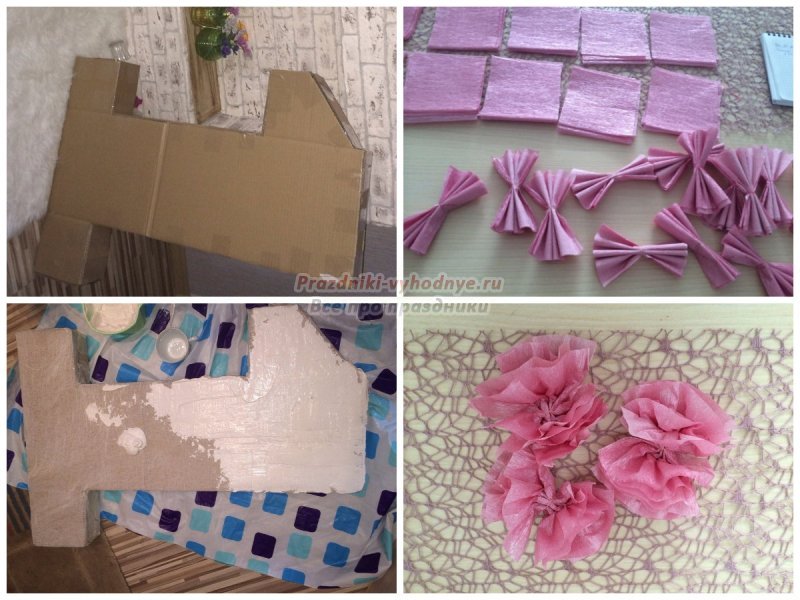
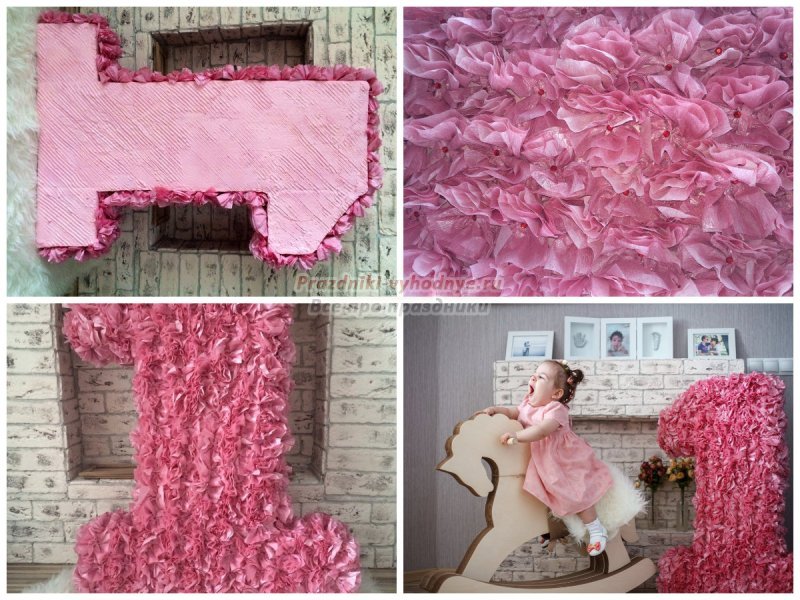
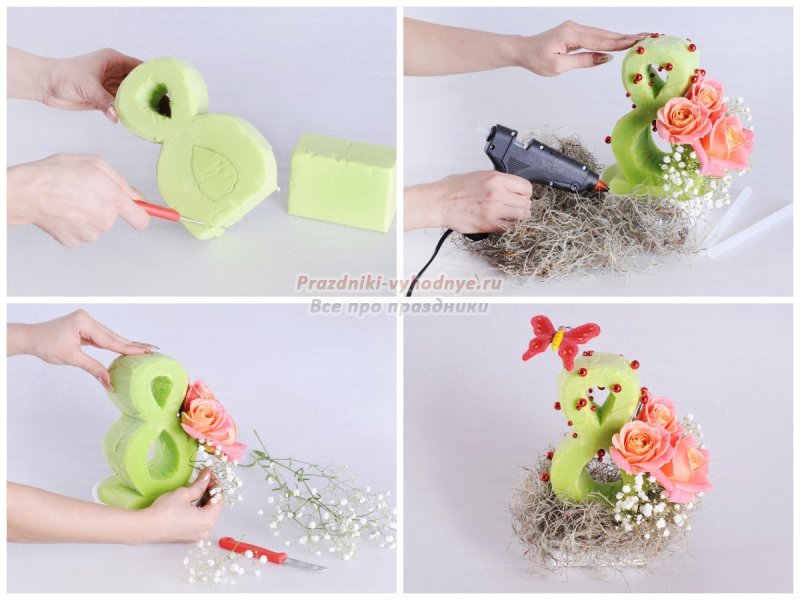
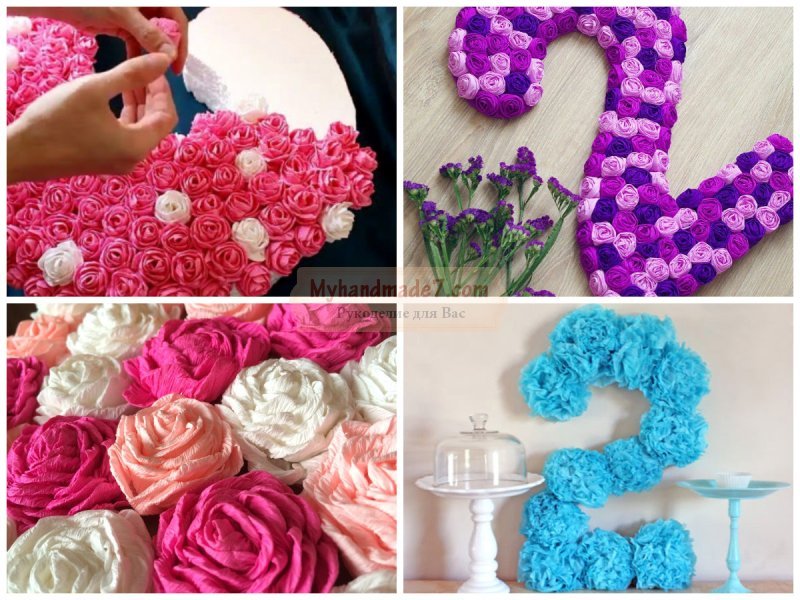
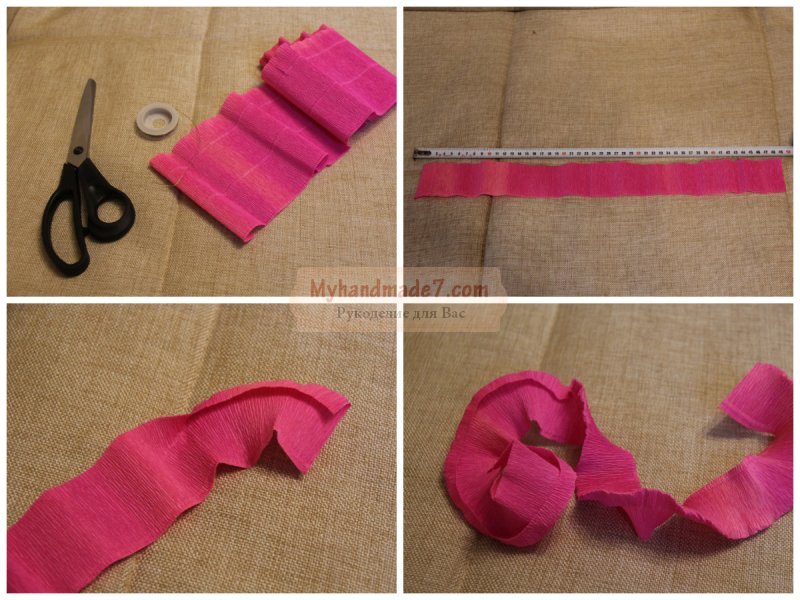
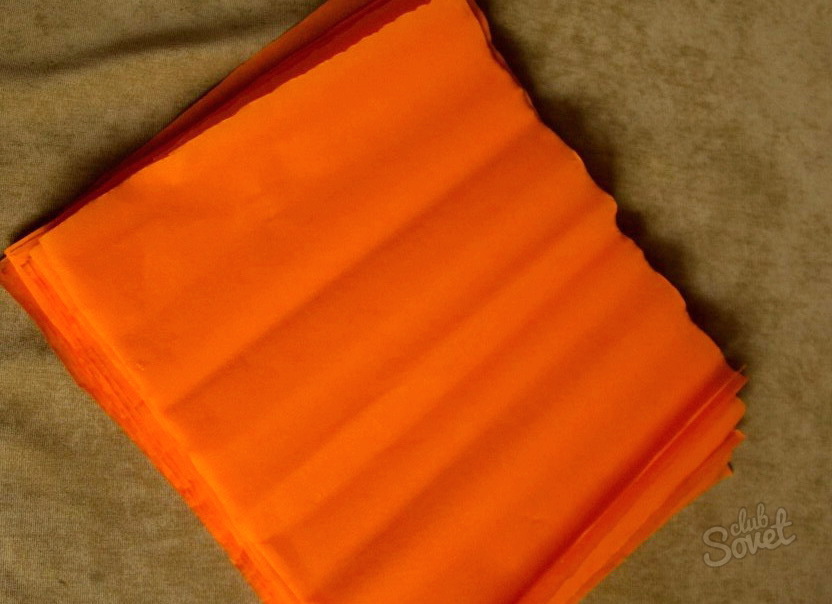
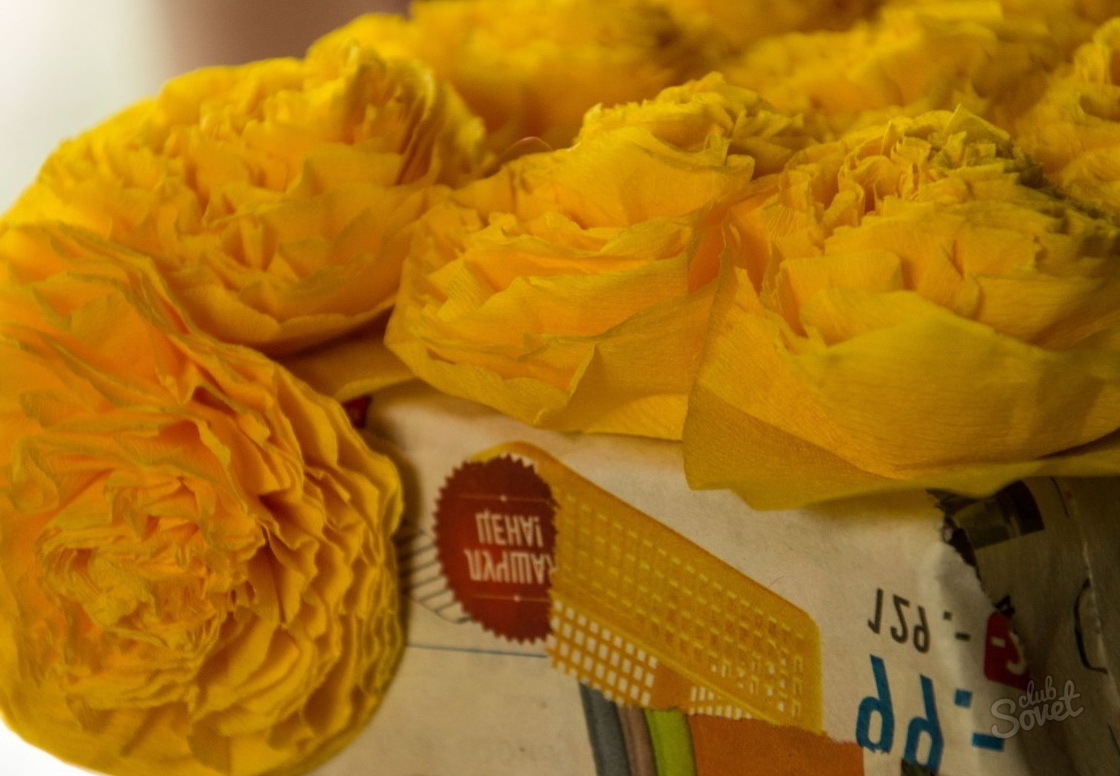
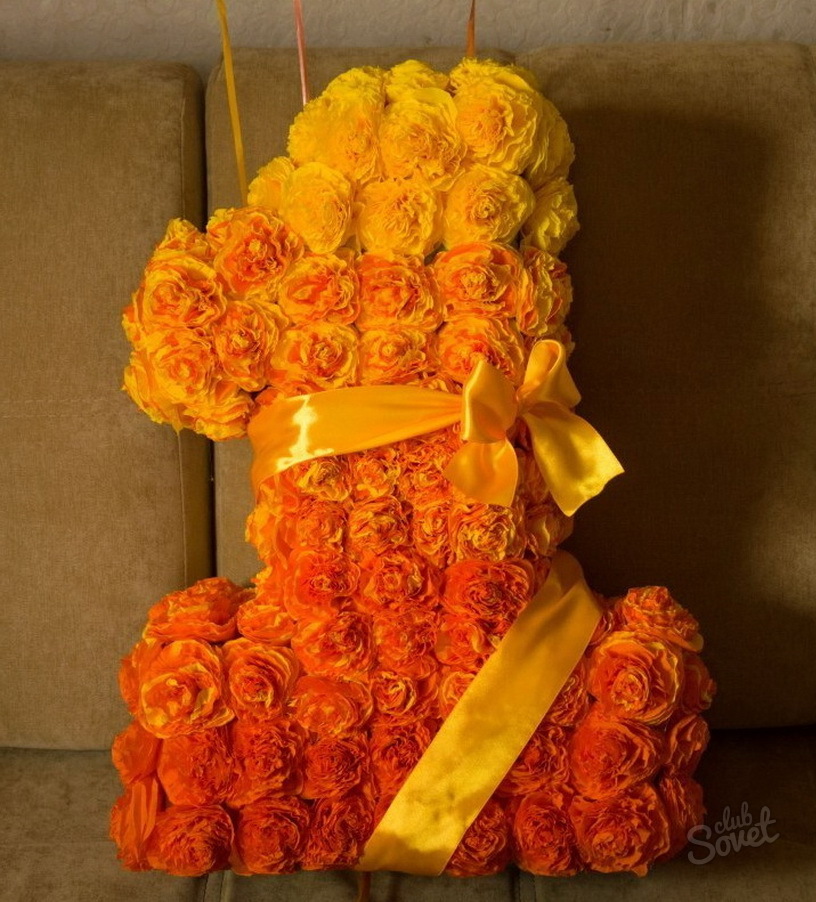
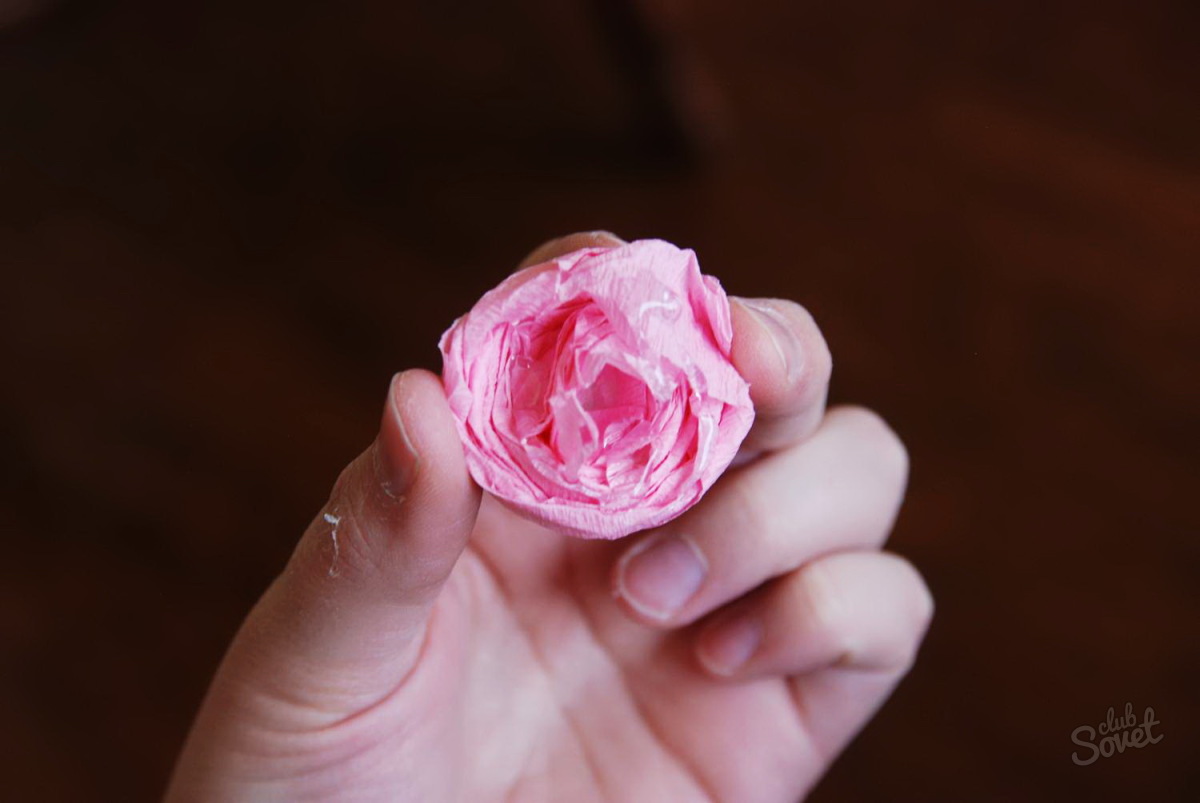
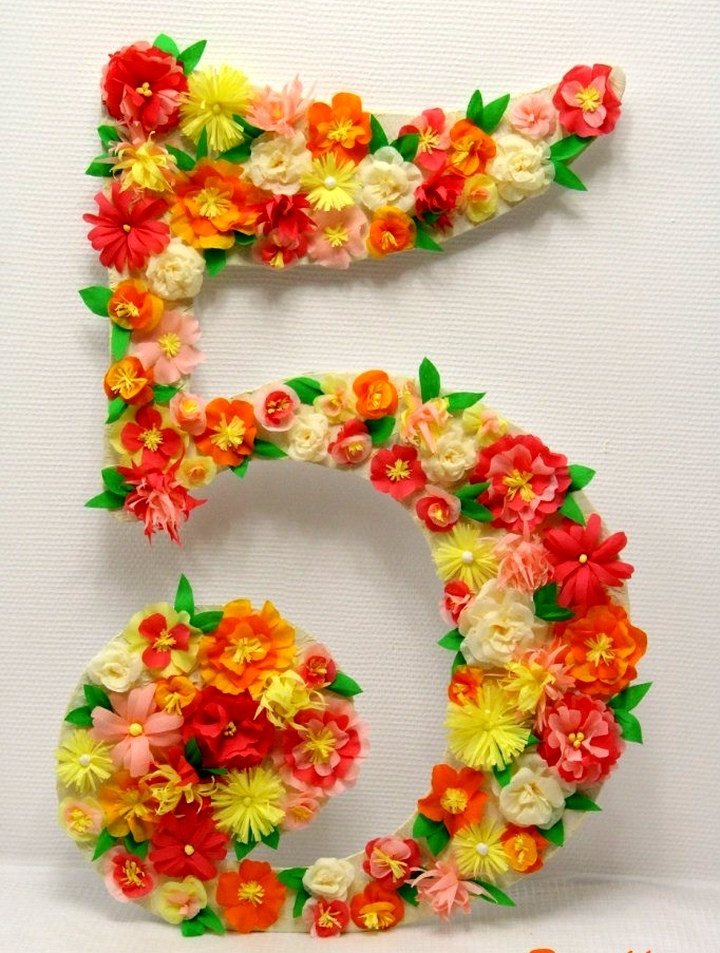
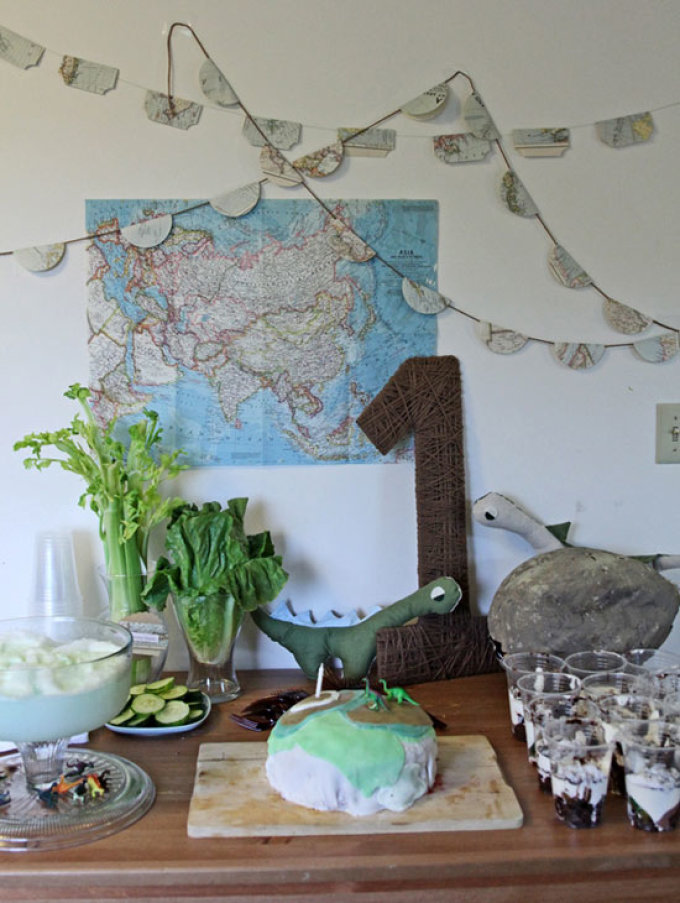
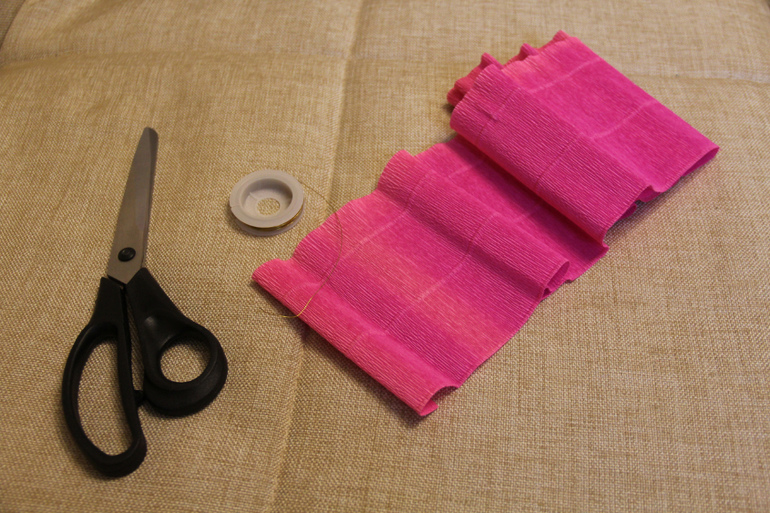
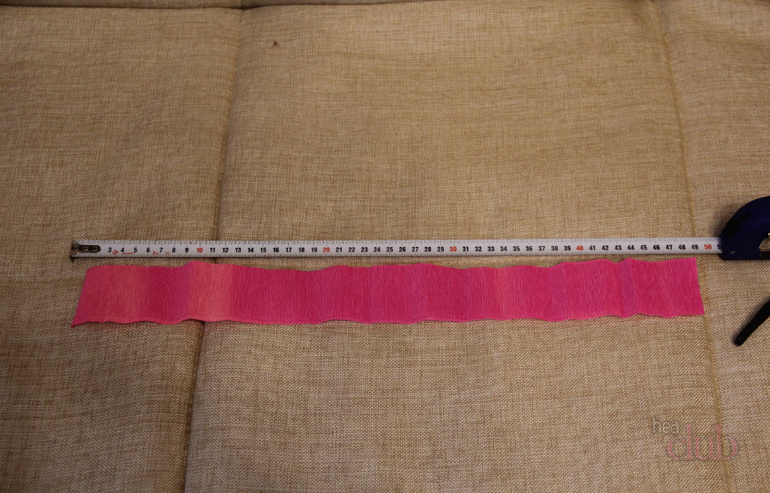
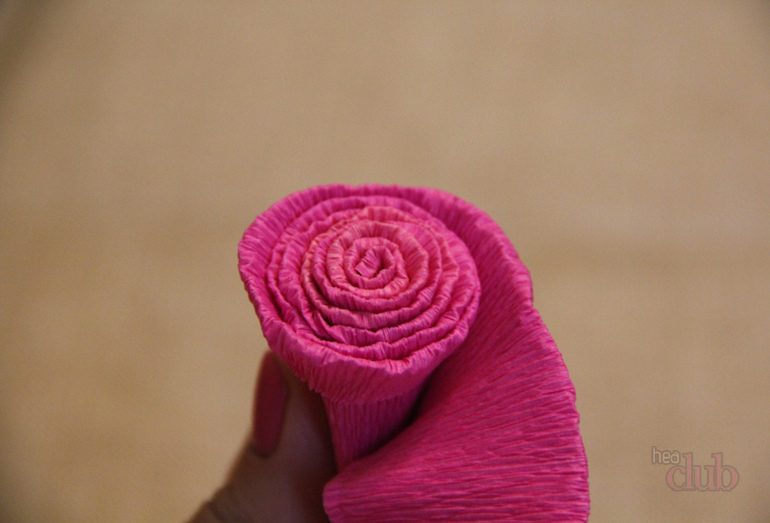
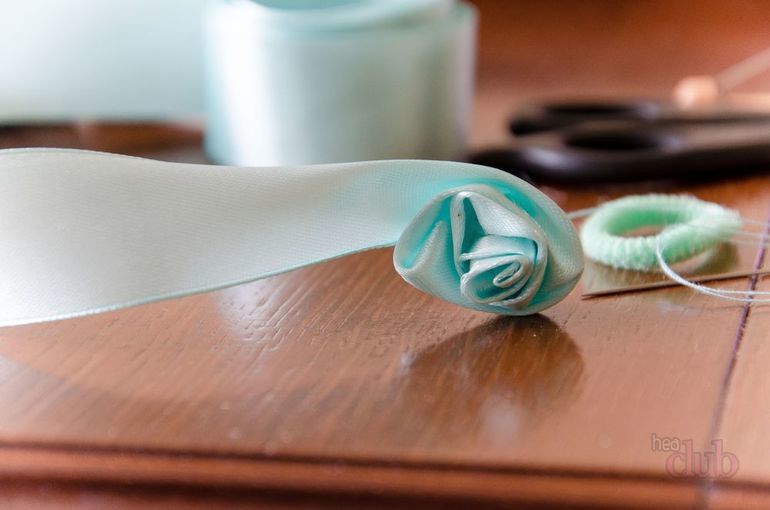
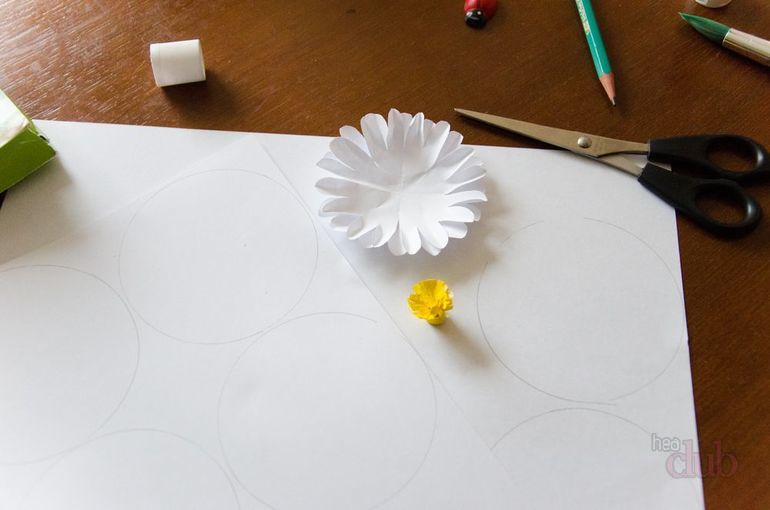
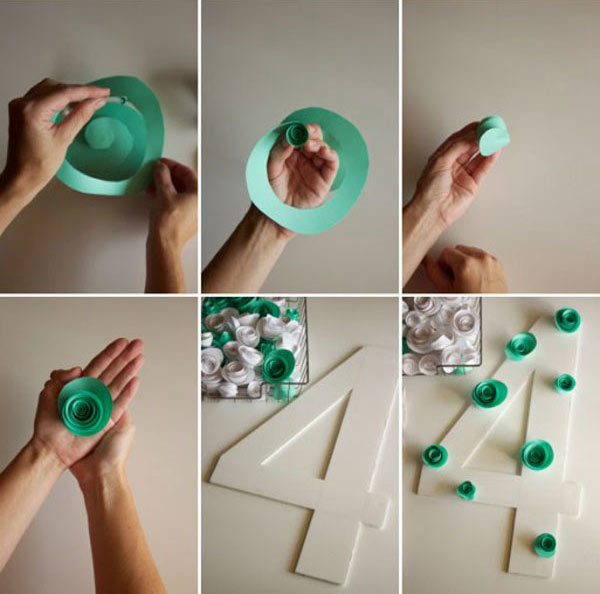
Do-it-yourself volumetric figures for a birthday will become a real decoration of the festive decor if they are decorated with flowers or pompoms made of corrugated paper. We already made crepe paper flowers when we organized. For a friend, you can prepare a paper bouquet with sweets or decorate the hall, because using this technique you can create numbers not only for your birthday, but also a figure eight for the March spring holiday.If you decorate the base with flowers, choose several similar shades of paper, then you will be able to create a bright and beautiful decoration for the holiday. For example, you can take white, red and pink corrugation. The width of one sheet is 50 cm, the sheet must be cut into strips of 3.5 cm, so that the strips on the corrugation run across the strip. When we have cut enough of these strips, each one needs to be stretched a little from one edge so that it becomes wavy.
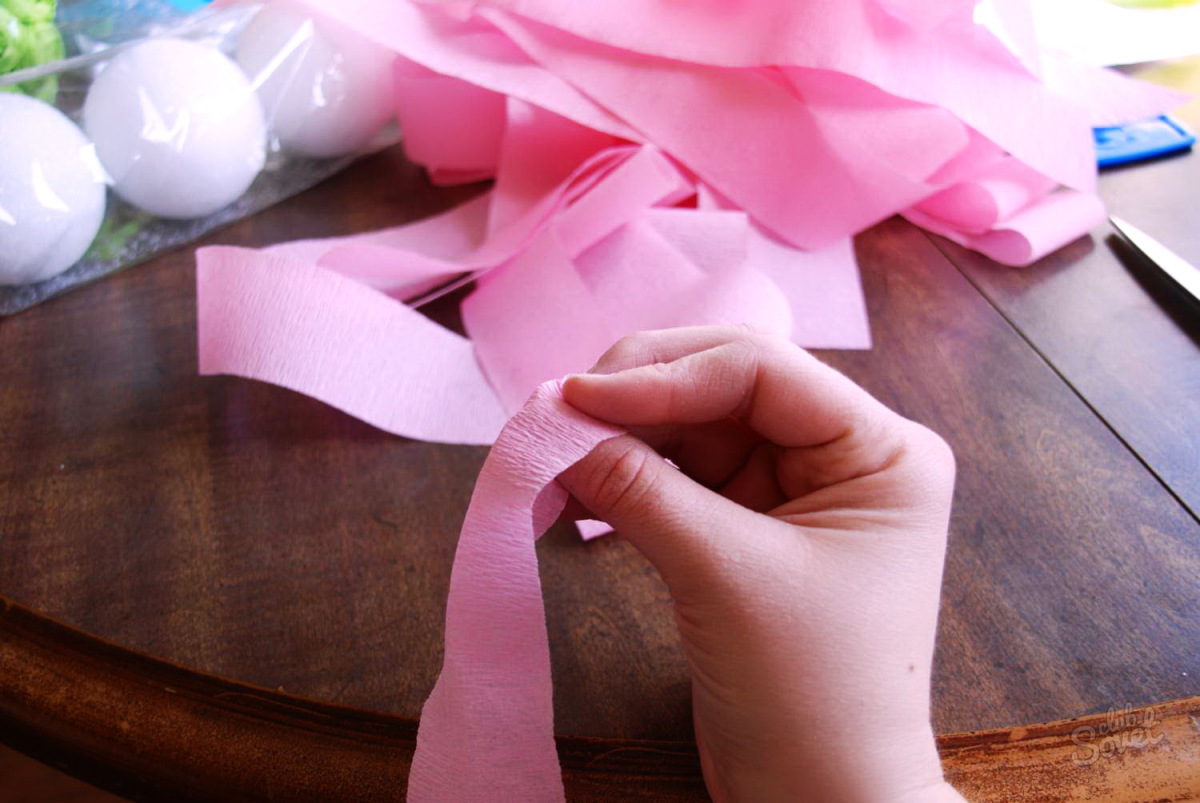
![]()
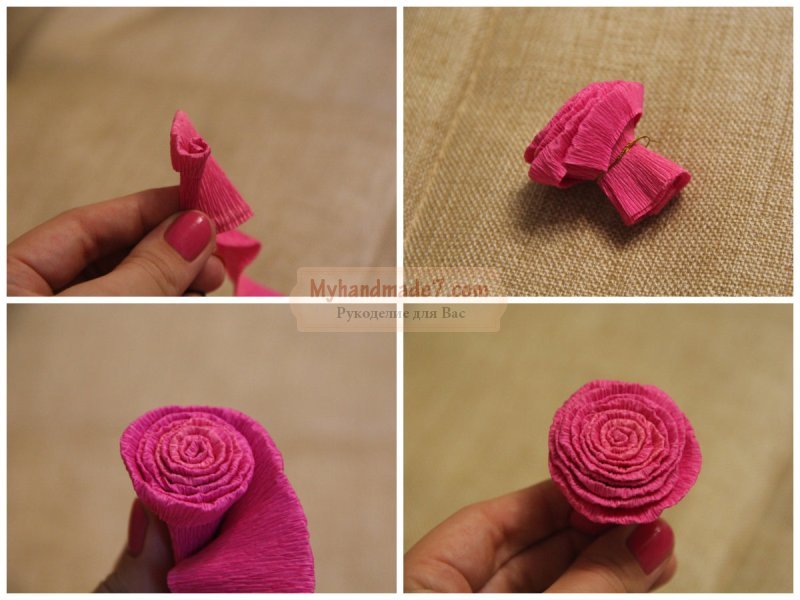
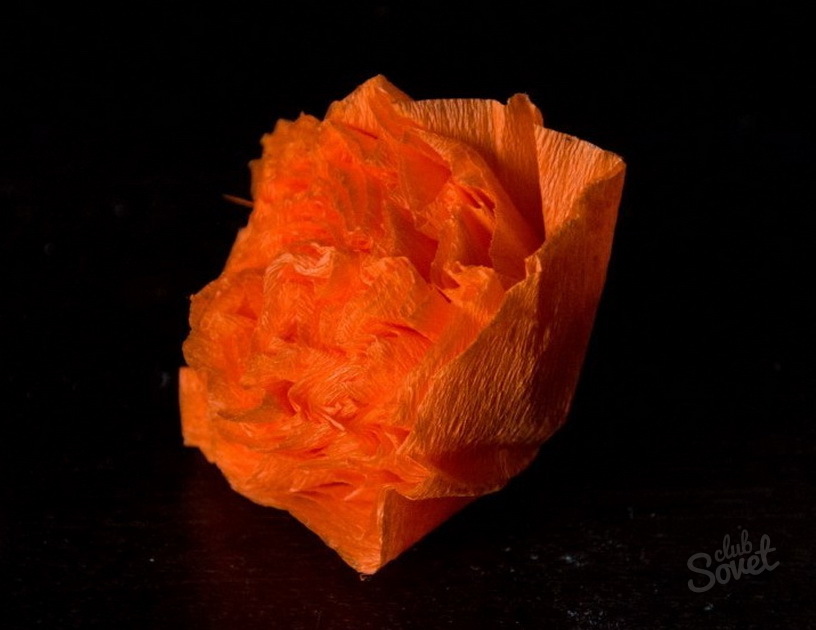
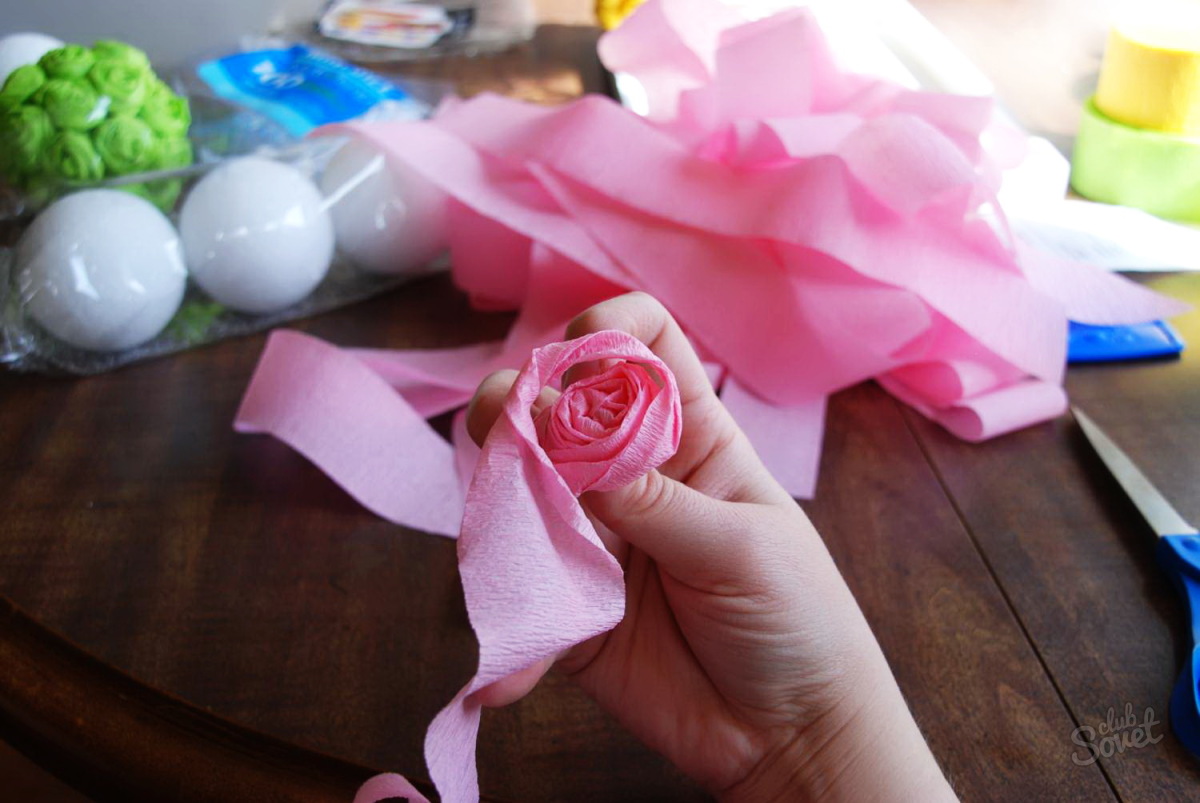
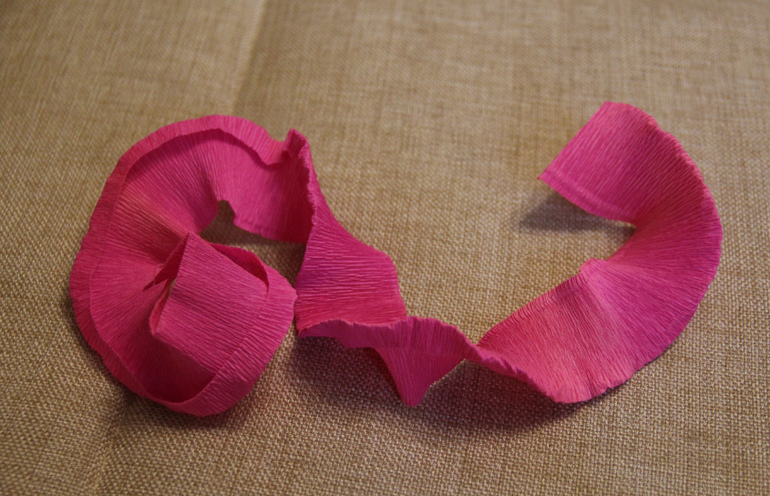
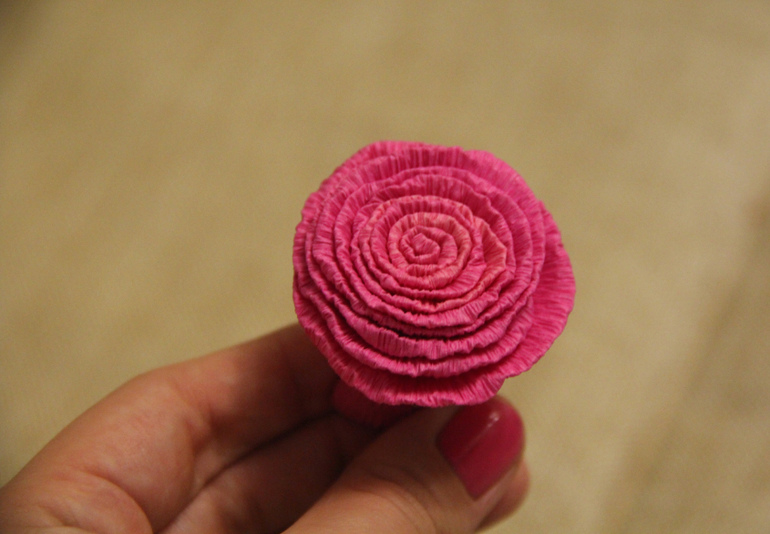
Such a strip is ready for twisting: twist it tightly, and then wrap it with thread to fix it. finished flower. When you twist the strip, you can also make folds to make the flower openwork and fluffy. You will see that on one side the flower will have wavy petals, and on the other - a dense spiral. Depending on which corrugation you use: soft or hard, you will get a completely different effect. It is advisable to choose the thread with which you will wrap the flower in the color of the paper, because in some places it can peep through the decor.
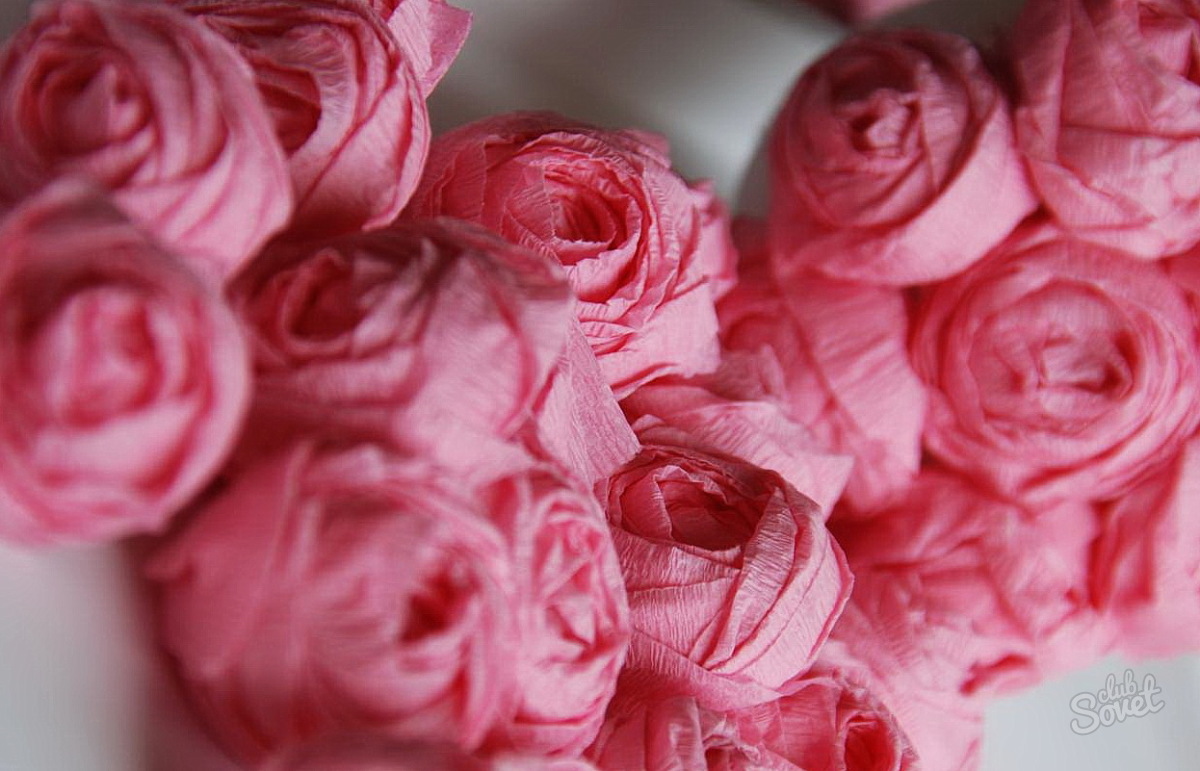
It is impossible to say exactly how many finished flowers you will need to decorate the cardboard blank, but you can easily determine this yourself when you receive the first flower and measure its size. In any case, you can always add more colors if there are not enough. We are sure that number 3 do it yourself for birthday, decorated with corrugated flowers, will decorate any children's holiday.
You can use the finished numbers 2 and 3 not only to decorate your birthday, but also if you are cooking, but in this case it is better to choose a dark green corrugation.
![]()
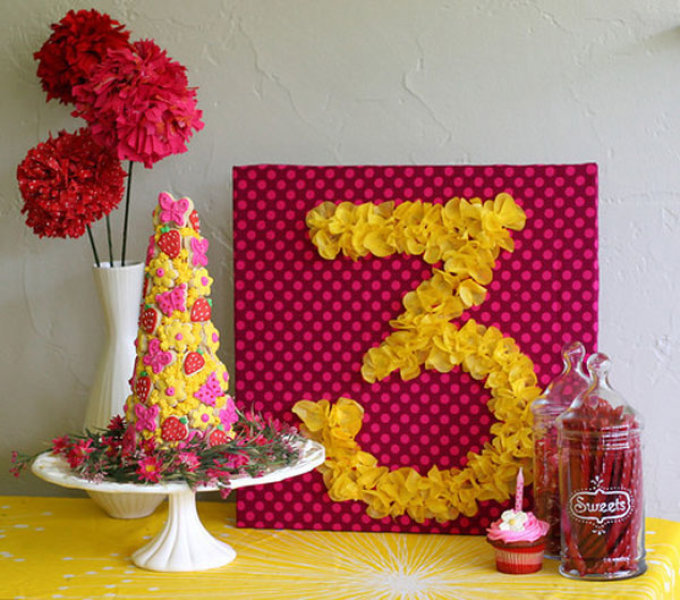
Number 4 do-it-yourself birthday it will turn out lush and bright if we use corrugated pompoms to decorate it. They are made in the same technique as large paper pom-poms, which are often used to decorate the hall where the solemn event will take place. Thus, your figure can fit perfectly into the festive decor, because everything will be decorated in the same style.
Number 5 for a birthday with your own hands
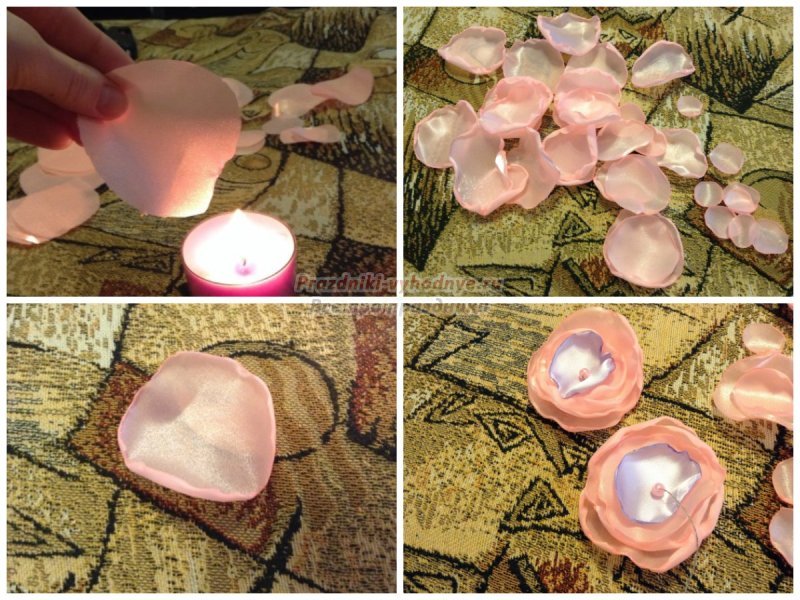
It will turn out unique number 5 for birthday do it yourself if you decorate it with flowers from satin ribbon. This option can be used if you are preparing the numbers for an adult holiday, for example, for a 50th anniversary. You can decorate the blanks with beautiful satin roses, for this you need to cut squares of a wide satin ribbon and singe their tips over the candle so that you get a round petal. A rosebud is twisted from such petals, which is then glued to the base with hot glue. To let us know if you liked the article or not - please click the button social networks or write your comment below. Thanks!Corrugated paper number will be a wonderful and original decoration if you are preparing for a holiday or want to arrange a surprise for a loved one. Volumetric bright numbers will be useful to you not only for your birthday, but for your wedding anniversary and even for New Year. With your own hands, you can arrange the most memorable party for your friends, and all that is needed for this is multi-colored sheets of corrugated paper, which you can buy at any store with goods for creativity or stationery.
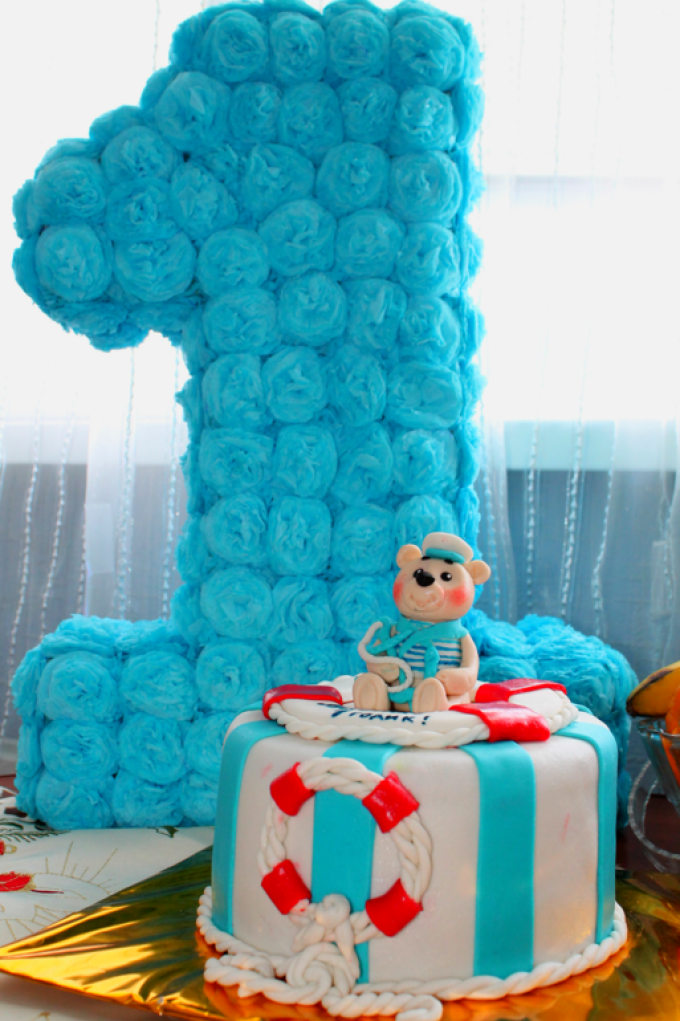
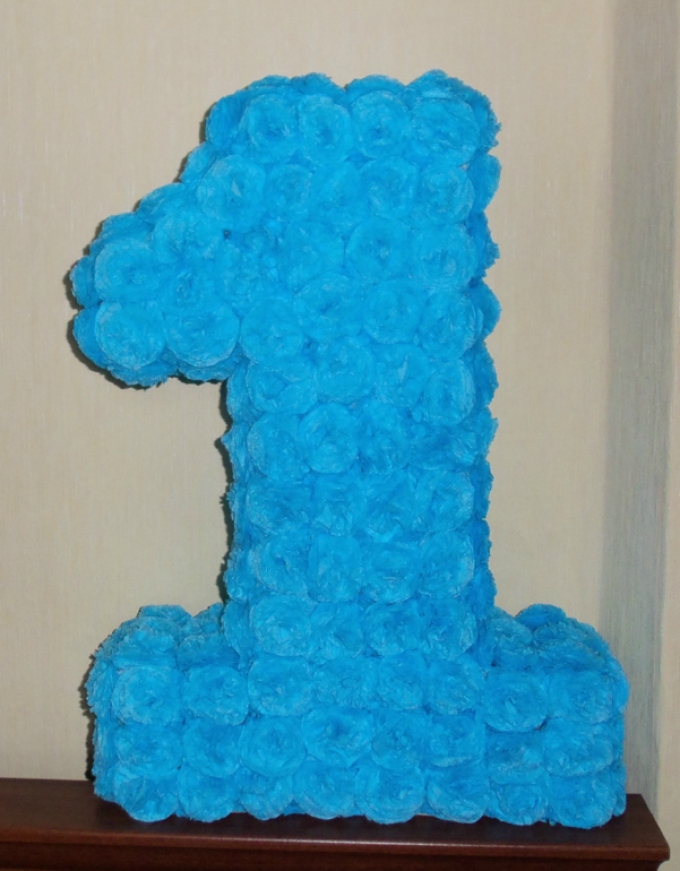
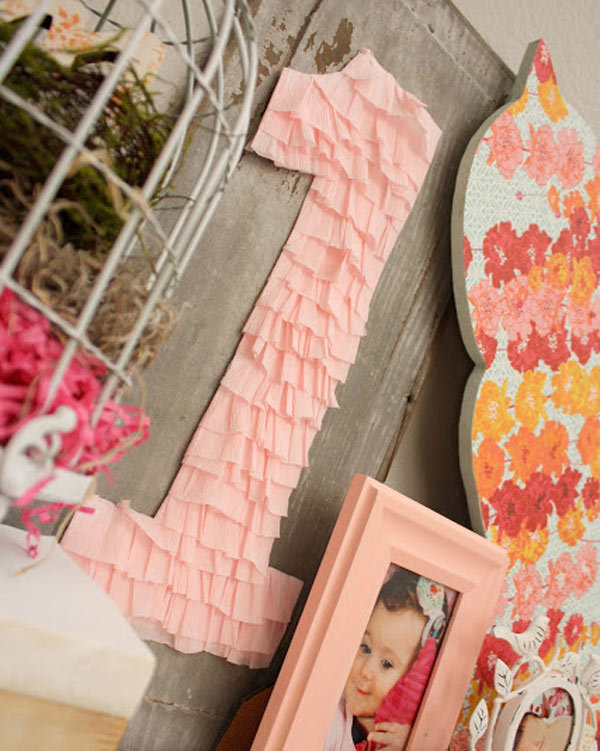
Corrugated paper number for a year
It will become a decoration of your holiday, and will also become an excellent background for family photos that will keep the memory of this day for a long time. Pieces of corrugation are suitable to decorate a cardboard blank, and the finished craft can be attached to the wall.
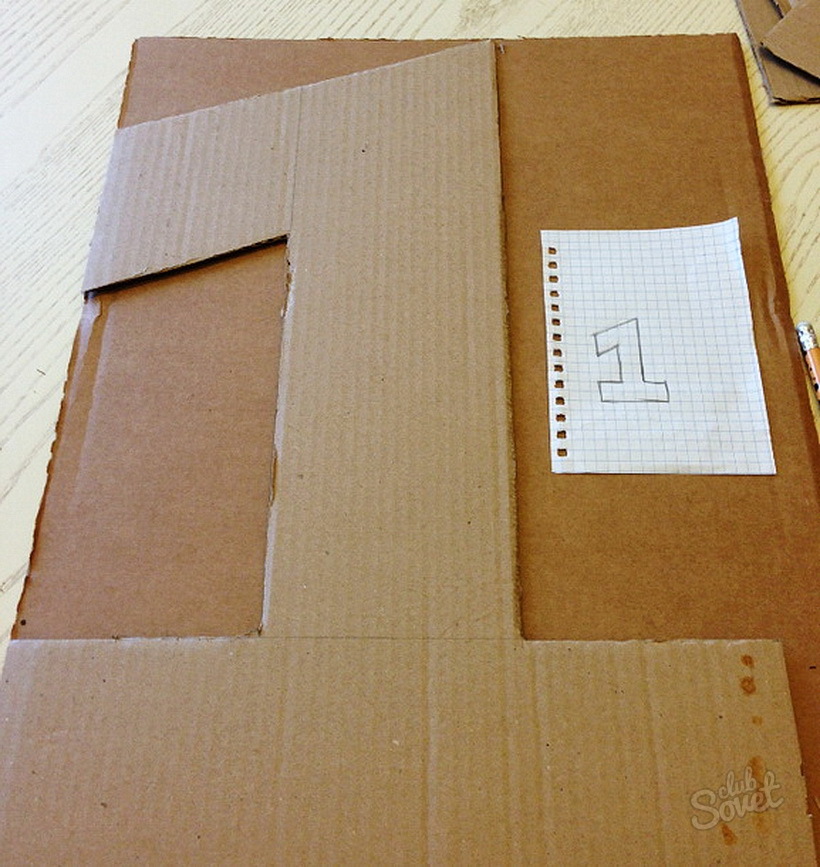
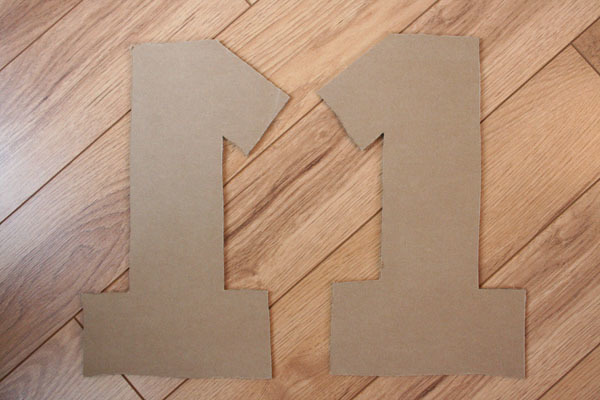
In this case, we will be making a flat craft, so we need thick cardboard, for example, you can take an old box from household appliances, draw a unit outline on a sheet and carefully cut it out.
It is very easy to draw a unit using a pencil and a ruler, but if in doubt, you can use a template that you need to print and stick on cardboard, and then cut it out with sharp scissors.
For crafts, you can use a corrugation of one color or several, then the figure will turn out bright. Usually, a color is chosen so that it is combined with the decor of the holiday, and maybe even with the outfit of the birthday man.
In this case, to perform do-it-yourself numbers from corrugated paper we will use the trimming technique, so we need to cut the corrugation into small squares. The size of the square will depend on how "fluffy" you want to make the main decoration of the holiday. For example, we will have a square with a side of 5 cm. To begin with, it is better to cut the sheets into strips, then put them together and cut into squares.
For convenience, PVA glue must be poured into a saucer, and take a pencil to work, we will use the blunt end of the pencil. Previously, the cardboard base itself can also be pasted over with corrugated strips.
Now you can start decorating, in this case we will stick paper squares only on one side, but in the case of a three-dimensional figure, side strips should also be decorated. Facing involves gluing only the middle of each square to the base. The elements are glued close to each other, which is why the fluffy decoration is obtained.
We apply the blunt end of the pencil to the middle of the paper square, and wrap the ends around the pencil, so it will be more convenient to glue the center to the base. After that, dip the center of the leaf in glue and attach it to the base. It is necessary to hold for a few seconds so that the glue is fixed, after which the pencil can be carefully removed, and in the same way glue the next square, as close as possible to the previous one, so that the tips of the squares stick up.
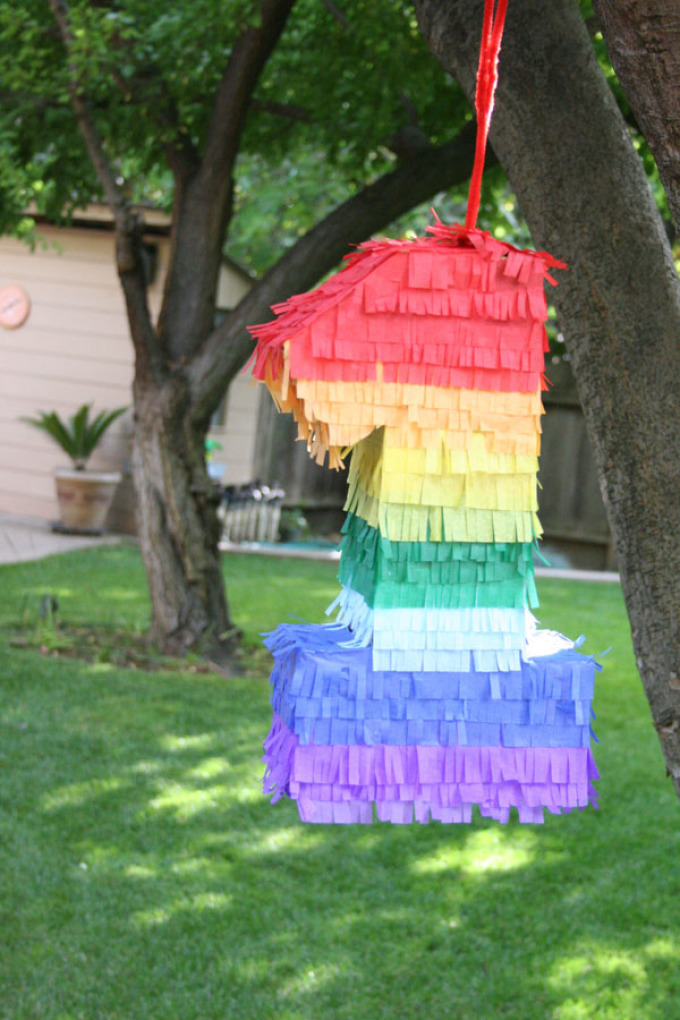
Gradually, you need to decorate the entire surface of the cardboard template. If you want to hang the finished decoration on the wall, then you need to attach a loop on top. And to put it on the floor, you need to make a stand at the back so that the craft is stable.
Number 1 from corrugated paper
flat corrugated paper year number in the technique, the facing turns out to be fluffy, but there is another way to decorate it. Again, first we need to cut out a cardboard template. You can use several layers of cardboard so that the template is dense enough and does not bend.
In Mexico, at almost all children's holidays there is a piñata, this is a voluminous toy made from cardboard and decorated with paper stripes. Ours will be decorated in the same technique. do-it-yourself number 1 from corrugated paper.
Compared to trimming, decorating with paper stripes is faster. When we cut out the template, it must be pasted over with corrugated stripes. It is advisable to use paper of different colors to make the craft bright.
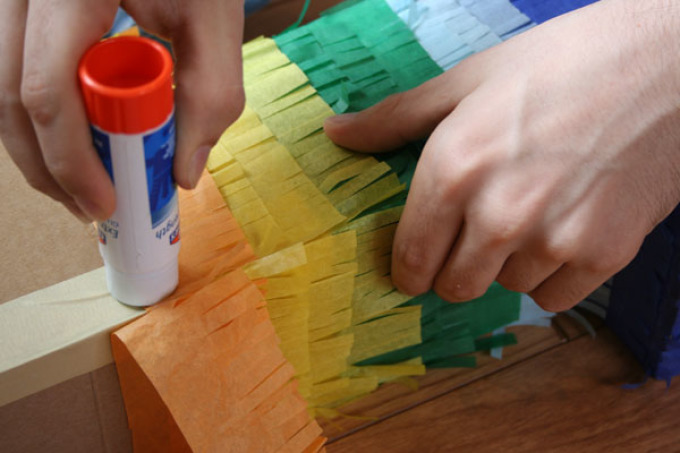
First, the corrugated sheets must be cut into strips about 5 cm wide, and then each strip should be cut perpendicularly to make a “grass”. When you decorate the template, you need to start from the bottom. Glue should be lubricated only with that part of the paper strip that is not incised with “grass”. Each next strip must be glued so that the fringe hides the glued part of the previous strip.
Thus, the entire surface of the template is pasted over, and when the glue dries, you can arrange a holiday for your baby. And if you are going to your goddaughter's first birthday, then prepare one.
Volumetric figure from corrugated paper
And if you know how to do it, then it will not be a problem for you to decorate with your own hands and unique children's holiday. Volumetric figure from corrugated paper requires preliminary preparation of the template, because we need to make a bulk blank, which, moreover, must be strong enough.
The easiest option is to make a blank using cardboard, in this case a large cardboard box from household appliances will come in handy. If you don’t have such a box at hand, contact the nearest grocery store or supermarket for help, the sellers will certainly not refuse to help you and give you one box from the warehouse. It will need to be disassembled into flat sheets: the side wide sides will go to the number templates, and the side strips can be cut out from the remaining cardboard.
To form the base, you will also need paper tape, because only on paper tape you can then glue corrugated flowers.
You need to cut out two identical blanks-numbers and wide stripes with which we will decorate the side strips of the three-dimensional figure. Paper tape will help you form a voluminous blank, they should carefully glue the seams, and for greater strength, you can glue it around with tape.
In this way, you can make any number, and use fluffy paper pom-poms or to decorate it.
In addition, the blank can be made from foam, especially if you recently bought large household appliances and you still have foam from the packaging. Such a base will turn out to be quite strong. When the base is ready, you can start the creative process, how to make a number out of crepe paper.
Corrugated paper number
Corrugated paper birthday number or napkins will turn out fluffy, bright, voluminous. Such a decoration will become the center of the whole holiday, and the room can also be decorated with voluminous pompoms, balloons. In addition to numbers, you can make decorations in the form of a large ball, which is also decorated with small corrugated flowers. As you can see, such a simple material as corrugation gives a huge scope for creativity, in particular, it will help you decorate your house for the holiday, because your child's birthday should be unforgettable. And if you are going on a holiday to a friend, prepare for her.
Numbers from colors of corrugated paper sometimes used to decorate holidays for adults, of course, you should not remind the birthday girl of her age, but on your parents' wedding anniversary, you can arrange a real surprise for them. In this case, it will be necessary to make two numbers separately, using delicate shades of paper. You can use it to decorate the table, and individual flowers can be used to decorate gift wrapping gifts.
Small flowers will help you decorate a bulky workpiece. There are some options how to make just such flowers, do not worry, even a beginner can handle this job.
The volumetric base should be densely filled with miniature flowers so that the cardboard blank is not visible through them, so there are two rules for decorating. Firstly, the flowers should be fluffy and voluminous, and, secondly, they should be glued close to each other. To be sure that the craft will turn out beautiful, you can first glue the cardboard blank itself with paper to match the flowers.
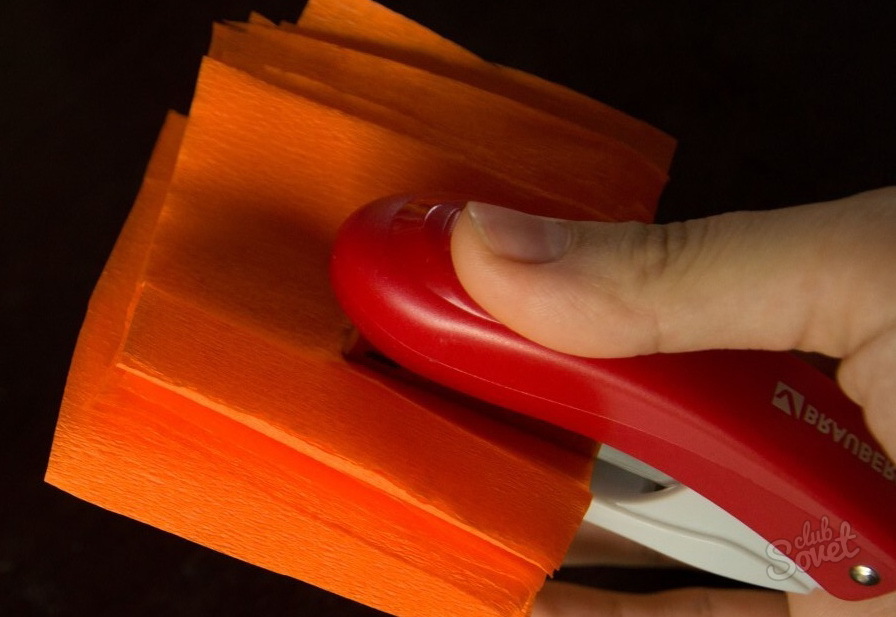
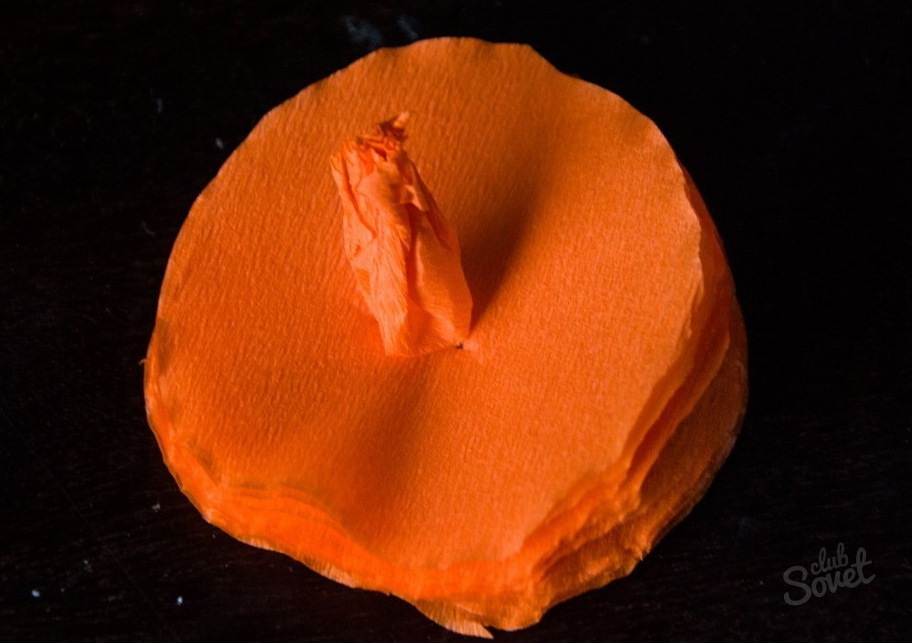
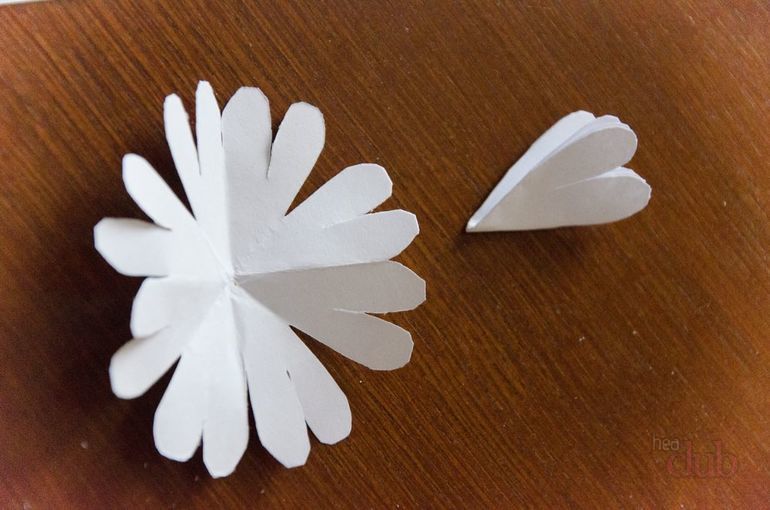
First of all, we will consider the simplest option, how to make a fluffy flower to decorate a cardboard blank. To do this, we need, of course, the main material - corrugation, as well as additional tools- scissors and stapler. We will need to cut many circles of the same diameter, so you can make a template on cardboard, for example, circle a glass and cut it out.
The corrugation is easy to cut, even if it is folded in several layers, so first we will cut the sheet into strips. Their width should be 0.5-1 cm larger than the diameter of the template circle. Then each strip should be folded several times, so that as a result we get a multi-layered square. Each such paper square in the middle (the intersection of the diagonals) must be chopped off with a stapler. Next, on this square, we need to circle our workpiece-circle and cut it out along the contour, while the stapler bracket should be located in the middle of the resulting circle. When the circle is ready, it is necessary to lift layer by layer from the very top, and gently crush them towards the center. We will get a fluffy flower that can be glued to the base.
How to make a number out of crepe paper
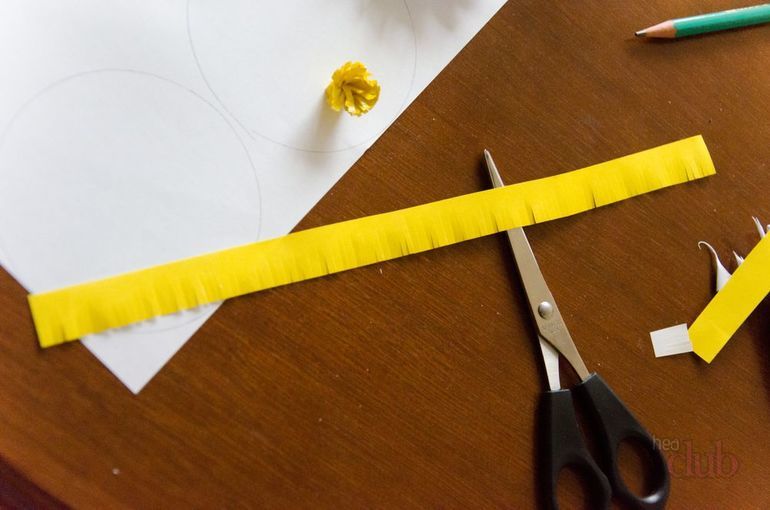
Volumetric number 1 for a year of corrugated paper can be decorated with fluffy "chrysanthemums". To perform them, the corrugation should also be cut into strips, then folded into several layers and cut with grass, without cutting the strip to the end from one edge. The “grass” should be along the entire length of the strip, but the resulting fringe should be twisted a little with your fingers to make needle petals. It remains only to twist the strip into a tight roll and tie it several times with a thread. You will get a flower, in which one side will be fluffy, and the second - a dense roll that can be smeared with glue and glued to the surface of the workpiece.

Using a corrugated strip, in which the stripes will run perpendicular to the length, you can twist a miniature rosette. To do this, the paper must again be cut into strips, and for each strip, make one edge wavy, stretching it with your fingers. The finished strip must be twisted into a tight roll and fix the edge with threads, tying the roll several times.
The first anniversary of a small miracle is always a special holiday. Therefore, parents prepare for it more carefully. In addition to the menu and outfits, the decor of the room is not the last place. The symbolic decoration for the first birthday is the one.
If you want to save on digital, then do it yourself. This article describes in detail the instructions for creating an original decor.
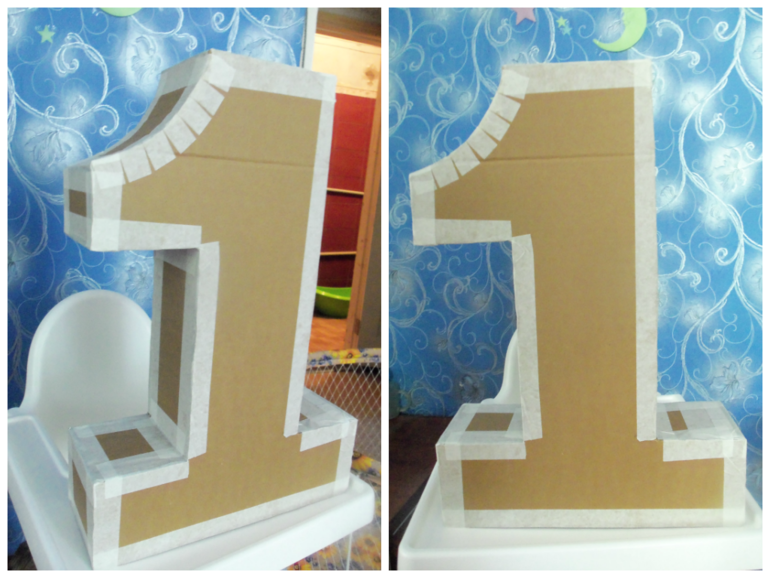
How to make a one for a year - a three-dimensional frame
To make a three-dimensional figure, you need to prepare a frame. You can make it from thick cardboard or a regular large box.
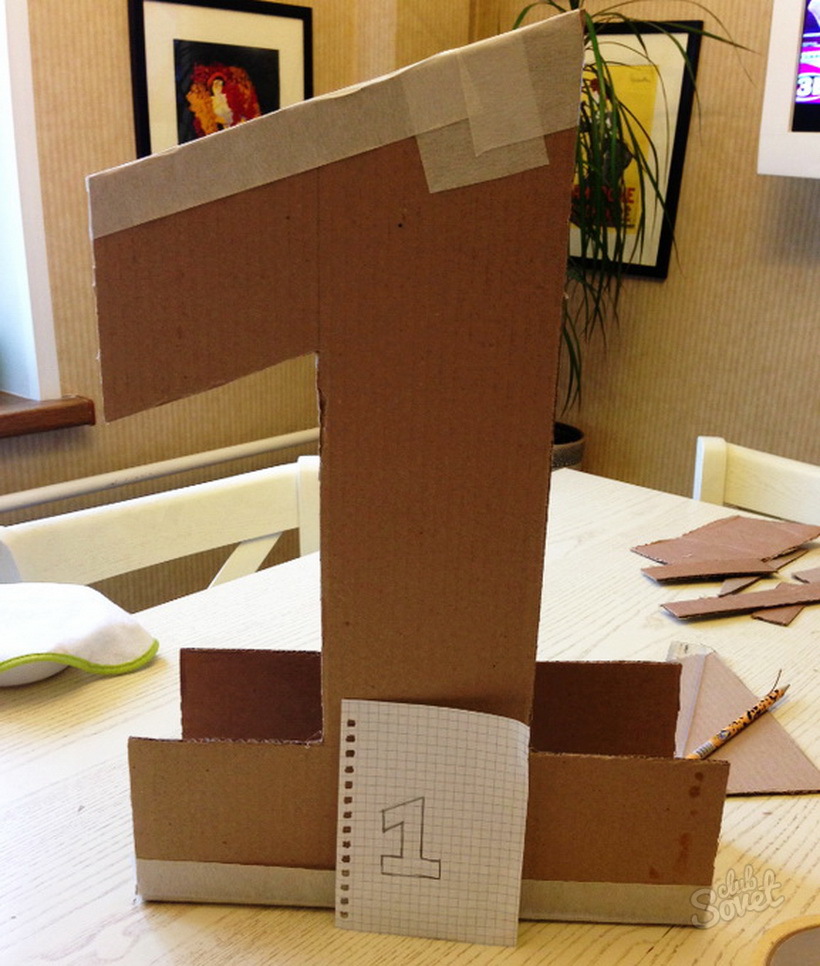
- The first step is to make a template. Draw a unit on paper. Use sheets with markings or in a box. This will give you straight sides. Measure the figure, depending on the desired height and width, calculate the scale in accordance with the template parameters.
- Transfer the enlarged figure to the cardboard. Then draw another unit, but only in a mirror image. Cut out the blanks along the outlined outline.
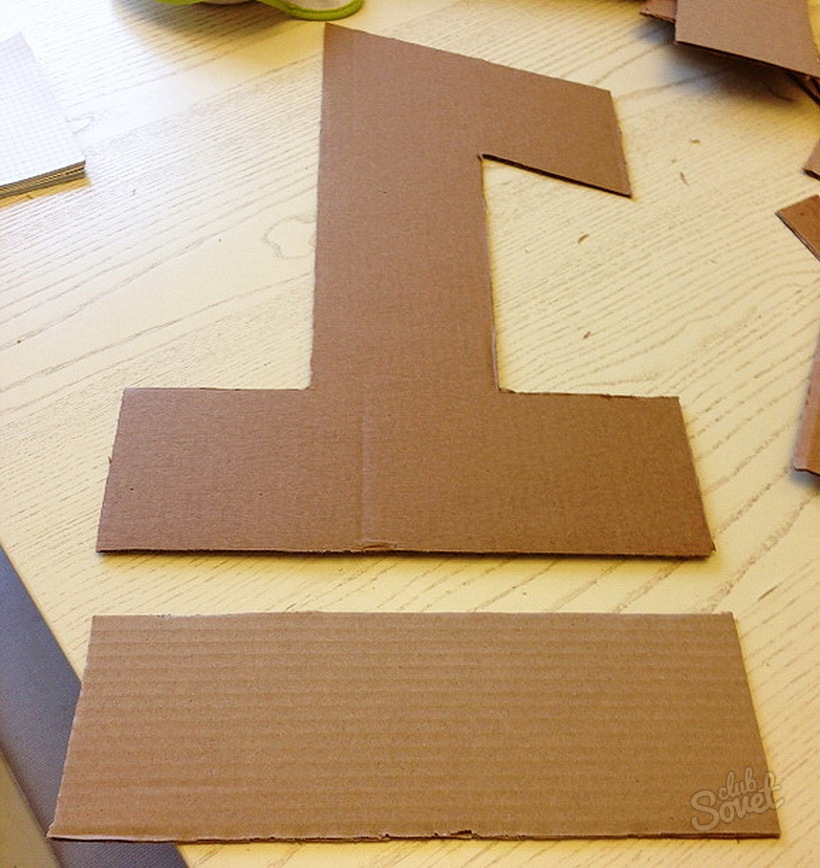
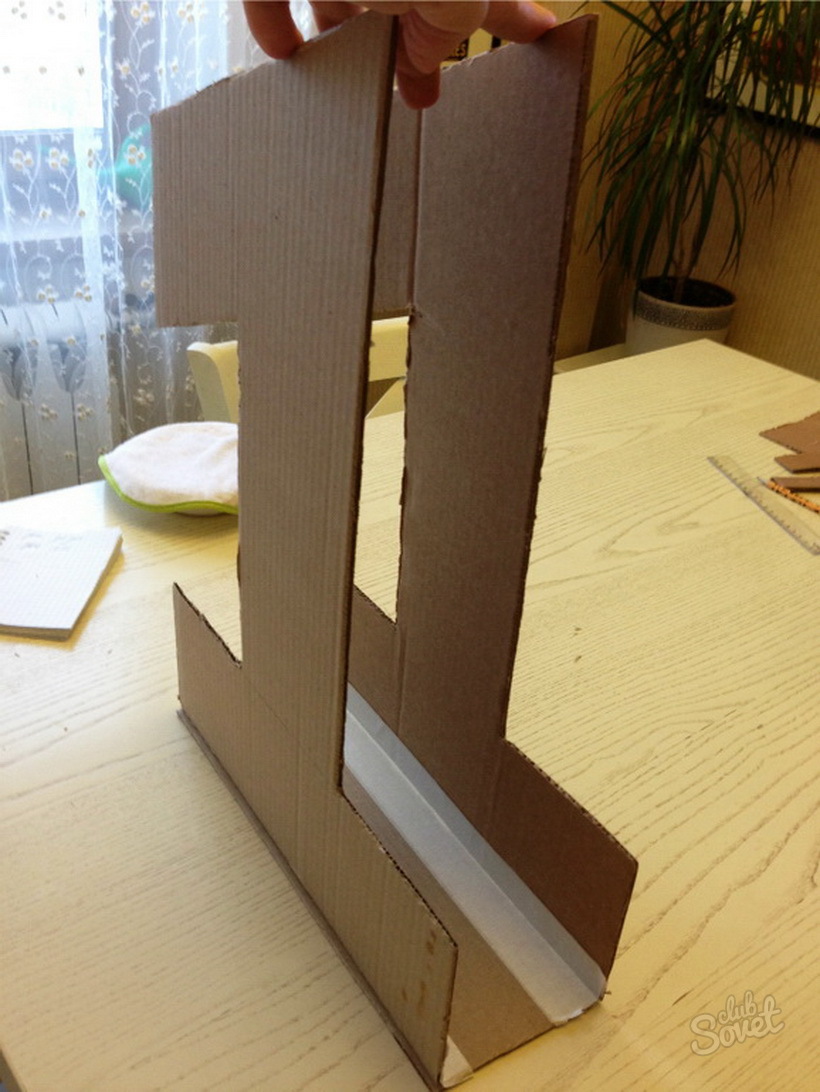
- Prepare the bottom for the number. To do this, first determine the thickness of the figure. The wider it is, the more stable the decor will have. If you want to hang a number, then make the thickness smaller. The length of the bottom will be equal to the width of the bottom of the unit.
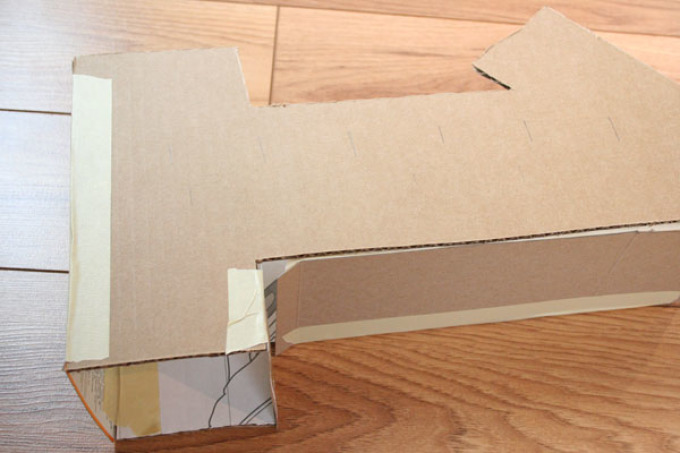
- Fix the bottom on one of the blanks with adhesive tape or strips of paper with PVA glue. Do this from the inside of the figure.
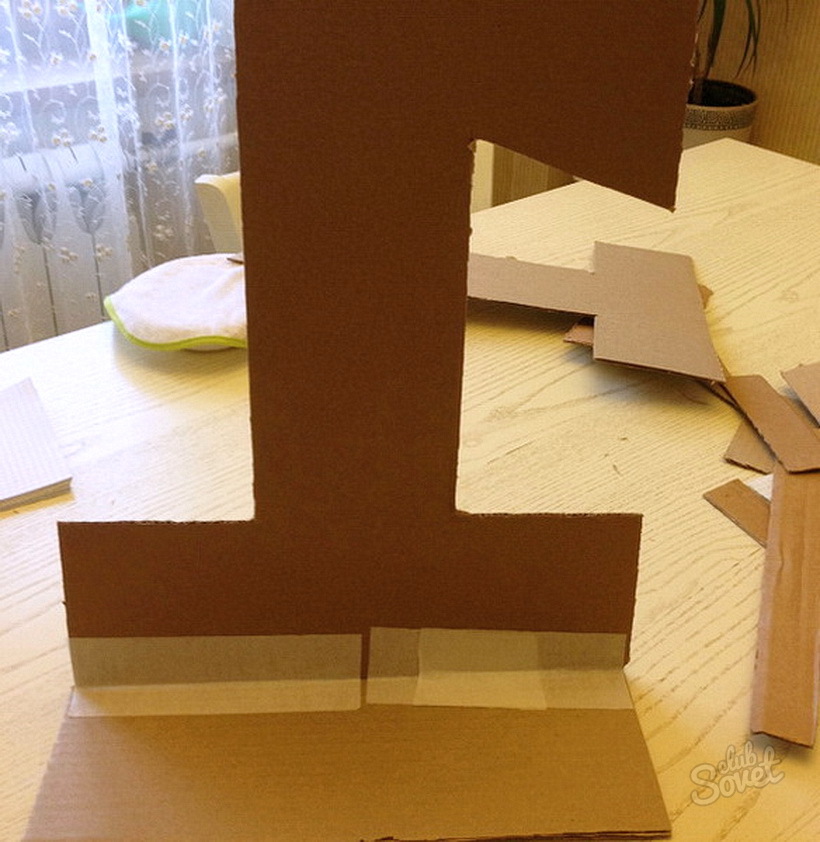
- Then unfold the bottom and glue the second part of the unit. From the inside, further strengthen the fold lines with a continuous strip of tape.
- When assembled, you should get this figure.
- Now cut out the top for the number in the same way. Its width must necessarily be the same as the bottom.
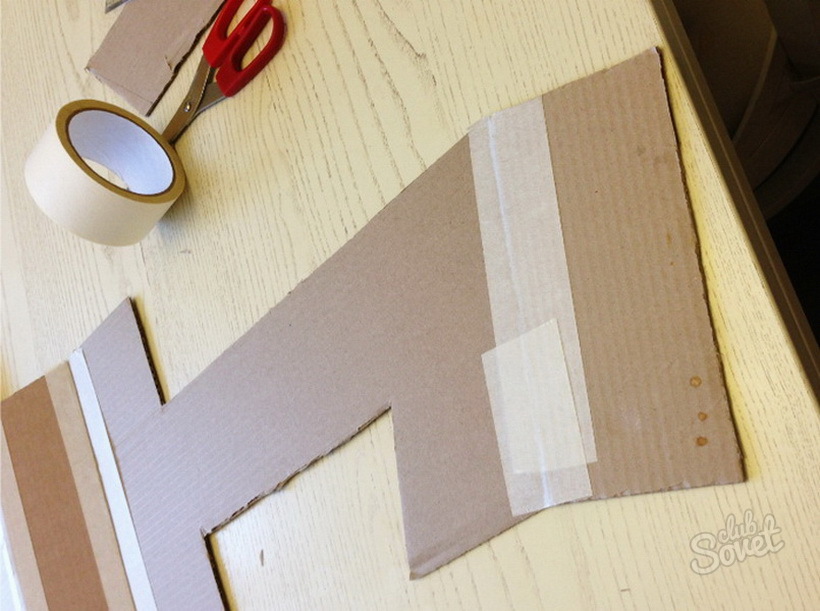
- Tape the three pieces together with paper tape.

- Glue the outer seams with duct tape to reinforce the folds.
- You will get such a hollow figure.
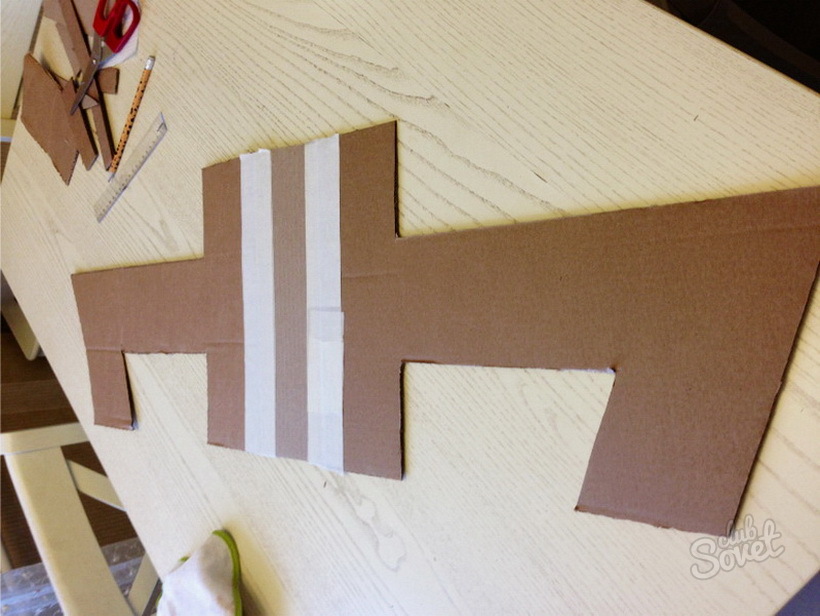
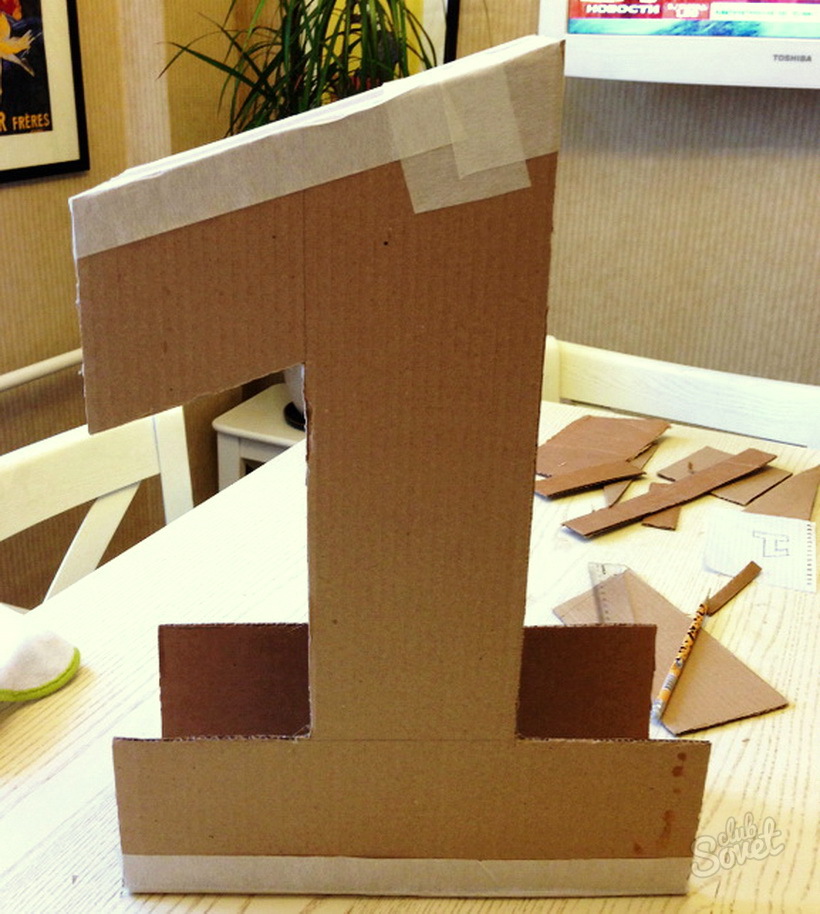
- Cover all sides of the unit with strips of cardboard. Make sure that the width of all blanks is the same and matches the bottom.
- If you observe the proportions and sizes, then you will get a three-dimensional figure to decorate a children's holiday.
How to make a one for a year - figure decor
The next step in creating a figure is decorating the frame. The most popular way to decorate a figure is from napkins or corrugated paper.
Prepare:
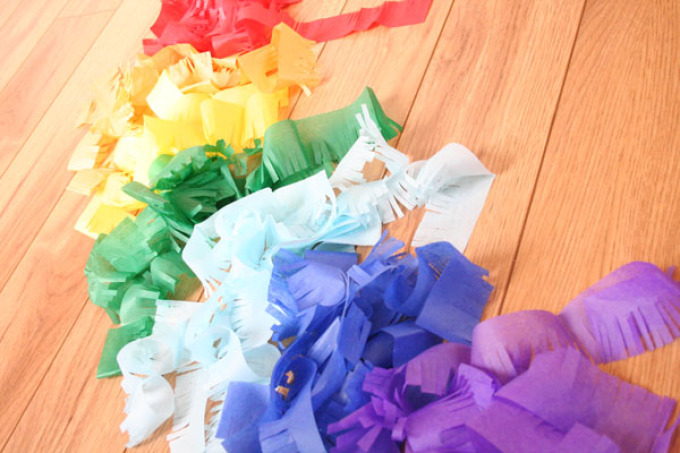
- crepe paper in different colors;
- scissors;
- stapler;
- glue gun.
Working process:
- Calculate the diameter of the flower. Unfold the crepe paper and cut it into strips depending on the size. Then roll several times to get a square according to the diameter of the bud.
- Cut the paper along the fold lines.
- You should get such squares.
- Assemble several blanks together. Their number will determine the volume of the flower. If you want to get a dense decoration, then use more squares.
- In the central part, attach the paper with a stapler. If necessary, install another bracket in the middle of the workpiece.

- Cut out a circle around the fasteners. To get even cuts from the figure, first draw an outline on paper and cut a circle along it.
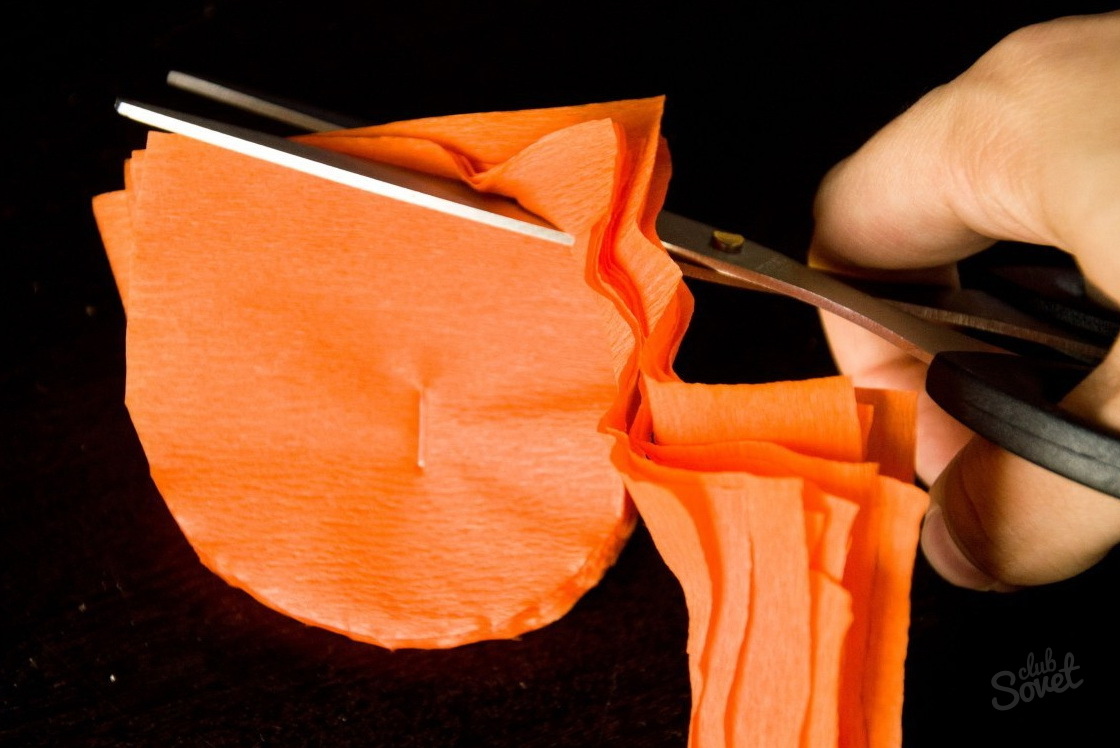
- Here is the correct blank for a corrugated paper flower.
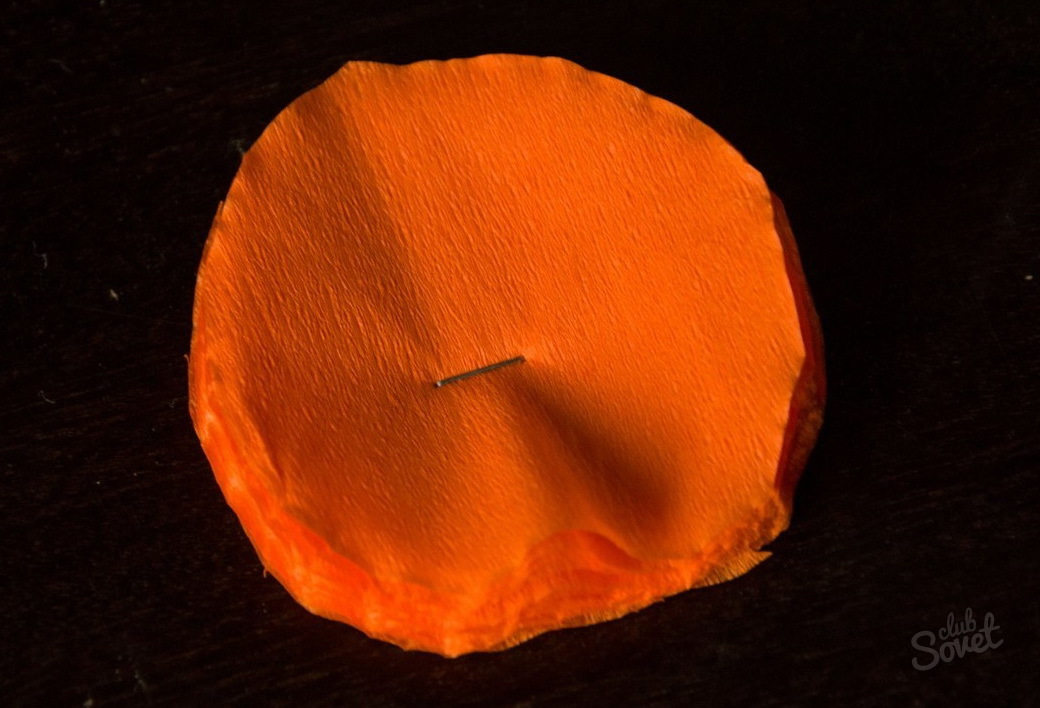
- Begin to form the petals of the flower. First, tightly bend the first and second circles to the center.
- Then lift the next layers of the workpiece. At the same time, firmly press each circle in the middle.
- Press the bottom layers around the center with your fingers. Make several of these paper flowers according to the size of the number.
- Using a glue gun, secure each paper blank to the frame. Try to place the flowers tightly together so that the cardboard is not visible.
- Glue blanks on all sides of the number.
- You can use different colors to decorate the unit or additionally tie a ribbon.
How to make one for a year - voluminous roses
Flowers for the unity can be made in a different way. such paper roses are more delicate and voluminous.
You will need:
- corrugated paper;
- scissors and glue.
Instruction:
- Cut crepe paper into strips. Their thickness will be equal to the height of the flower, which will determine the volume of the figure. Take one end of the workpiece and roll it into a tube.
- Wrap the strip around the center several times, forming curls. Then wrap around the middle. Continue to form a rose in this way until the ribbon ends.
- Apply glue to the back of the flower and attach to the frame.
- Such flowers should not be very close to each other. Otherwise, you will wrinkle the edges, and the decor will look ugly.
- The cardboard frame can be decorated with any.
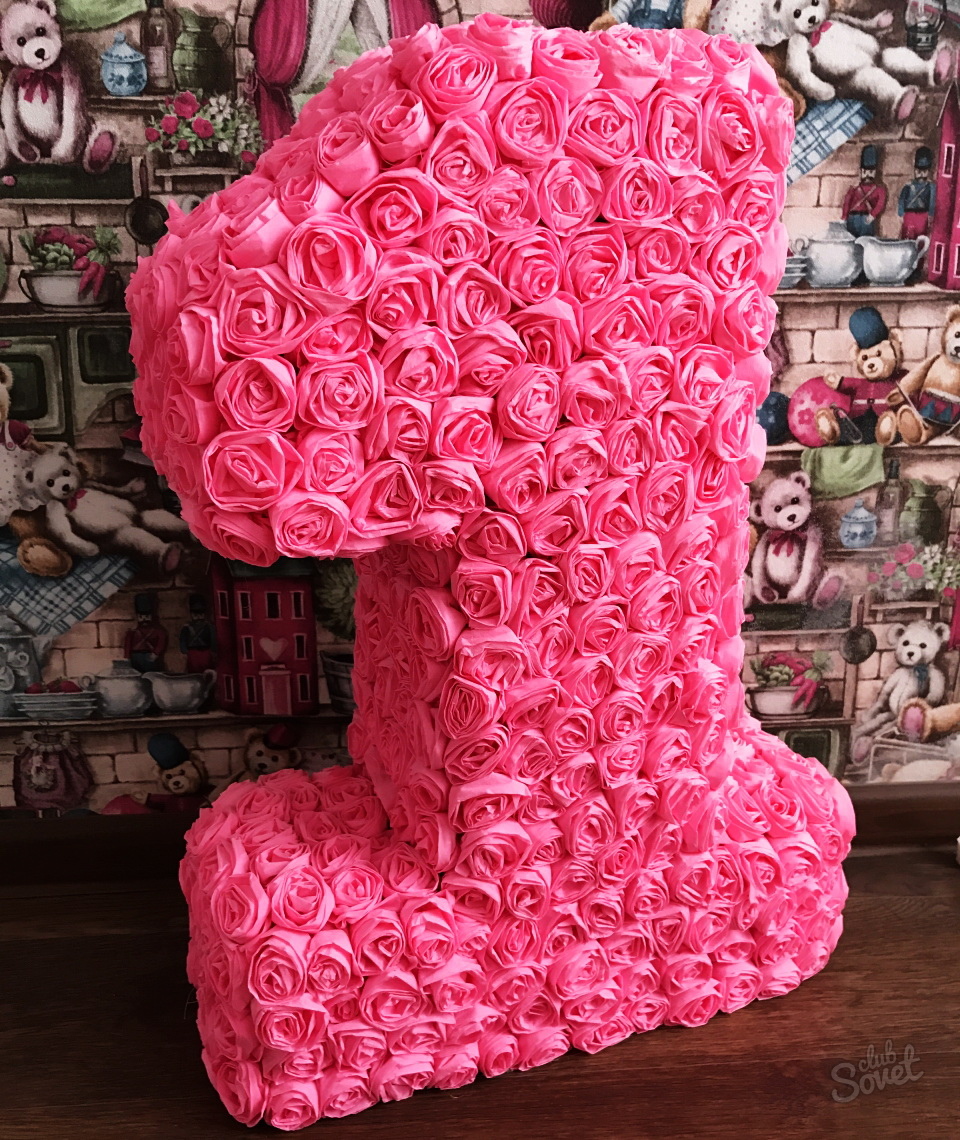
Thanks to this detailed master class you can independently make a voluminous one for the first birthday of the baby. Such an original decor is suitable for decorating a room for a holiday or will become a bright addition during a photo shoot.
Another way to twist paper flowers for numbers, see the video:
How to make a birthday number with your own hands?
Children's birthday should be held in a special festive atmosphere. I would like to decorate the birthday boy’s room and hang a large inscription in the hallway so that right from the doorstep the little guests are charged with positive and fun.
You can call on the help of professional decorators. They will quickly hang expensive decor. But it is much more interesting to do interior design with beautiful “things” of your own making for both parents and children. Joint creativity will allow you to spend time excitingly.
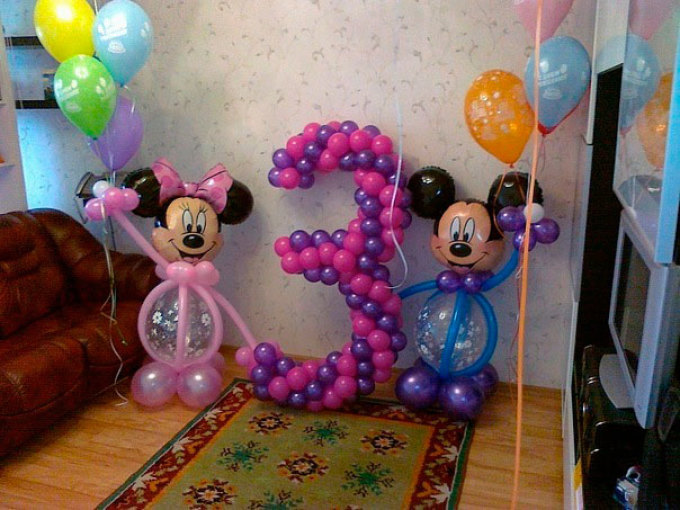
This article contains a variety of ideas for performing figures for a birthday man. You can make it from balloons.
But if this design is tired, then arm yourself with scissors, cardboard, corrugated and colored paper, decorative elements, threads and get to work. The main thing in such an important matter is a good mood and a positive attitude.
What to make a number for a birthday?
Numbers corresponding to the age of the birthday person, made from small balls, are the most familiar way for us to decorate a room. Could there be anything easier than placing an order for the desired figure in the nearest event agency? But if you make a figure with your own hands from any other material, then it will look unusual.

Don't give up on an idea self-manufacturing figures for the birthday of the birthday boy, if you have little time. The figure is cut out of cardboard quickly, and the needlewoman always has the fabric and threads at hand.
If the figure is not needed urgently, then you can print bright photos in advance or come up with something completely original. An interesting photo shoot for a birthday boy in such a room with large numbers is guaranteed.
What are the ways to make numbers?
- A large number can be cut out of cardboard and decorated with whatever your imagination and resources are capable of.
- For the base, let's take a regular cardboard box of the preferred size. The contours of the desired number are outlined on the cardboard. The figure is cut out with a clerical knife and decorated. Such a figure will be flat. It can be hung on the wall.
- If you need a voluminous figure or you have the time and desire, then it is better to make such a figure with which the birthday man can play and rearrange from place to place if desired.
- To make the figure voluminous, you will need two identical cardboard blanks. But besides them, you will also need to cut out long cardboard strips with even edges (of the same width) in order to glue the sidewalls.
- The frame is assembled easily with a heat gun or masking tape.
The decor of the figure must be selected in accordance with the general design style. The most commonly used materials are:
- leg-split
- colored yarn
- bright fabric (organza, chiffon, satin, velvet)
- floral film used for packaging
- colored paper
- corrugated paper
- napkin flowers
All these materials are used for wrapping the base. But you can use them to give additional volume to the numbers. To do this, you need to make flowers with protruding petals from paper or fabric or make fluffy pompoms from woolen threads, add various "pounds" and bows.
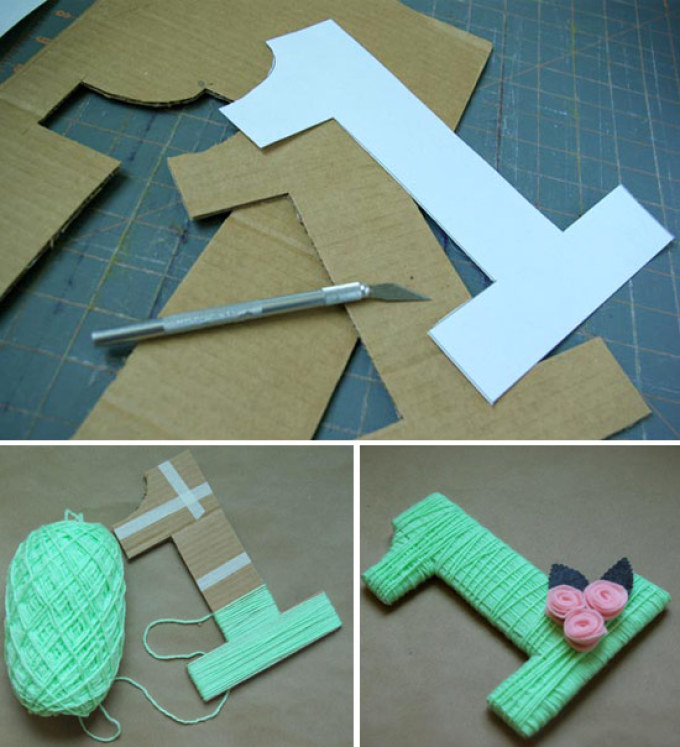
Number in eco style
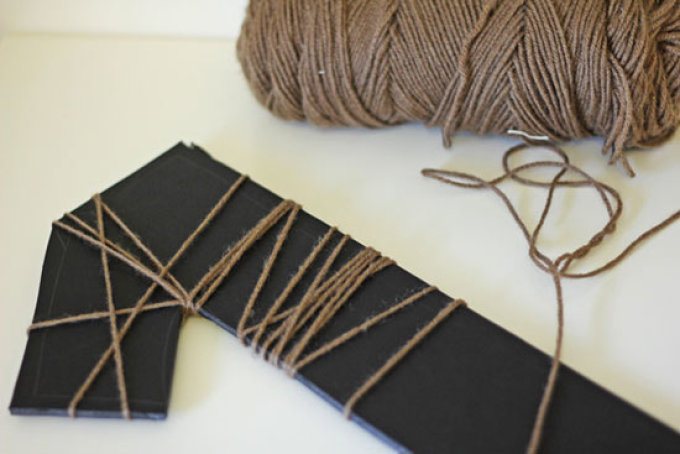
- To make an eco-style figure, you will need a cardboard base and twine. The base is gradually smeared with glue and carefully wrapped with twine over the glued area.
- The finished figure can be painted acrylic paint, or you can leave the twine unpainted. Such a figure will decorate any interior, and it will take quite a bit of time and effort to make it.
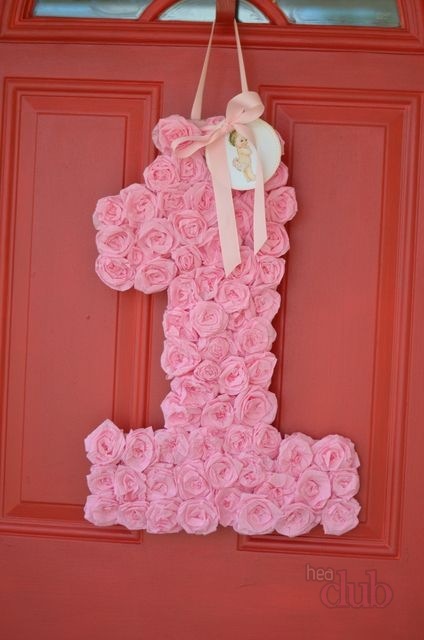
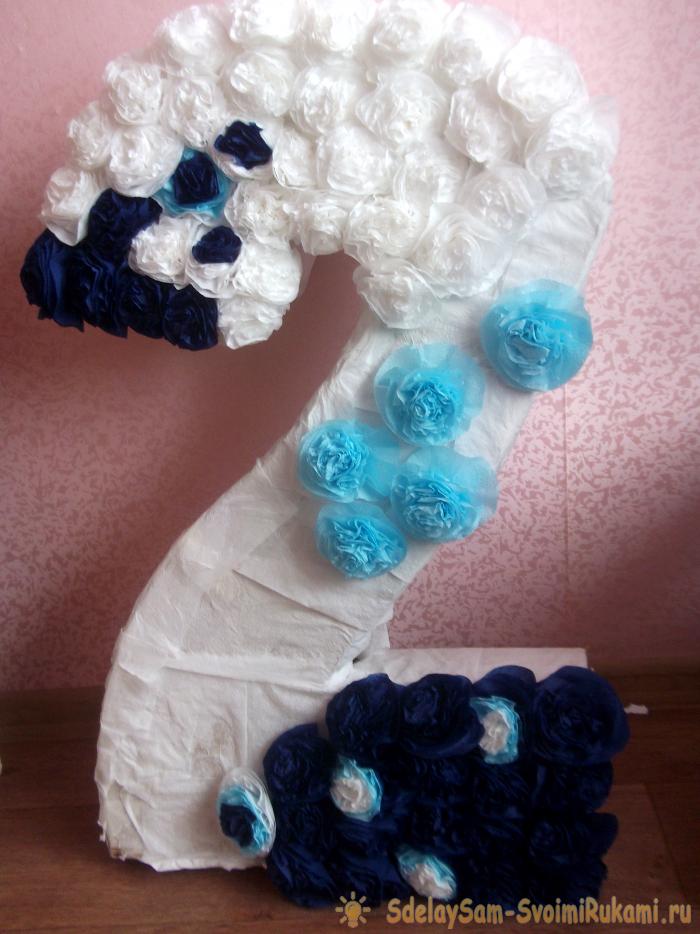
Number from flowers
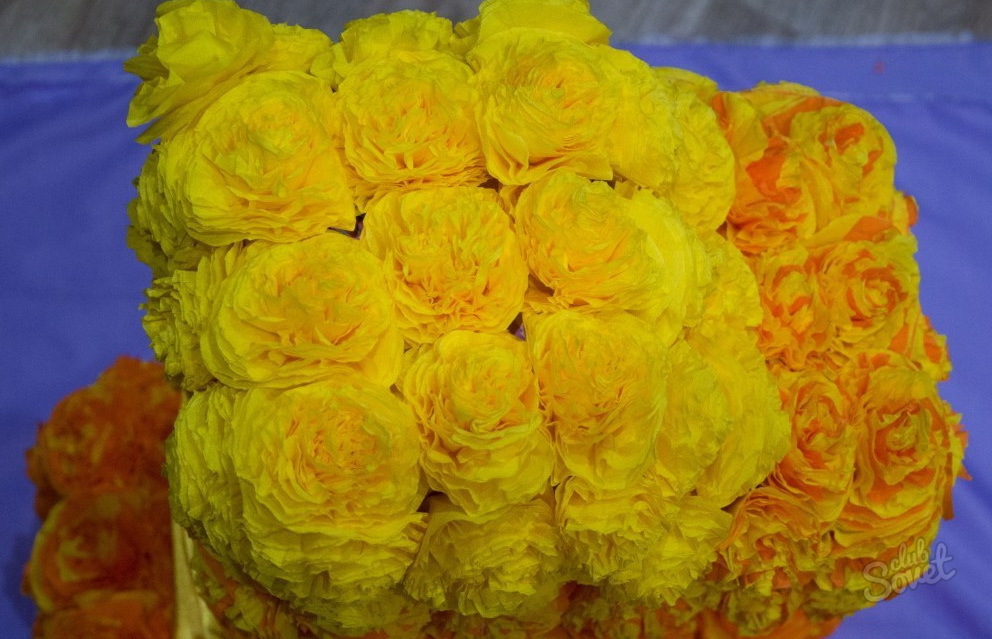
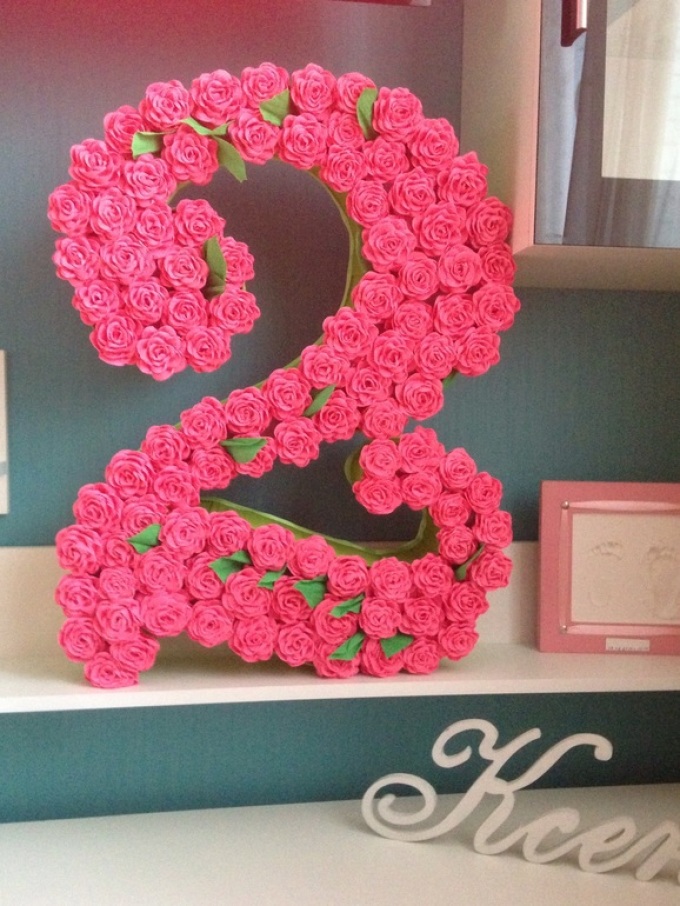
- To make a number with a floral pattern, we need a lot of roses, cut and glued from paper.
- The flowers are stacked tightly to each other, filling the entire base.
- Such a figure, even in the absence of other decor, will look great.
The time spent carving paper flowers is compensated by the smiles of the children and the joy of the birthday man. After the holiday, the figure can be hung in the children's room until the child is a whole year older.
Number from pom-poms
- To make a number from pompoms, you will need a large number of wool pom-poms
- The process of filling the base with pom-poms is the same as with paper flowers.
- In the following sections, we will take a closer look at how to make beautiful numbers for the birthday man.
Birthday number from napkins
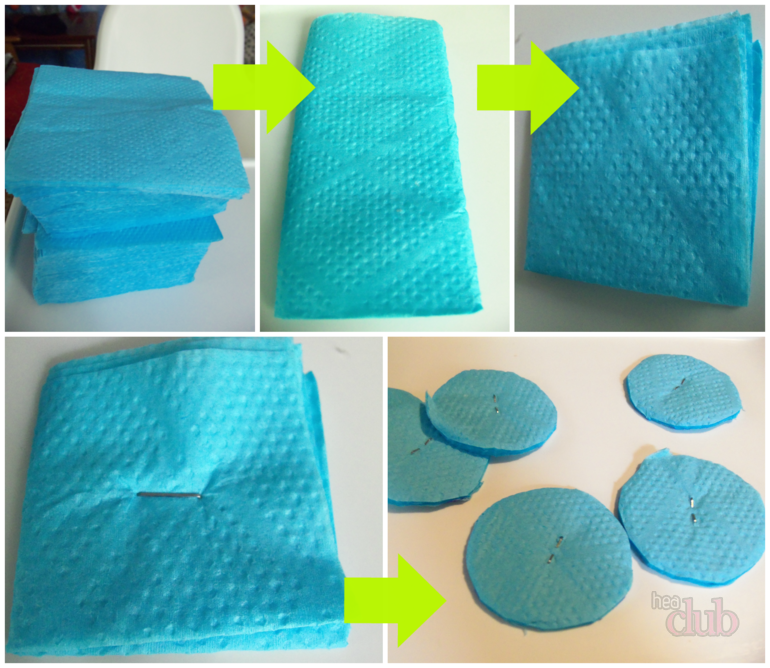
You can decorate the frame cut out of cardboard with flowers from napkins. Having gained patience and cut flowers of the same size from ordinary napkins, you can please the birthday man with the most fluffy number in the world!
Manufacturing process:
- We cut out napkin flowers in unlimited quantities: we divide the single-layer napkin folded four times into 4 squares
- We lay the squares in an even pile and fix in the center with a stapler or a piece of thin wire
- The square stack is cut off to make a circle.
- It remains only to cut through the edges of the resulting circle, not reaching the center
- Raise the napkin petals and straighten them.
- So we will create fluffy flowers, which then will only need to be glued with PVA glue to the base
 This is the figure obtained after pasting with flowers
 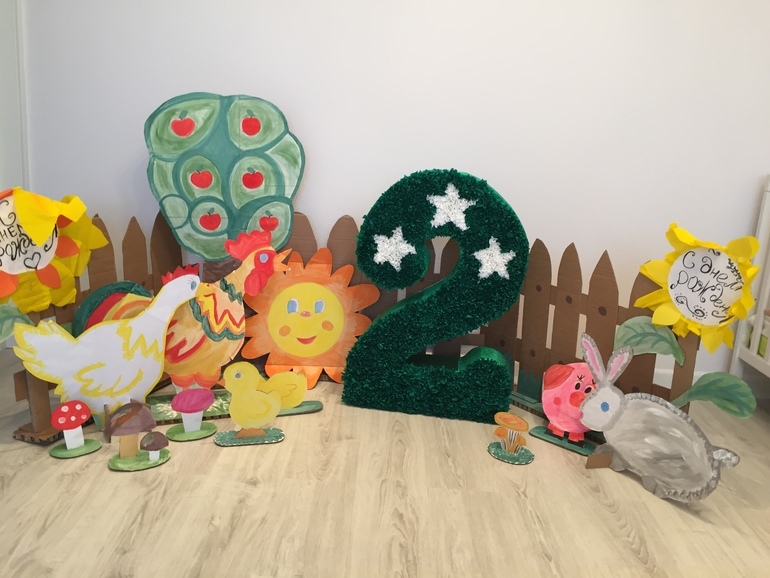 Deuce and scenery
 Corrugated paper birthday number
Corrugated paper flowers look simply gorgeous. They can be done in two ways. You only need a large amount of corrugated paper of the desired color. The number will turn out more beautiful if you glue flowers of 2 or 3 different colors on it.
Method 1:
- We cut the paper into strips. Approximate dimensions in centimeters: 50 / 3.5. We follow the correct arrangement of the "veins" of future flowers: they should stretch along, and not across the flower.
- Next, you need to stretch the flower on one side to get waves. Such stretching is possible due to "veins".
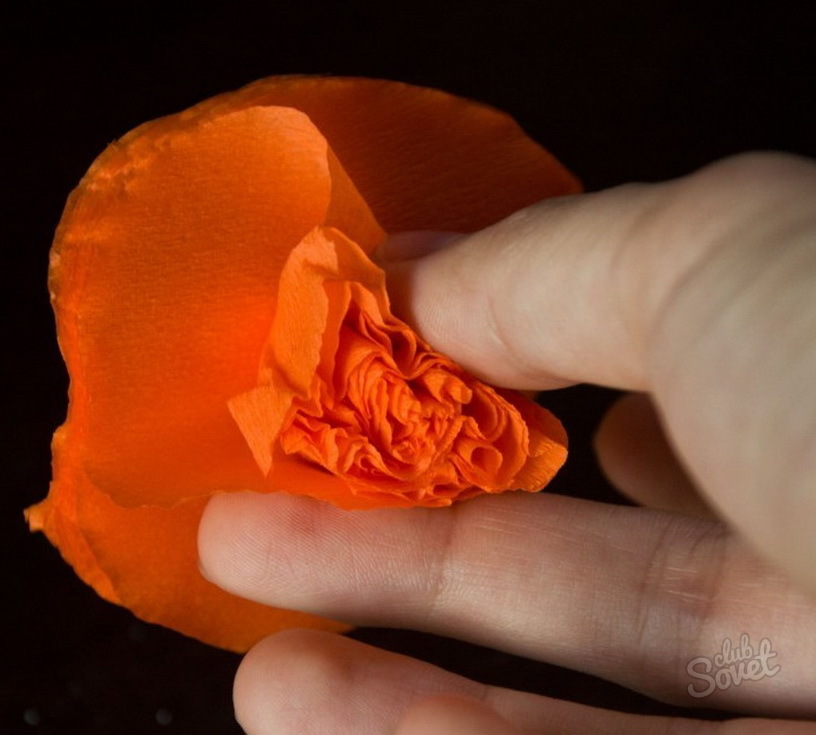
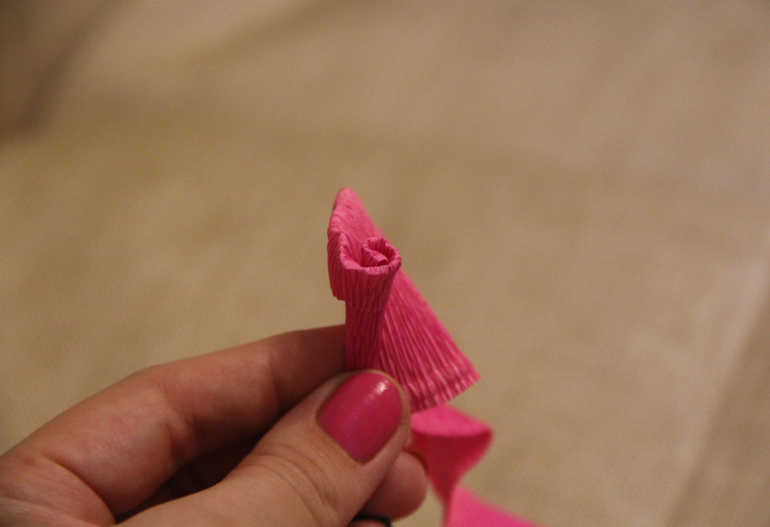
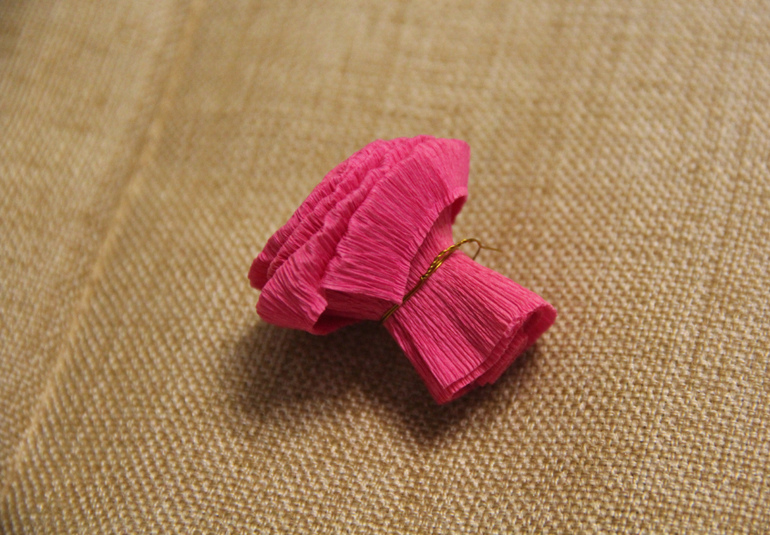
- We hold the stretched flower blanks firmly by one side with the waves up, and grab the base-cup.
- We fix the lower part of the flower with an elastic band or threads to match the paper.
- The softer the corrugated paper, the more voluminous and fluffy the flowers are.
- The walls of the cardboard base are pasted over with corrugated paper to hide possible gaps between the flowers.
- The base is glued with flowers. To do this, it is convenient to use a hot glue gun. You can "plant" flowers on ordinary PVA glue.

Video: corrugated paper flowers
Method 2:
- Corrugated paper cut into equal squares
- We apply glue to the cardboard base of the number
- We wrap the pencil with corrugated paper, laying it with the central part to the core
- We lower the lower part of the future flower into the glue and apply it to the cardboard base
- So gradually fill the entire surface of the cardboard base with squares
Filling the cardboard base with squares
Numbers inflatable for birthday
A children's holiday is not complete without balloons. Can be done for birthday great wall decoration:
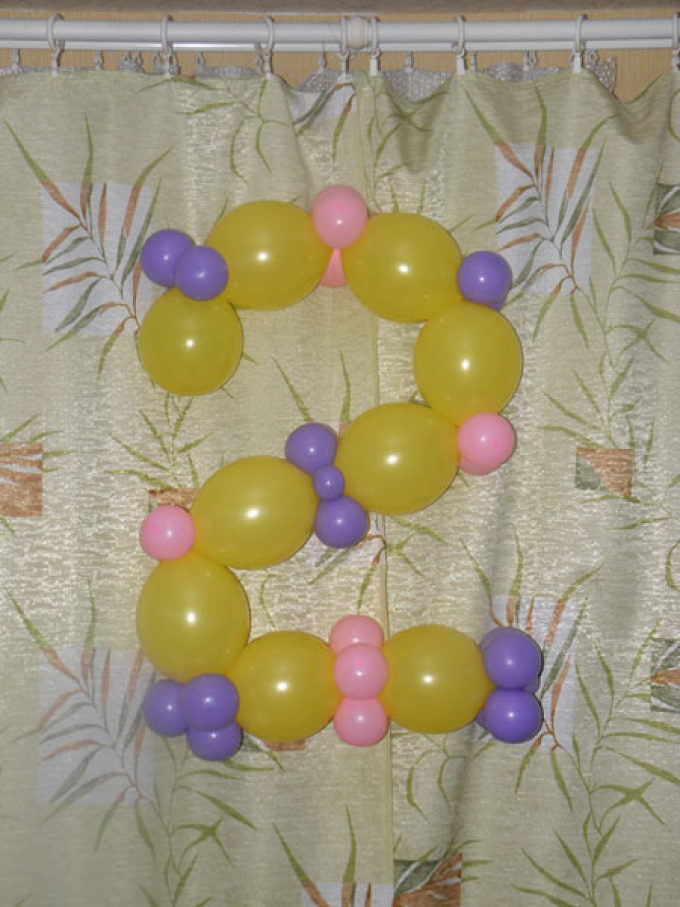
- you will need a styrofoam base (is it a rectangular piece or a square piece)
- small size balloons
draw the correct number - we inflate the balls and attach them to the base with double-sided tape according to a pre-drawn shape
Cardboard numbers for birthday
- The easiest way to make a number out of cardboard is to draw it on a piece of cardboard or a cardboard box and cut it out without bothering to create a three-dimensional product.
- The figure can be pasted over with colored paper or smeared with glue and sprinkled with tinsel. You can cut out a stencil of the desired pattern or pattern, attach it to a painted cardboard number and paint over the areas inside the stencil with contrasting paint.
- A volumetric cardboard base consists of two identical parts of the number (the second can simply be circled) and long strips of cardboard of the required thickness for the sidewalls.
- The parts are connected with a glue gun, and for the reliability of the structure and better fixation, stiffeners are glued from the inside.
- Volumetric figure can be placed vertically right on the festive table. If you make a horizontal platform out of cardboard, then the figure can also be placed on the floor. Then it will become a chic attribute for photography as a keepsake.
 flat shiny digit
 How to make a volumetric figure:
 Glue the parts with adhesive tape
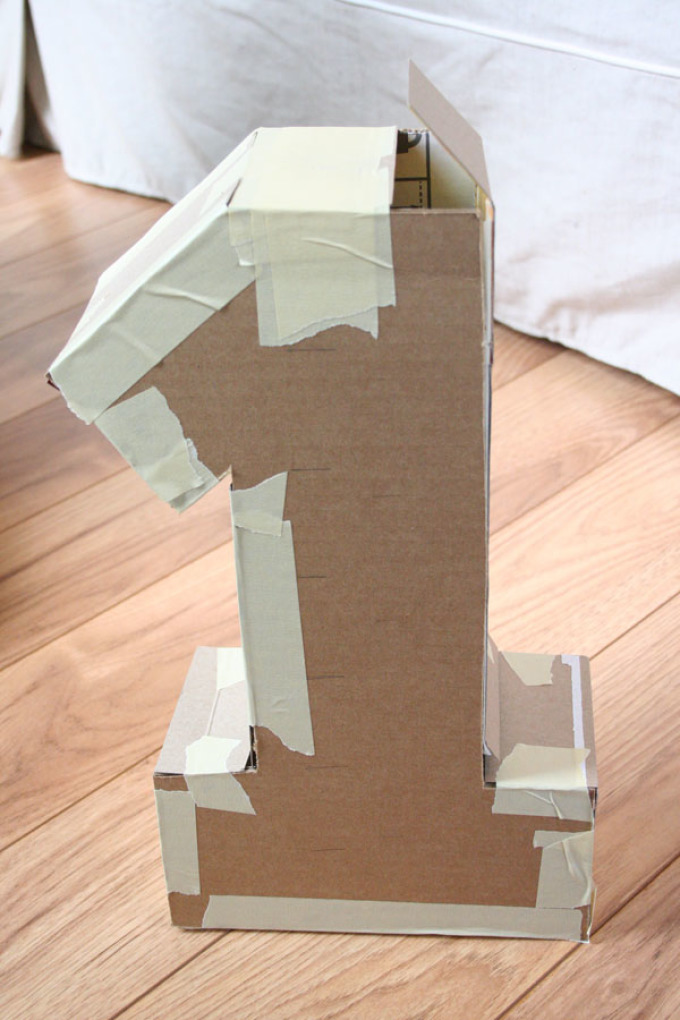
Decorative birthday numbers
Decorative numbers can be made using the quilling technique.
You can glue a lot of paper umbrellas of different sizes and fix them on a cardboard base.

The details of the figure can be cut out of the fabric and sew a large voluminous pillow. Ribbons, fabric flowers, lace and beads are suitable as decorative elements.

If you make the base from a special floristic sponge piaflora, then fresh flowers can be used as decor: the sponge retains moisture for a long time and nourishes the plants. But a significant drawback of such a piece of decor is its fragility.
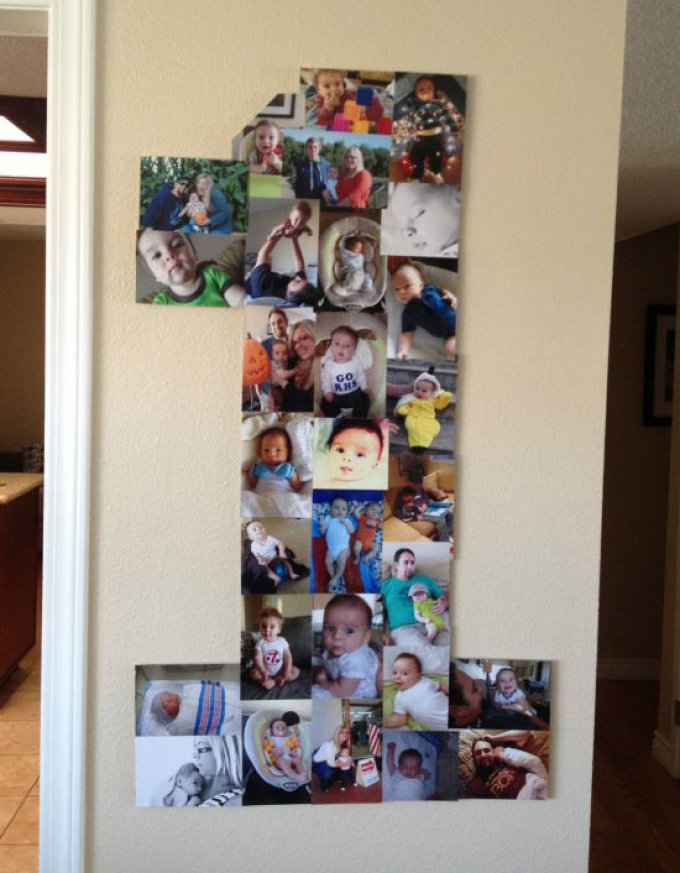
Numbers from birthday photos
Here are the numbers that will be truly unique, so these are made from photographs. They can be pasted on a cardboard flat figure or in Photoshop, pick up photos for a collage and line them up according to the intended shape. The finished collage only needs to be printed and pasted on the base or wall.
Numbers from felt for a birthday
A felt figure, if it is decorated with small toys cut out of felt, a child can use in his games after a name day.

To make a figure, you will need one piece of bright felt (for a flat figure) or two (for a three-dimensional one). The figure is sewn like a soft toy and stuffed with filler - cotton wool or padding polyester.
Birthday balloon numbers
It is impossible to imagine a children's holiday without balloons. Numbers from balloons, although they are a constant attribute in the photo of birthday people, they can also be made in an original way.
The video shows one of the ways to make figures from balloons.
Video: balloon figure
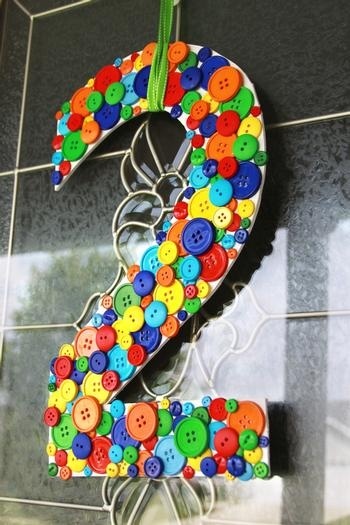
How to decorate a number for a birthday?
Anything can be used as a decoration for a number. If only it looked beautiful and festive. You can make paper flowers, you can paste over the number with buttons, or sew small animals from felt and attach them to the number.
Ribbons, lace, pieces of fur, crowns and hats, beautiful bouquets of artificial flowers and large beads will fit to decorate the figure.
Ways to decorate numbers:
- quilling decor
- use of internal lighting
- gluing squares of corrugated paper or pre-prepared flowers
- metallic, mother-of-pearl or embossed paper
- the cloth
- satin ribbons
- sequins
- colored cones
Number 1 for a birthday for a boy and a girl
- To make the number 1 for your birthday, you will need a large piece of cardboard or a cardboard box, tape or masking tape, and a utility knife.
- We draw the letter of the desired shape. Cut out. We circle the second part along the cut out unity and also cut it out.
- We fix the sides with tape. And let's start decorating.
- We cut out roses from napkins and glue them on a cardboard base, gradually filling the entire figure. You can pre-paste the number with colored paper to match the napkins used for roses.
Video: how to make a 3D volumetric figure 1 for a birthday?
Video: do-it-yourself number from napkins
Number two for a birthday for a boy and a girl
The number 2 can also be made voluminous and decorated with “napkin” roses. The manufacturing process of the number 2 is shown in the video.
Video: volumetric figure "2" from flowers (napkins) for a birthday
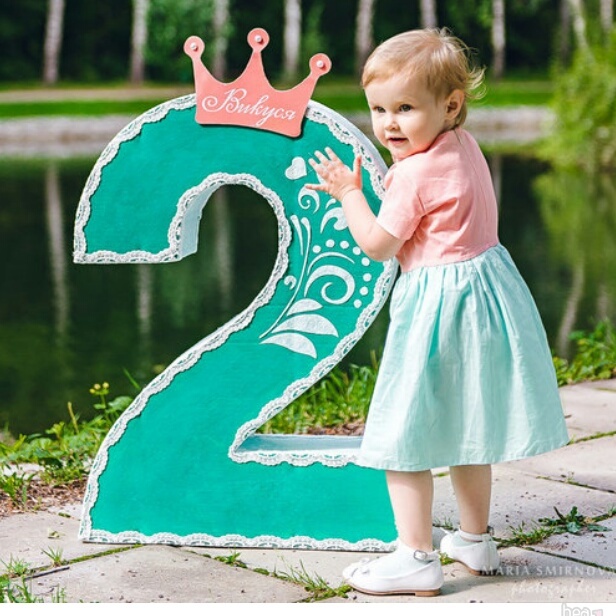
For a girl, the figure can be decorated with a crown, a chic bow, or dressed up in a skirt.

We propose to do number from ribbons. You will need a large piece of corrugated cardboard, double-sided tape, scissors and a bright ribbon about 7-8 m long and 5 cm wide. We will decorate the number with beads.
- Cut out 2 cardboard base blanks. If the cardboard is thin, then it is better for strength to cut out two identical sides and glue them together.
- Next, we proceed to tightening the numbers with tape. We fix it with a stapler or tape. You can fasten the ends of the tape with threads or hide them behind the tape and secure with tape.
- We glue the beads with a heat gun.
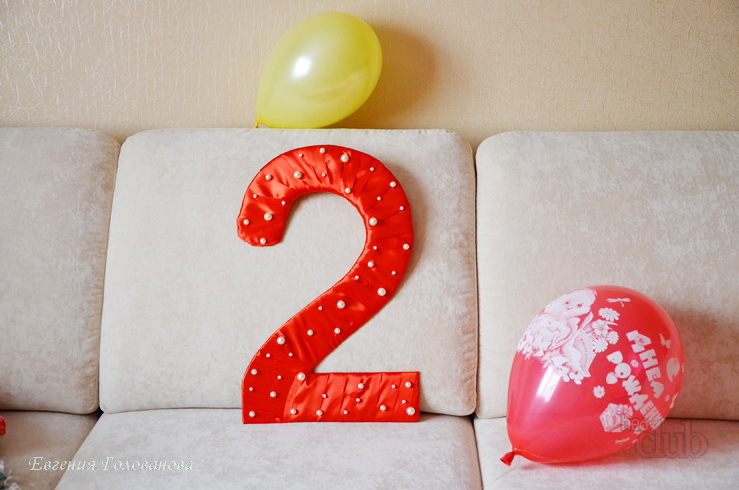
The figure for the boy can be done in nautical style: from blue and white stripes. A figure made in the same color with a bow tie or tie is also suitable.
Video: how to make the number 2 for a birthday
Number three for a birthday for a boy and a girl
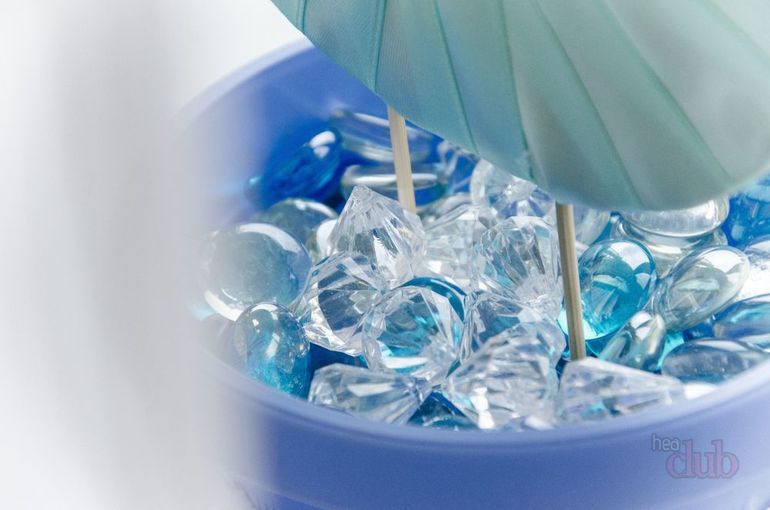
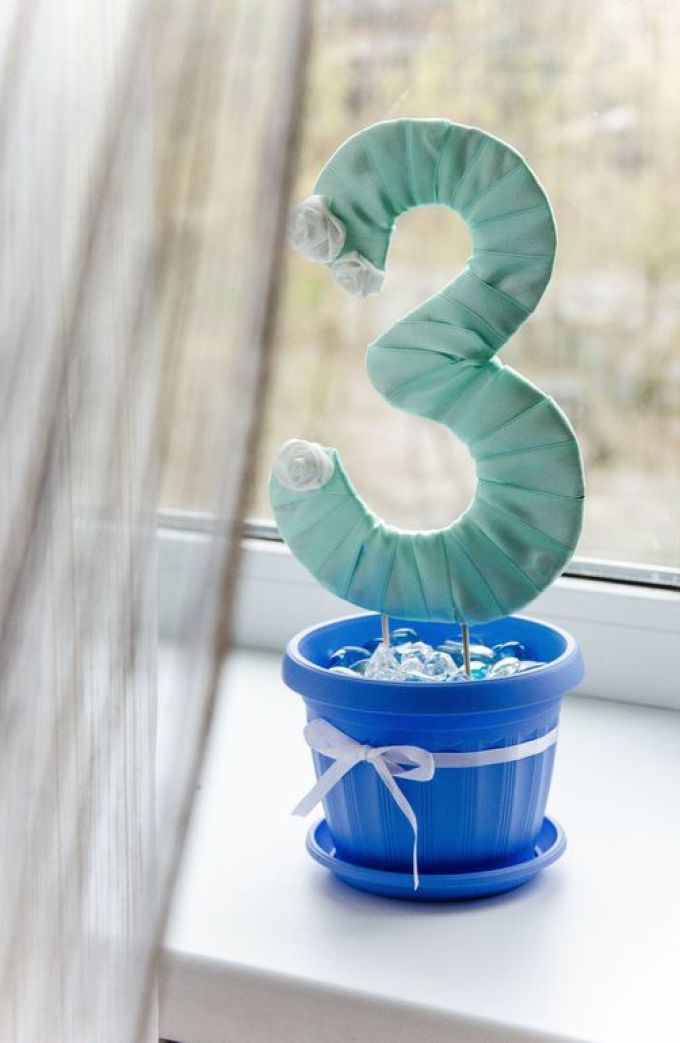
The number 3 for a change can be "grown" in a flower pot.
You will need:
- flower pot
- cardboard box from which we will cut the number
wooden sticks - various decorations
- ribbon
- thermal gun
How to make a number?
- We cut out two identical triplets and put wooden sticks between them (they are necessary to fix the number in the flower pot)
- Glue the halves of the number and connect them
- We begin to wrap the top three with tape
- We fix the tape with a thermal gun, and where necessary - we sheathe
- We glue the pallet to the flower pot
- We fix wooden sticks with a thermal gun to the pot and put pebbles inside the pot for reliability of the structure
- Top can be decorated with decorative pebbles
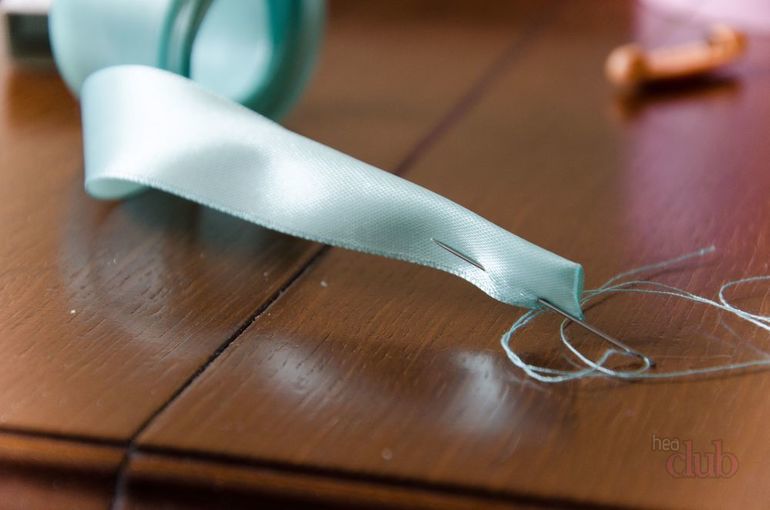
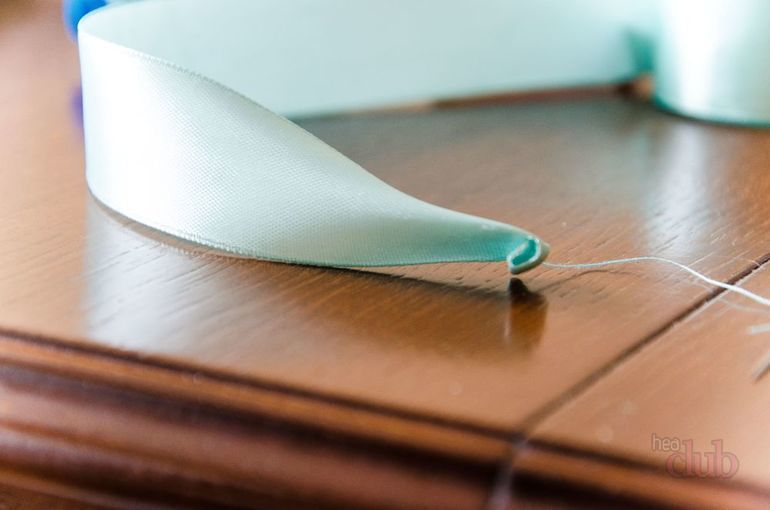
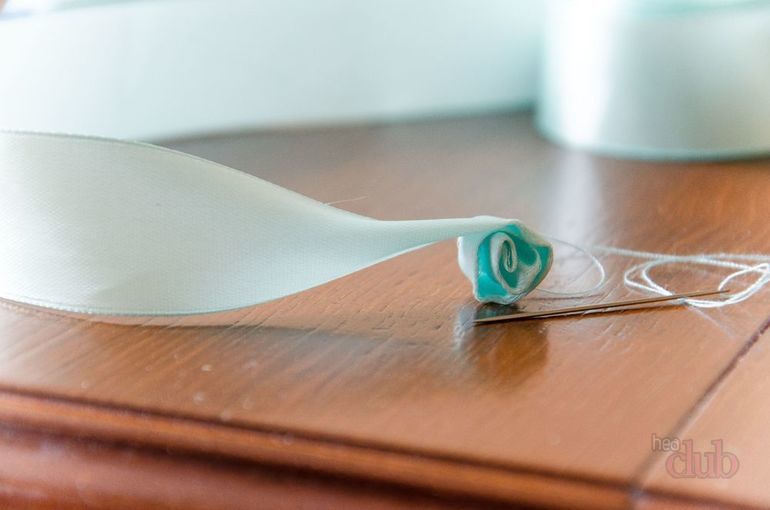
- We decorate the figure with ribbon roses. It's not hard to make them
- We fold the ribbon in half and begin to wrap, gradually sewing on the lower part of the future rose
![]()
Video: number 3 for a birthday
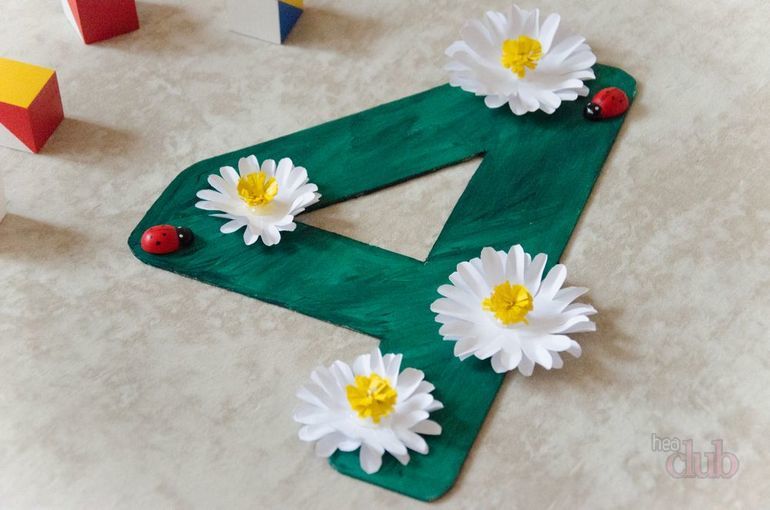
Number four for a birthday for a boy and a girl
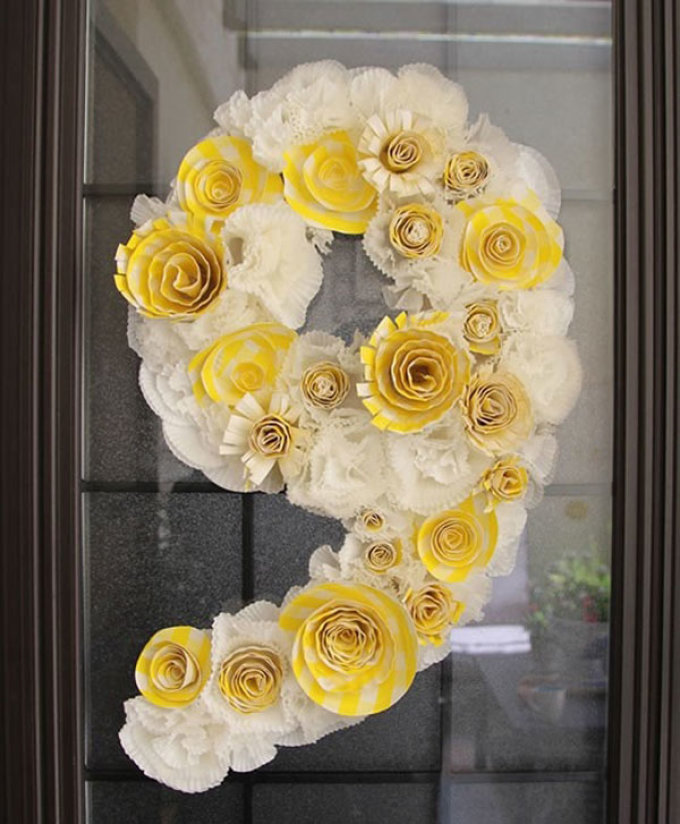
The number four can be done in a similar way. Cut out the base from cardboard and paint with paint or paste over with colored paper. Cutting daisies out of white paper is also not difficult. The photo shows the manufacturing process of the four.
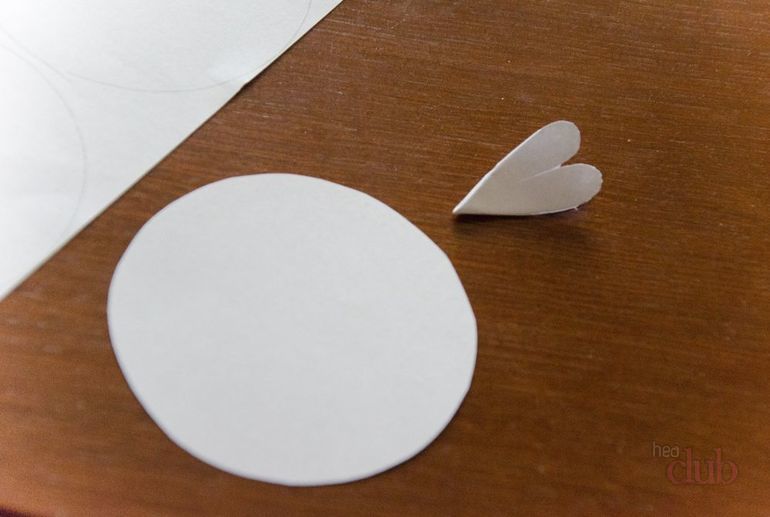
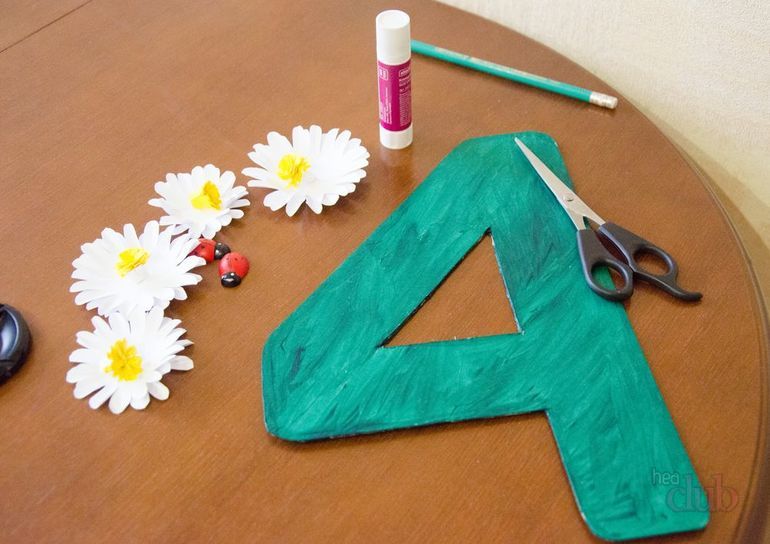

And here's how you can make flowers from circles of colored paper:
 Here's what happened
 Video: how to make the number 4 for a birthday
Video: corrugated paper and cardboard figure
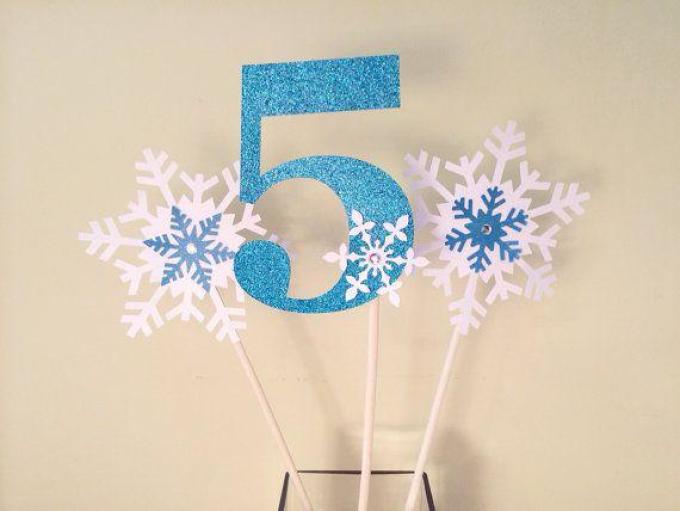
How to make the number 5 for a birthday for a boy and a girl?
The five can be made from a cardboard base, decorated with ribbons or “napkin” flowers, or you can cut out circles of different sizes and cut spirals out of them. Then, having collected the resulting ribbons in the center, you get another original type of floral decoration. you can insert a bead into the middle of the flower.

When the birthday of a beloved baby is approaching, all parents try to prepare all kinds of treats for their crumbs. To make the holiday pass in a solemn atmosphere, moms and dads decorate the apartment with balloons, photographs and other attributes of the celebration.
Volumetric figures for a child's birthday are becoming increasingly popular with parents who want to decorate an apartment for the holiday, prepare for a photo shoot and just please the baby. However, not every parent knows how to make such a figure on their own.
The work on creating a deuce can be conditionally divided into two stages: creating a frame and decorating a figure.
How to make a frame-base of a deuce?
In order to make a frame, you will need:- large cardboard box
- wide tape,
- masking tape on a paper basis,
- ruler, marker,
- stationery knife, scissors.
First you need to draw the number two on the box. Try to carefully draw all the corners. When the drawing is ready, it needs to be cut out. Since it is very difficult to cut thick cardboard with scissors, it will be better and more convenient to use a clerical knife. Then you should make a copy of the deuce, laying the base on cardboard. As a result, you should get two cardboard numbers.
To make the deuce look voluminous, you should cut out a few more cardboard elements and use adhesive tape to connect them with two numbers.
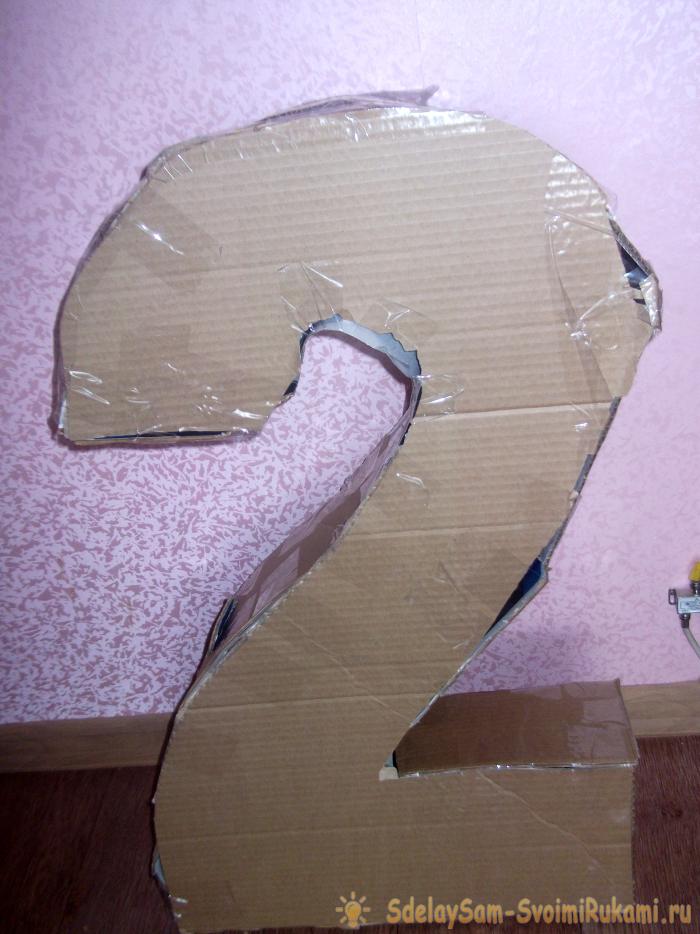

The frame is ready.
It is known that flowers from napkins will not be attached to ordinary adhesive tape. In order to make the decoration process easier, you should glue all the joints with paper-based tape. Glue the frame of the deuce with napkins of the color you like using PVA glue.
How to decorate a volumetric figure?
There are many ways to decorate a three-dimensional figure. Some prefer to use corrugated paper for decoration, others choose felt. There are those who like flowers from napkins.- several packs of napkins of any color,
- PVA glue,
- stapler,
- scissors,
- cardboard circle.
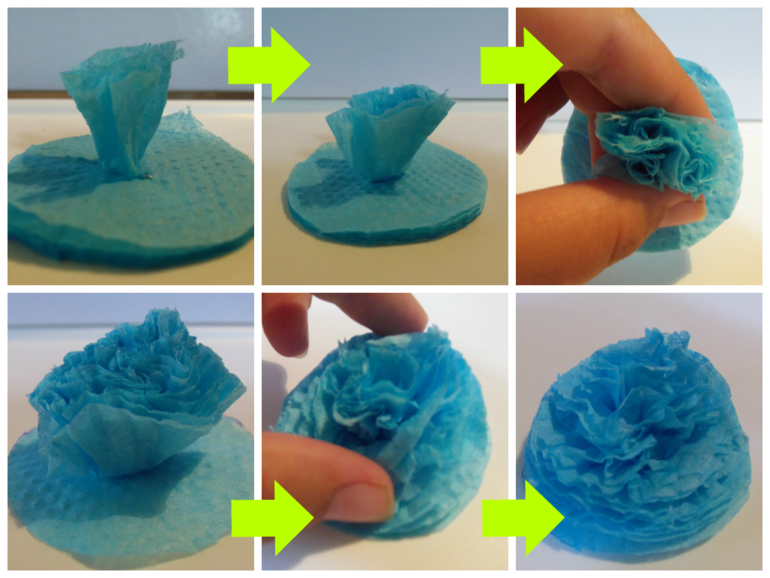
The easiest way to make a flower from napkins.
1. Take three napkins folded in four. Place a medium-sized circle cut out of cardboard on top of them. Cut along the outline.2. Fasten all the resulting circles of napkins with a stapler in the center.
3. Now you need to disconnect upper layer paper napkin and crumple it, then the second and so on. Crumple each layer individually, trying to maximize the pressure from below. As a result, you should get a rose. You will need a lot of these flowers.
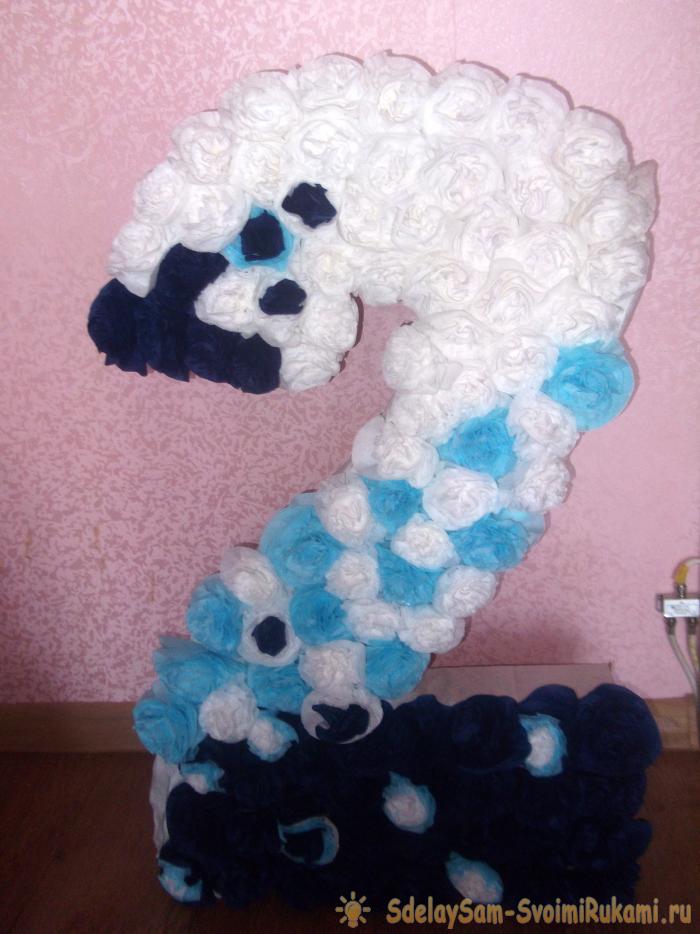
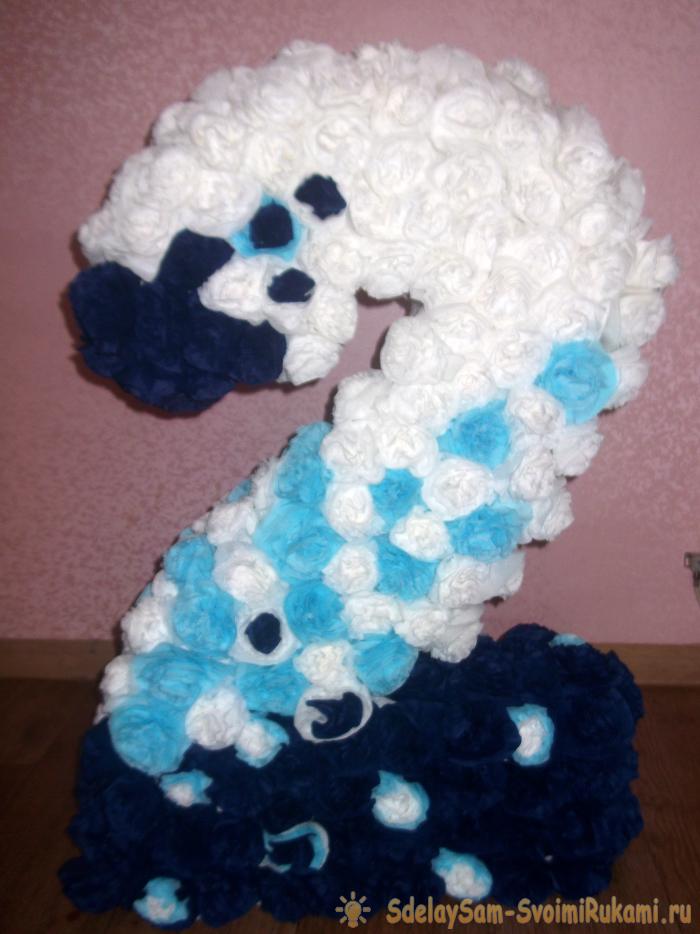
Consider the design of the deuce in advance. It can be made in one color or in a combination of several colors, you can come up with some unusual pattern, or you can simply alternate roses of different colors.
It is necessary to decorate the figure with flowers not only in front, but also on the sides. This will visually increase the size of the deuce and give it additional volume.
Volumetric figure 2 is ready.
Your baby will definitely like it and will become the main decoration of the celebration, captured on memorable photos during the celebration of the birthday of your two-year-old.