I wanted to make Ilyushka a merry day of jam this year. We did not celebrate a year, we went to the parade, and in the evening the three of us sat quietly. Then, however, grandparents threw a separate holiday, but that was on a different date. I prepared for the second anniversary for a long time, looked for the right gifts, ordered books from a certain publishing house from Moscow, even waited for the easel to appear in the color we needed, I really wanted it to be the same color as our snake.
But most of all I got confused about the decor. On the whole, it was possible to do without it at all, especially since we didn’t have a children’s room with a bunch of Ilyushin’s friends and their parents to brag to, or even a simple photo shoot for which this very decor could be made. But now I wanted to make a huge volumetric figure for my son’s holiday, even if you crack! I really liked these things when I saw them on the Internet. And as usual, I share the instructions with those who are as crazy as I decide to make a volumetric figure with their own hands.
So. First, I needed cardboard. More precisely, two sheets of cardboard of the same size. Usually cardboard remains after some major purchases - a refrigerator, TV, washing machine. I did not have free cardboard at home. At first, I scoured the shops, where I repeatedly took empty cardboard boxes for Ilyushin toys. But now, for some reason, the sellers not only could not offer large sheets of cardboard, they did not even give boxes. Maybe they sell it for waste paper, I thought.
Then I googled Simferopol supermarkets, where everything is for construction and home. And I was even about to drive and buy it, when that same easel-gift arrived. I glanced at the elongated cardboard box and broke into a smile. And just two parts - what you need!
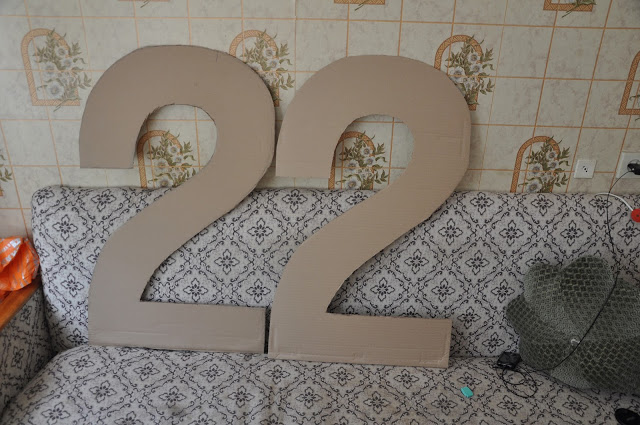
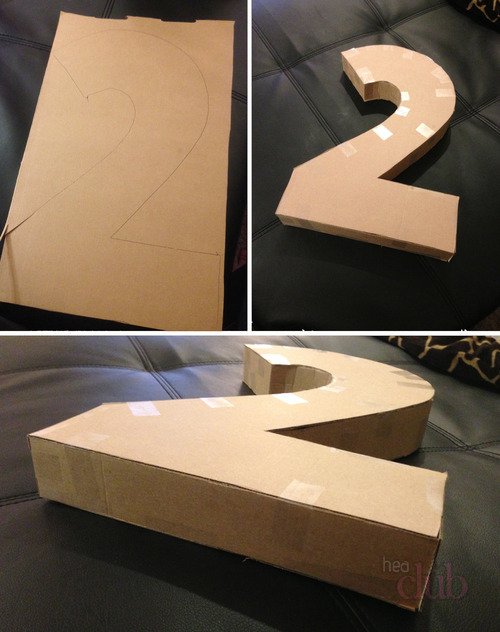
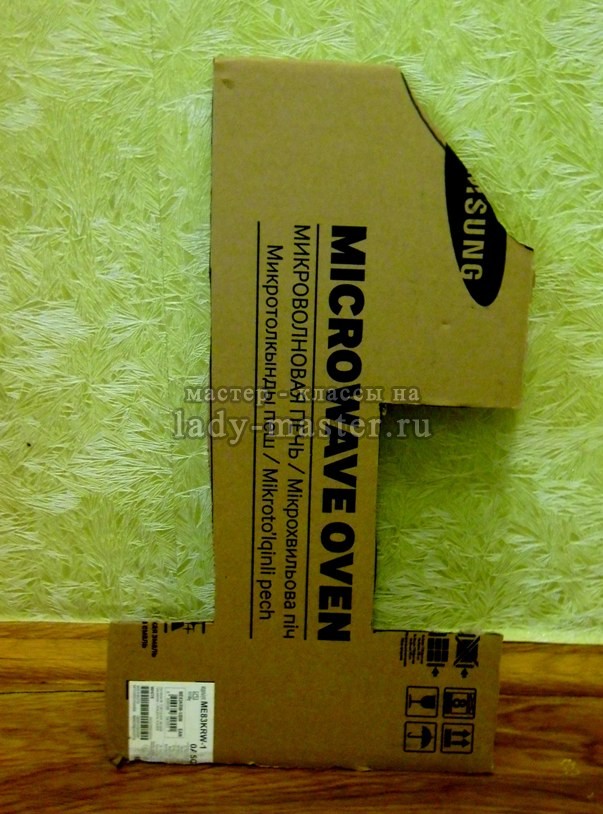
First, I drew the number "2" on one of the cardboard boxes. I drew by eye, but I was very worried, because after looking at a bunch of pictures with ready-made volumetric figures on the Internet, I realized that the worst thing is to draw a number badly at the very beginning. Because she is already ugly, and after you sit over her at night, pasting flowers or pounds, this ugliness comes through even more. It was important for me to draw an even, not crooked, not oblique, beautiful harmonious number. It seems that I succeeded, however, already in the process of gluing, I came to the conclusion that the upper part of my deuce is still a little larger than the lower one. But she didn’t get upset, but resorted to “disguise”, which I will talk about a little later.
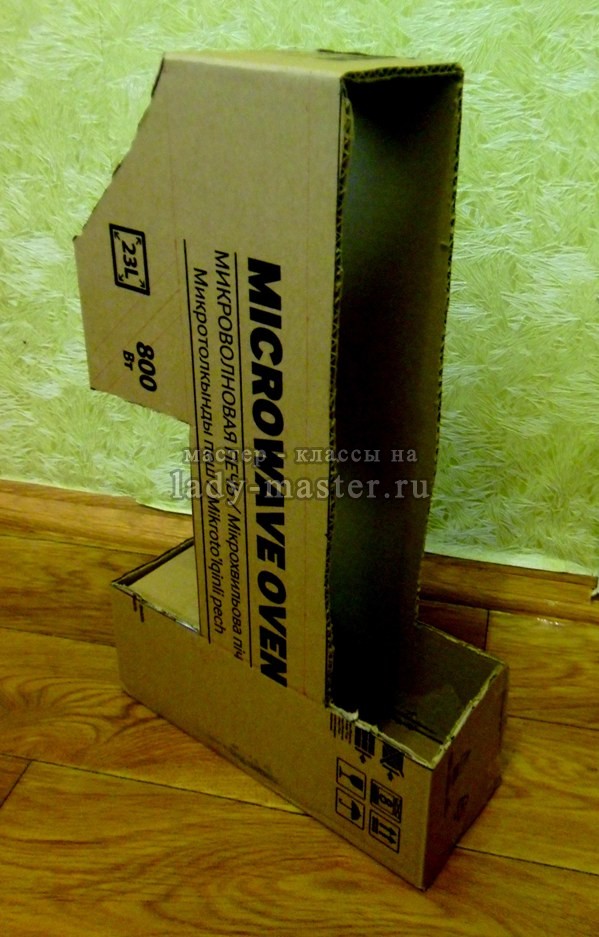
So, I cut out the drawn deuce with scissors (you can still use a special cardboard knife, but I don’t like it), then I attached it to the second sheet of cardboard, circled it around the contour and cut it out again. Thus, two identical deuces were obtained.
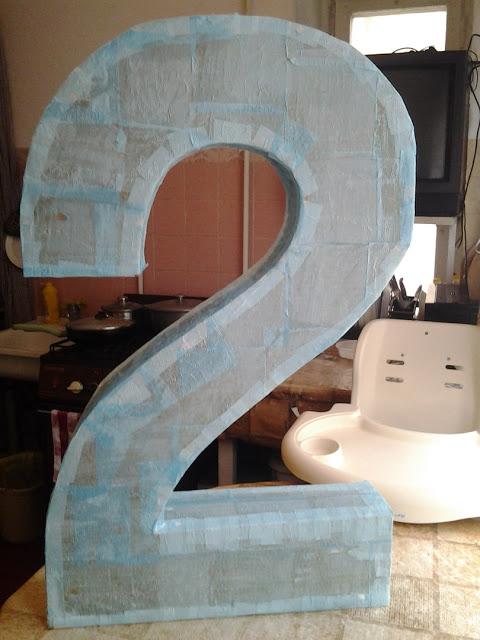
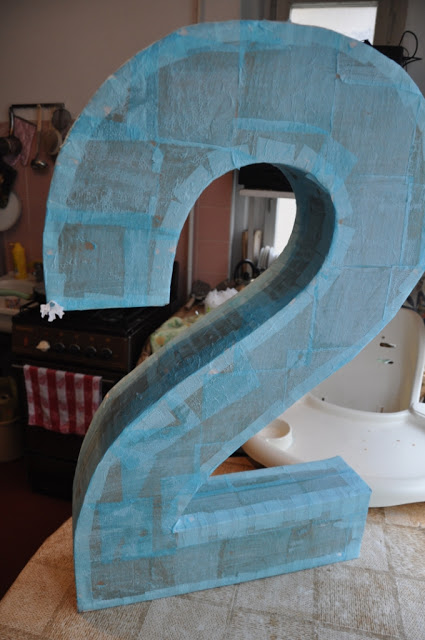
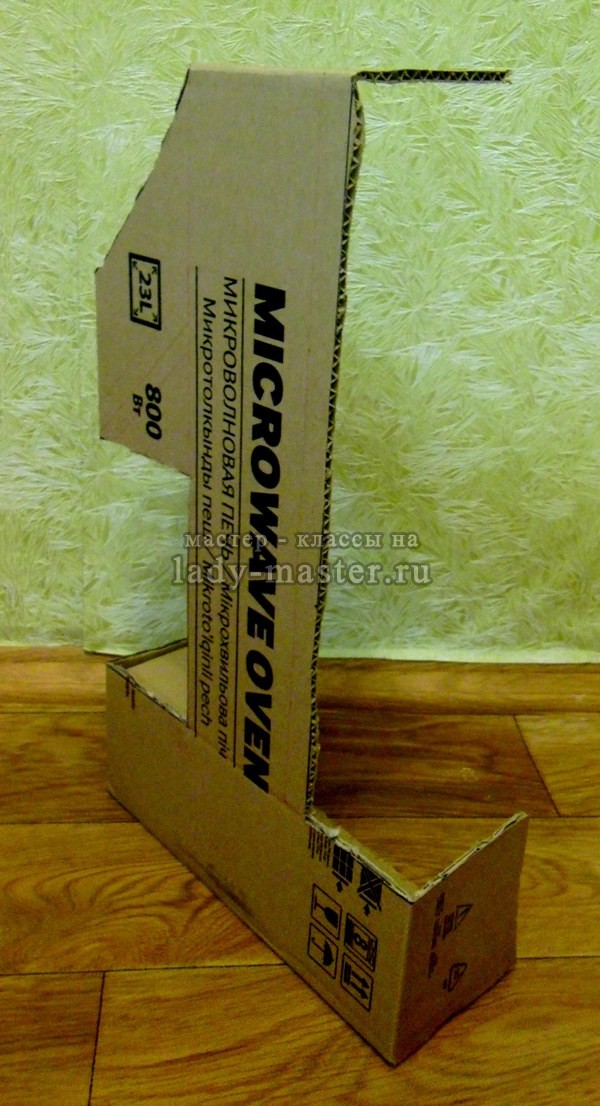
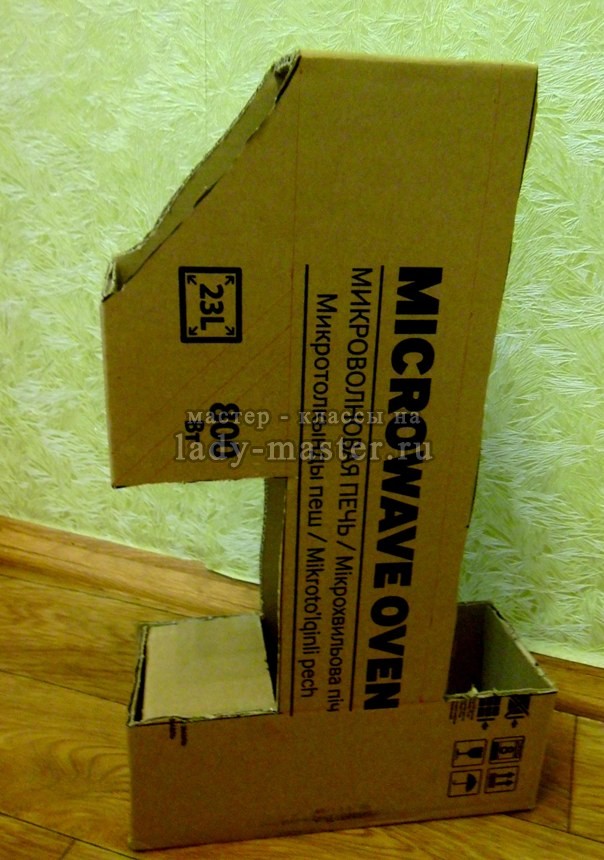
Then, with the help of masking tape and the remnants of cardboard, I began to glue the deuces together. It is important to note here that it is imperative to take only masking tape (which has a non-sticky side, as if paper), because the usual one holds worse, and may even peel off after a while. Secondly, I thought that, in theory, one more separate and beautiful sheet of cardboard was needed for gluing, and I was even going to gut one of those same boxes for Ilyushin toys in this case. But it turned out that the remains after cutting different shapes and species are also great, the main thing is to cut them so that there are strips of the same size. In fact, I did the gluing with the help of 10-15 clapsticks, which I had to not only glue to the numbers, but also glue them together. But it worked out well too. For the best effect, I advise you to fix with tape not only from the outside, but also from the inside. In the end, after about an hour, I got this design:
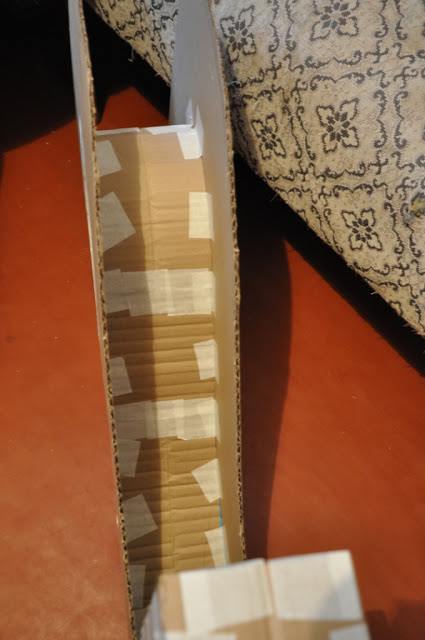
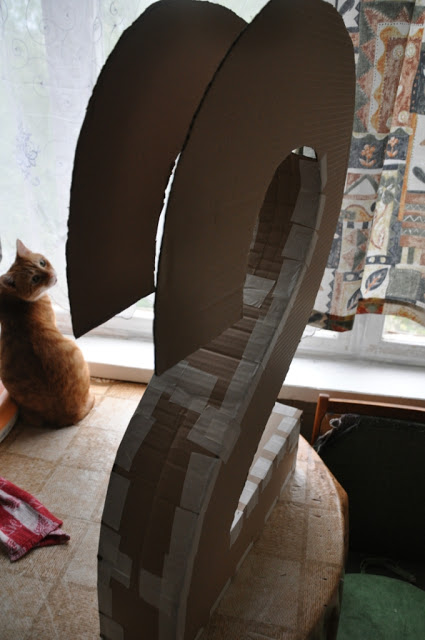
The figure came out 90 cm high and 60 cm wide. It stands on its own.
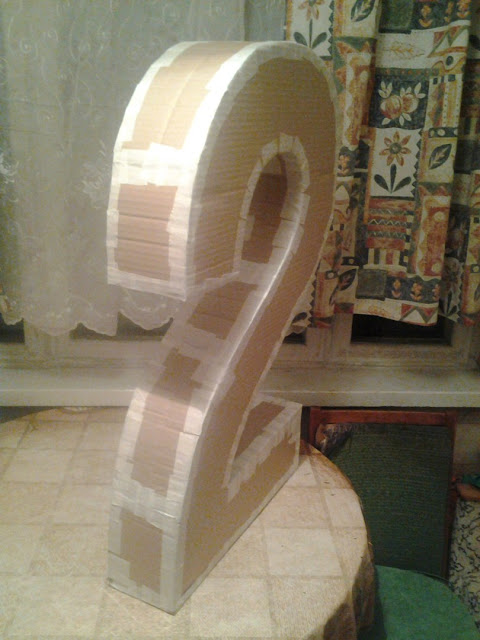
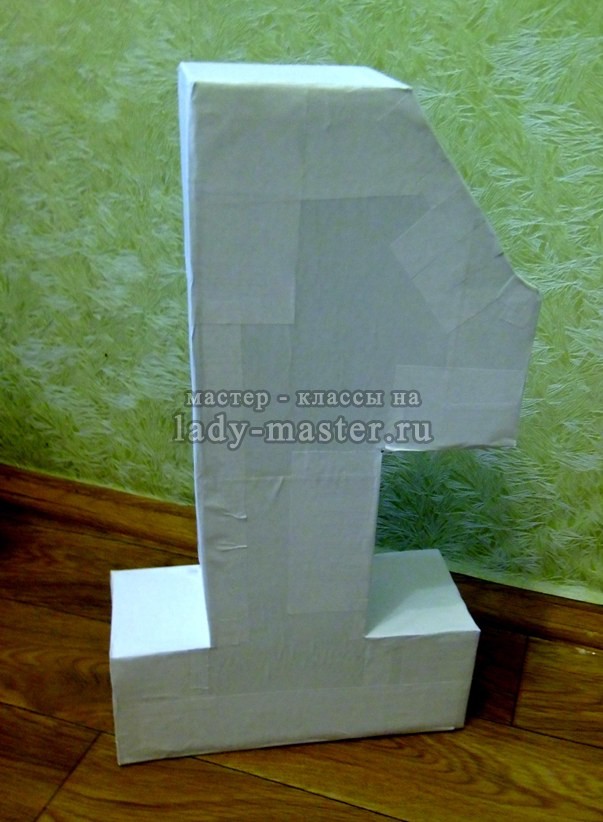
Before I started decorating, I pasted over the front with regular paper napkins. I read that the pounds will hold better this way.
You can decorate such numbers with anything, but most choose two means: napkins or corrugated paper. Napkins also turn out beautiful, besides, there are fewer troubles, because you can make roses of large diameter from napkins and then it will take less time to paste.
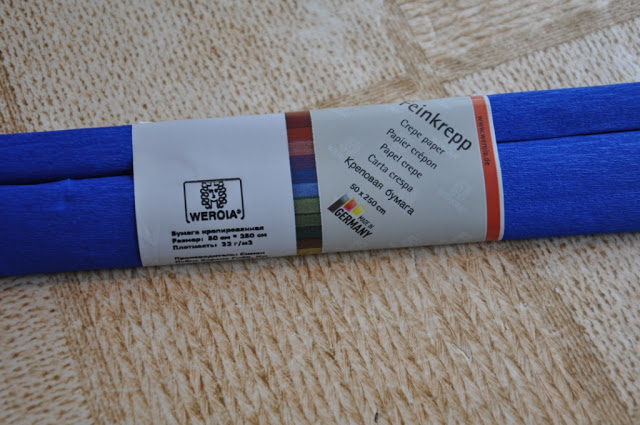
But I liked the figures from corrugated paper more, but I decided to specifically get confused. In addition, corrugated paper is many times more expensive than ordinary table napkins. In general, I went for corrugated paper, I was going to buy only dark blue, since the figure was originally conceived as a single color. But here's a set-up - in a store where paper turned out to be cheaper than in other places, there were only five rolls of dark blue. I had to urgently correct the idea, and in the end I bought five dark blue and five white rolls. This also added to the hassle - if the figure is monophonic, then know for yourself just glue around the perimeter and do not be distracted by anything. And then I had to figure out how to combine these two colors with each other to make it look decent.
In general, I took good, German-made paper (the worst, “loose”, thin and poor-quality paper is considered to be Russian and Chinese production, and the best is Italian).
These pictures I would call "A long journey always begins with the first small step"))
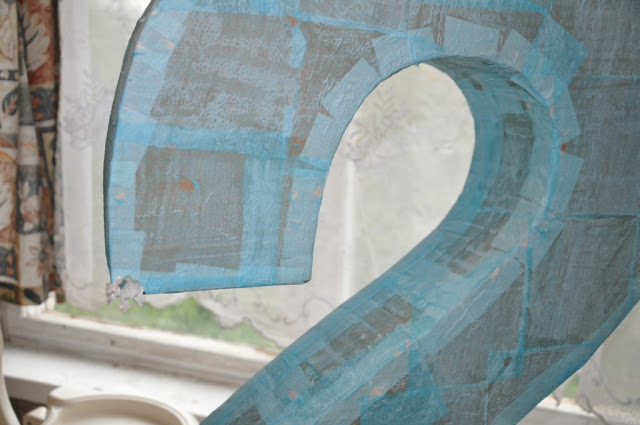
And there are already more than a dozen steps. The thing went.
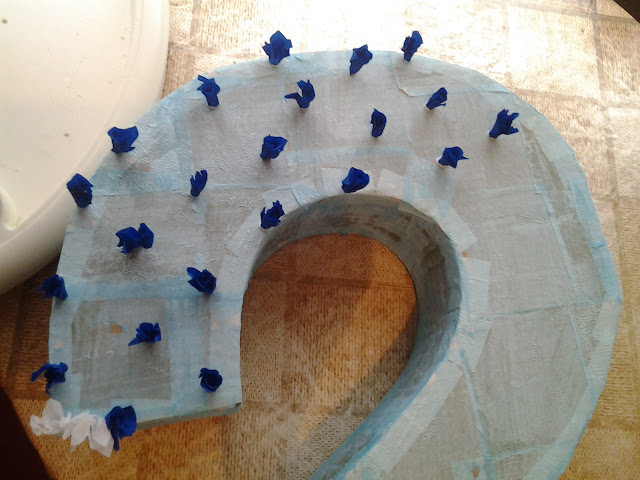
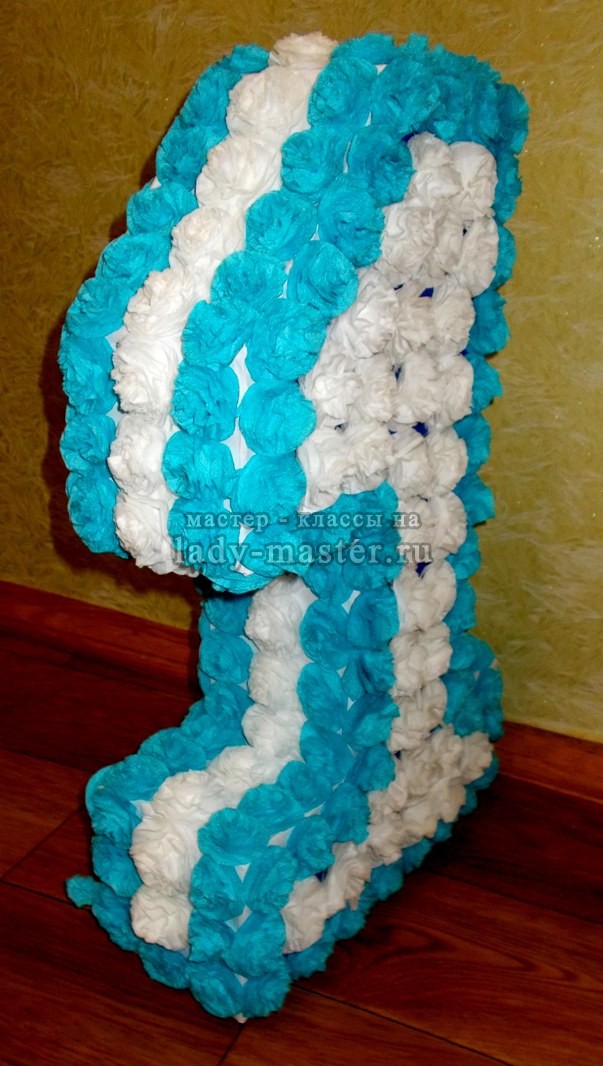
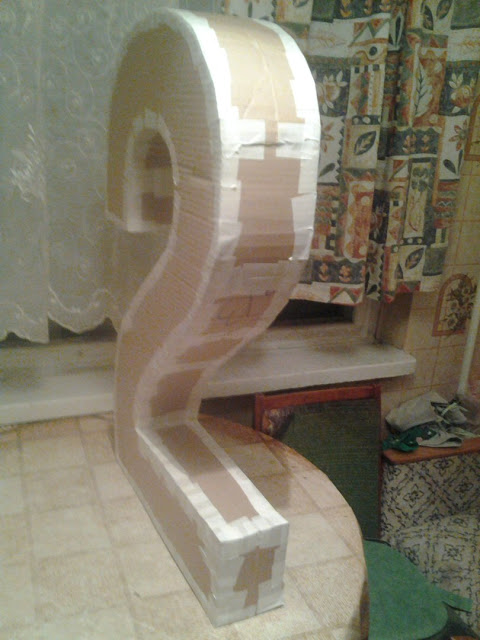
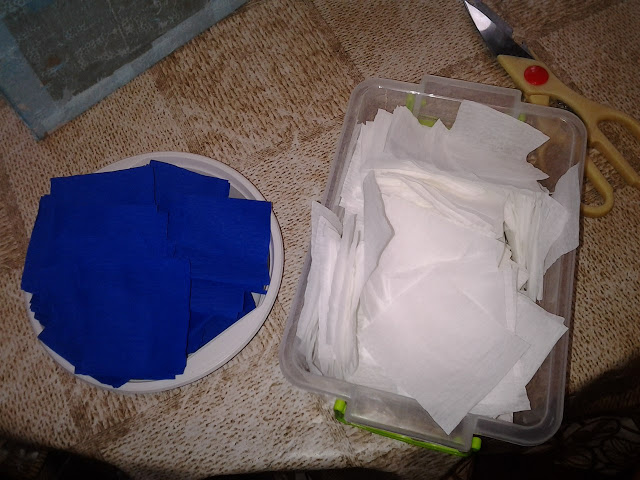
Since the figure is two-color, at first I marked the middle with a pencil, where the colors “meet”, and started gluing with “blotches”, and after that I went with the main color. The technology for gluing each pound is simple: take a pencil, put it with its unsharpened side in the middle of the pound and squeeze the piece of paper around the pencil with the other hand. After dipping in glue - and on the number. Glue is most often used “hot”, from a glue gun, but I used ordinary PVA, it also holds well, the main thing is not to pull it while it dries. The distance between the pounds was determined by eye, but it is about 1 cm. There is no need to do less, because the “flowers” then, after drying, open well with the help of ruffled by hand.
Step by step and I got this:


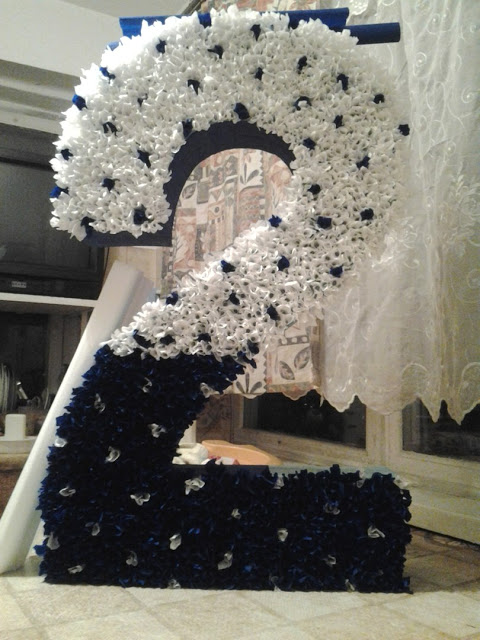
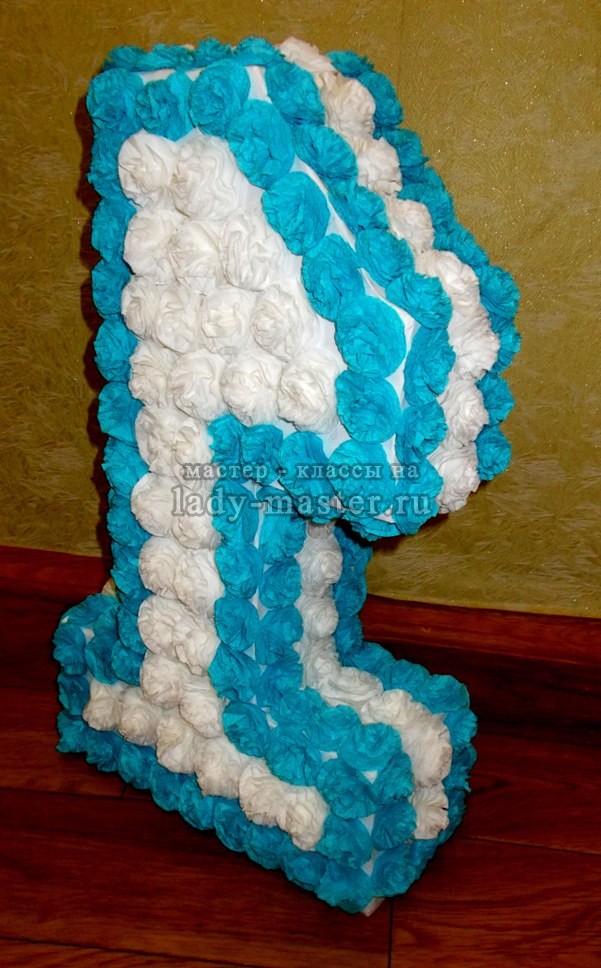
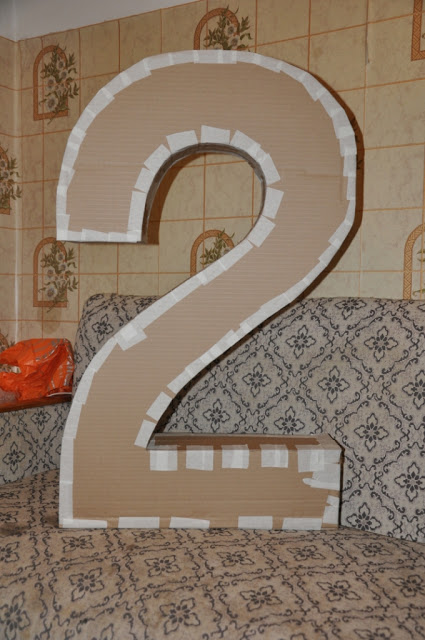
It remained to glue the upper and inner parts, but since this is not a unit, for example, but a deuce, then I had to fool around here. It’s clear with the top - you glue it and it will only become more magnificent. But if you glue it completely inside, then the gap in the deuce will almost close and the figure will become incomprehensible, like a big fluffy spot. I had to cover it with corrugated paper somewhere inside and on the side instead of the pounds. Due to the more fluffy top, the figure turned out to be not so harmonious, and I decided to make it a “tail” (it can be seen in the pictures below). So the design is slightly leveled.
At the back, the figure can also be pasted over with corrugated paper or ordinary color paper. But I didn’t do it, it’s just the wrong side, it’s still not visible to anyone.
Before all this business, I asked the girl who made a one of a similar size how much time it took her to do this. She said that she did two weeks a little bit and only at night, since she has two children. I did the figure in four days. Whether because it was just four days left before Ilyushin's DR, or because I was incredibly carried away by the process itself (I even meditated while gluing a million of these pieces of paper), I don’t know. But the last night was the toughest - I finished at four in the morning and, in order to stay awake, drank five cups of coffee. There was nowhere to retreat - Moscow is behind us)) Well, the truth is, I would not have gone to the DR with an unfinished figure. Where is it then?
But the most difficult thing was, perhaps, that Ilya had to be constantly driven away from the numbers. Throughout the process, he constantly strove to tear off the pounds, then jump on her, then just kick. Well, the cat, bitch, did the same thing. In general, the invasion of zombies on my figure))
We celebrated DR ourselves with my parents, and when I left the house to get into the car and go to them, on the way to the car, several people said “Wow!” When they saw this miracle in my hands, one couple asked where we bought this , and another aunt wanted to buy from me right now. We solemnly seated the figure on the front seat. It only remained to fasten)
To say that everyone at home went nuts is to say nothing. The girls praised, the grandmothers groaned and gasped, and every time I said: “Yes, yes, four nights!”. Some did not believe that I did it myself and asked how much I bought it for. The only sadness is to take plenty of pictures and somehow especially with this figure at the holiday, the parents did not succeed: there were too many people, noise, noise, angry Sarkis, sleepy Ilyusha ... And I decided to take a photo later separately when we return home. And when we returned home, Yana came to us almost immediately on vacation and started spinning. I asked Sarkis and Yana to take the number with them when we went to nature, but in the end I didn’t want to stuff it into the trunk, and Yana didn’t want to crowd in the back seat with me and Ilya so that the number would go ahead. As a result, we only had a few photos from the home photo shoot, and even without Sarkis, because he was at work. Ilya didn’t want to take a picture either, again he tried to make fun of the figure, and only his beloved Zaya defuse the situation a little. The sister, seeing the figure for the first time, said: “Fuck, how beautiful! But you're still crazy
The first year of a baby's life is marked by many events: at three months he begins to hold his head, from six months he learns to sit, at nine he tries to stand up and walk with support on a soft rug. Parents record each stage on camera to leave bright shots for a long time. happy life. Therefore, when a son or daughter turns 1 year old, mothers, together with dad, plan how to spend it long before its onset. Recently, the hand-made number 1 for a year has become popular, which turns out to be voluminous, creates a festive atmosphere. Let's talk about materials, various ideas for its execution.
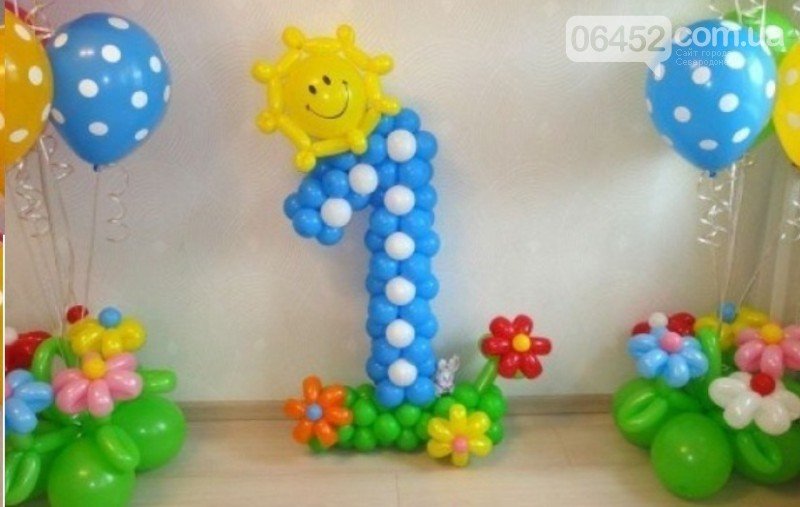
Numbers in balloon modeling style
Kids love balloons so much that it is impossible to imagine the interior of the room where the children's birthday will be held without balloons. Today, of course, it is not uncommon to see balloons in any solemn decoration, but they do not become commonplace and do not become a thing of the past, but remain in demand. So, the sequence of performing the number 1 from the CDM (balls for modeling) is presented in the video.
Frameless figures
To change the location of a digit without linking it to certain place, you will need a frame base. If there is none or there is difficulty with its implementation, then there is a lightweight version without a framework. Figures made in this technique will be limited to one point on the plane. The wall will act as an emphasis, it is on it that the number 1 of the balls will be located.
To do this, you need to take small balls of the desired colors. It is necessary to focus on the gender of the child and the general color scheme in the room where it will be placed. Blow them up to about the same size. In advance, draw a figure outline on the wall with a thin pencil to make it easier to attach the parts to the base with tape. It is better to use double-sided tape, as only the tips of the balls are fixed to the wall.
Cardboard figures
For the base, you need the simplest cardboard box, which allows you to design a large number. In order to get a flat part, we place the material on the floor, outline the contours of the future figure on it. Cut out carefully with a utility knife. Decorate to your liking and hang on the wall.
Making a volumetric figure will take a little more time. It will be mobile, so you can not only change its location, but also play with it. For this process, prepare two identical pieces of cardboard that correspond to the numerical number. Then cut out long straight strips. They will glue the edges of the figure.
You can assemble the frame and get the figure necessary for further decoration using a thermal gun or masking tape.
It remains to turn on the imagination and come up with an idea for decorating a festive figure. The material for decor are:
- threads;
- colored yarn;
- leg-split;
- satin, chiffon, velvet, organza in bright colors;
- colored paper (corrugated, metallized, fluorescent, hologram, etc.);
- packing tape.
By wrapping the number 1 with paper, additional volume is achieved. Then attributes for decoration are used. Flowers, butterflies, airplanes for a boy and other elements that will create a festive atmosphere can act as decorations.
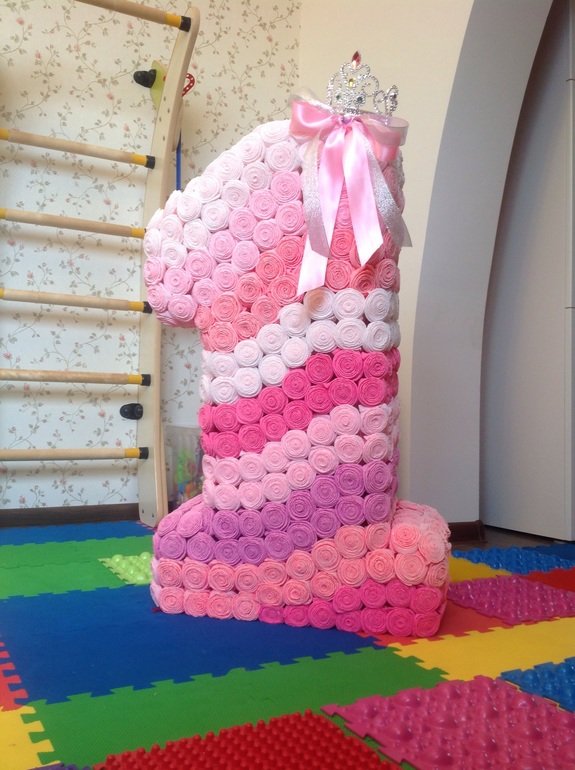
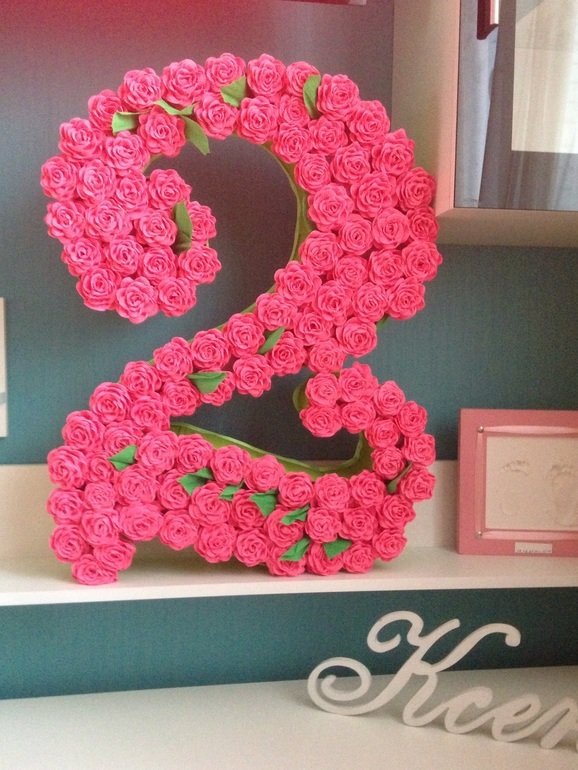
Floral numbers
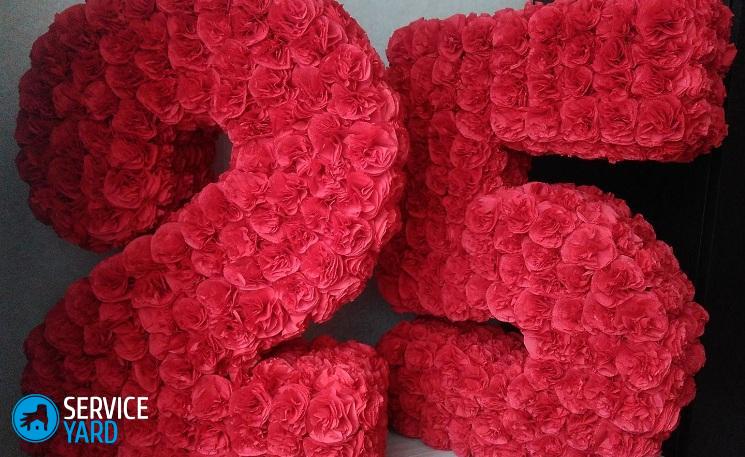
The basis for making figures from flowers will be cardboard. By analogy with the previous image, a template is created for the number 1. It will be decorated with many roses cut out of paper and glued tightly to the base. The finished product does not have a frame, so it is made in the form of a picture and hung on the wall. Such a panel can hang for a whole year over the baby's bed, until he becomes a year older.
The joint production of flowers fills the work with warmth, love, and the smiles of children, delight and a sea of positive emotions will make up for the wasted strength. You can decorate the prepared volumetric blank with flowers from napkins.
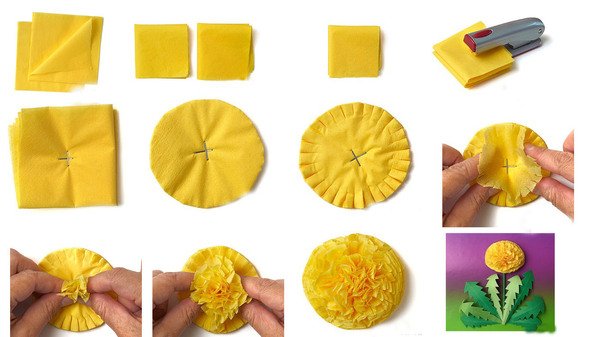
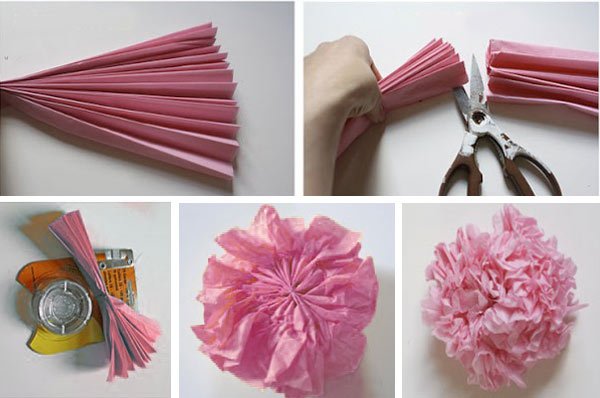
Master class on the manufacture of parts for the design of the frame:
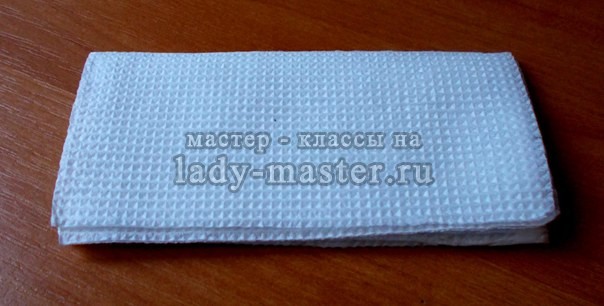
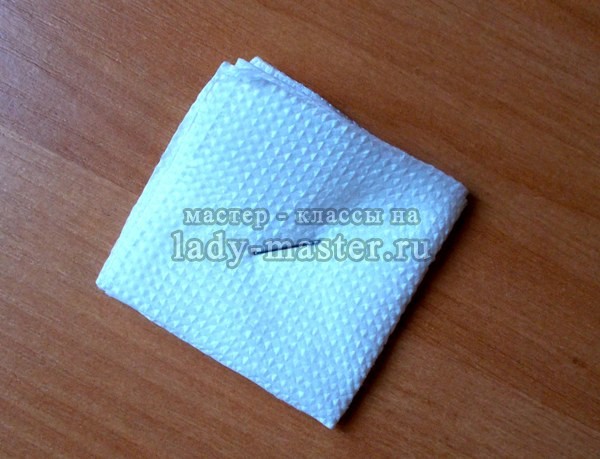
- fold a single-layer napkin in four;
- divide the base into four squares;
- we form an even stack, fixing the center with a stapler;
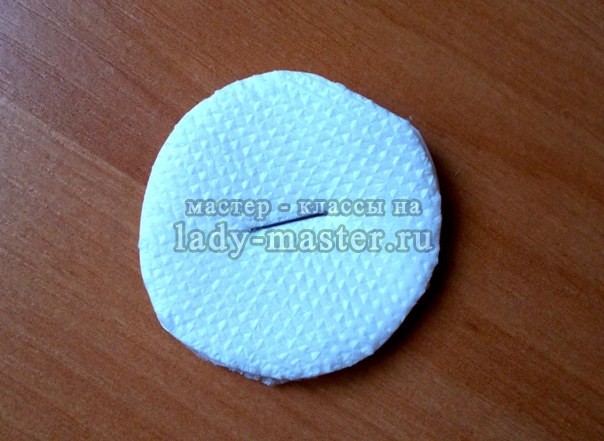
- cut off the edges, forming a circle;
- we cut from the edge, a little short of reaching the center along the entire circumference;
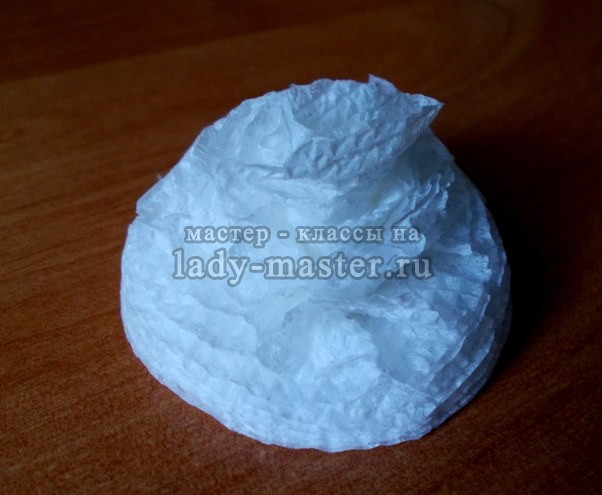
- we straighten the resulting petals so as to give fluffiness to the flower;
- glue, as in the photo, using PVA to the frame.
fabric numbers
Recently, a very popular material that young mothers use to make crafts is felt. It is from felt that you can create a functional letter by decorating it with small toys from the same base. After the solemn event, the kid will be happy to spend time playing with a symbolic number.
A unit is sewn, like any voluminous toy. It is filled with sintepuh, cotton wool or anti-stress balls. The front side is made out at the request of the mother.
Figures from satin ribbons are original, bright and unusual. The base can be wrapped in one color, so it can imitate a rainbow mood. Roses, also created from ribbons or cut from fabric suitable for this, can serve as a decor.
Fluffy, flat, voluminous, original or other figures, created with love to decorate a baby's birthday, will bring only positive emotions and joy to the family.
Video on the topic of the article
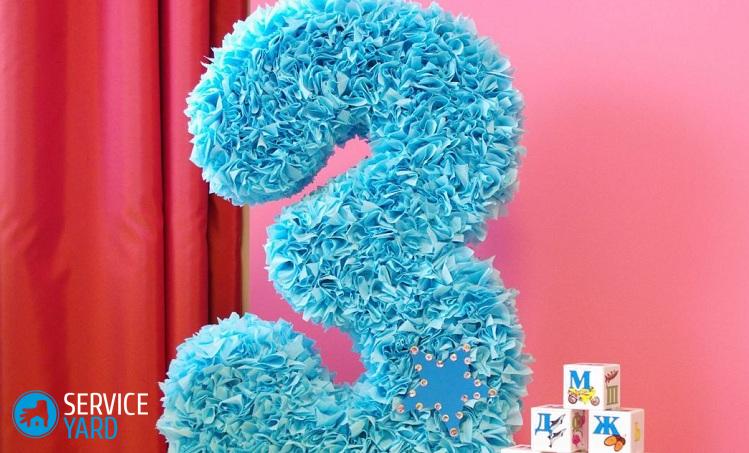
Volumetric figure from napkins is an excellent decoration for a birthday or other holiday associated with any date. This figure looks especially good at children's birthdays, because children can play with it and if it gets damaged, you will not suffer any large material expenses.
Such holiday decorations can surprise any guests very much. It is original and very beautiful. We will consider the manufacture of numbers using the example of a deuce.
Choosing the necessary materials
I must say that a figure, like the photo above, cannot be made using only napkins. Napkins are just a decoration, but there is a cardboard frame underneath. It's time to make the necessary list:
- The first thing we need is cardboard. Depending on the size of the figure you want to make, you will need a different amount of cardboard. Remember that if you want to make a 1 meter high figure, then you will need at least 2 squares of cardboard with an area of 1 square meter each. This is the minimum, count that for a 1 meter high figure you need about 3 square meters of cardboard.
- Napkins. The amount again depends largely on the size. For our figure, a meter high, we needed 350 pieces.
- Scissors and stationery knife.
- Glue, it should securely stick the napkins to the cardboard.
- We need adhesive tape to make the frame.
- stapler.
- Tape measure
Making a frame
We start making the figure by assembling the frame.
We need to make two flat deuces. To do this, we take two identical pieces of cardboard prepared by us in advance and draw a figure outline on one of them. Do not rush to draw the outline on the second. It's much easier to cut out one 2 and circle it on another piece. This will make them as symmetrical as possible. And so, the two bases are ready, now we need to make the side faces, which will be an indicator of the thickness.
We measure the length of the back of the deuce. Cut out a rectangle with the given length. The height of the rectangle will be the width of our final digit! Choose your size carefully. For a meter figure, a width of about 20 centimeters is well suited.
You can leave the bottom of the number blank, but you can also cut out a rectangle to cover it.
Having all the elements, we will have to put them together. Glue them together with tape. As a result, you should get something like the following result.
The frame is ready. It's time to start the longest and most monotonous process - the manufacture of decorative elements - flowers.
We make flowers from napkins
When making a volumetric figure from napkins with your own hands, this is the most tedious step, although maybe someone will like it. We had to make 350 flowers for our deuce. Those who set themselves the goal of making a figure whose height is more than 1.5 meters are not lucky.
Take a napkin and fold it in half. As a result, we should get a square, which consists of sixteen layers of napkins. We fold the square with an accordion.
We fasten our "accordion" in the center with a stapler.
We cut out a circle from the workpiece and carefully begin to straighten it. As a result, we should get something like this result:
You may not be able to do the same the first time beautiful flower, but this is more a matter of practice, try it and each time you will get more and more beautiful. In addition, you have a large scope for training in the form of 350 flowers.
Making a rose from napkins
Fold the napkin in half. If you want to get a more lush rose, then take two napkins. Fold in half, fold again. In the middle we fasten with a stapler and cut out mugs from a square.
Raise all the layers of the circle up and do not touch only the bottom one
We fasten the tip with a corner and fluff the flower.
If you want to get a flower with wavy edges, then just carefully make a zigzag with scissors.
A way to decorate for the lazy
The method described below is perfect for those who do not want to mess around with a bunch of flowers from napkins. But for this method, you will need threads of different colors. And quite a lot.
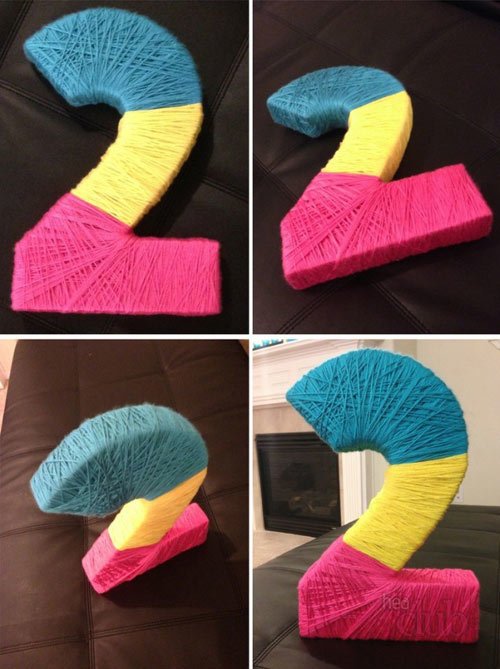
From these photographs, many understood what the idea was. Such a figure turns out to be very beautiful, but still wrapping a figure just as tightly with threads is very slow and not easy.
Another advantage of this method is that you don't have to follow the third step, which all those who choose the napkin method go to.
Glue the flowers on the frame
Everything is very simple and clear here. You need to complete the production of the figure. Now you need to carefully stick all the flowers on the frame. Our figure is ready!
Video
For a child's birthday and a beautiful photo shoot, you need original props. Napkin figures are very popular today - they can be seen at many children's parties. Indeed, such birthday decorations are beyond competition. They are light, inexpensive, children can play with them and get only pleasant impressions.
How to make a number from napkins? “You don’t need to have superpowers for this, you can cope with this task with a little effort and spending a few hours of free time. But the emotions of a happy child who receives such a figure will more than pay off all the time and effort spent.
Materials that will be required for work
To create a festive composition, you will need different materials.
Napkins
Plain napkins without pattern. Of course, the larger the figure, the more you need the number of napkins.
Important! One package is unlikely to be enough for you, so take several packs of 100-200 wipes in each at once. The more magnificent the decor, the more beautiful the numbers from napkins look.
However, napkins are not the most important thing.
Important! Wooden figures are less common, as a rule, they are not decorated with napkins, but painted with multi-colored paints.
Cardboard
Empty boxes, shipping packaging from household appliances can be used as a blank for do-it-yourself numbers from napkins. In general, those materials that are often simply thrown away are used in this case, and there are such features here:
- From the packages from under the products, small numbers are obtained. Milk or juice bags are cut off and inserted one into the other. Their outer part is masked with papier-mâché (glued layer of crinkled paper).
Important! For pasting, take thick PVA glue, because it will be very disappointing if the cardboard swells and falls apart. Or you can choose a package with a foil surface, such as a juice box.
- It will be necessary to work with cardboard - correctly cut, glue, stiffen the product.
Styrofoam
It is much more convenient to work with foam, because it is light, like cardboard, but at the same time, it is rigid. You can easily find foam panels in any hardware store. If you would like to make the numbers thicker, then thin sheets can be glued together using ceiling tile adhesive.
But polystyrene also has disadvantages. The material is quite capricious - it crumbles, sticks to hands and tools, it's still a pleasure to work with it! So how to be?
- The most successful option is to use a professional cutting tool with a heated nichrome thread. Such a hot wire is able to cut foam like butter.
- You can also make a soldering iron cutter with a fixed copper wire. These options are suitable for those who are going to make numbers from napkins with their own hands in large quantities.
Important! Styrofoam is cut exactly along a metal ruler - you should attach a ruler and draw a cutter along it. You can put a vacuum cleaner hose near the incision site - this way, the work area will remain clean.
Volumetric figure for the first birthday
For a single one for a year, with our own hands we will make a base hollow inside from napkins.
If the unit itself is easy to build on paper and cut out, then how to calculate the length of the sides? You can do everything by eye, or you can turn to the help of a mathematical formula: P = 2(a + b) , where a and b are the sides of the figure.
Important! Do not forget to make a margin for gluing the parts together.
So, for work we need:
- Double corrugated board.
- Hot glue.
- Craft knife and scissors.
- Hot glue.
- stapler. Napkins.
Let's get to work:
- Cut out the number from the template. Transfer to cardboard and cut out 2 pieces.
- Correctly calculate the length of the sides of the future figure, cut out the sides.
- The number can expand downwards - if you have it that way, then the sides will look like a trapezoid.
- Using masking tape, tape the pieces together. Secure them from the inside with hot glue. Attach the second part of the unity and secure with tape.
- Strengthen the inside in advance, install tightly fitting cardboard pieces into it. They will act as rigid ribs, and the decor will not sag.
- Decorate the number with napkins.
We make a flat base for numbers from cardboard
A sheet of sufficiently dense packaging cardboard will act as our base so that the finished composition does not bend and deform under the weight of the decor:
- To make the number 8 from napkins, prepare a template: print or draw the number by hand. Or build a number directly on a piece of cardboard.
- On a square sheet of cardboard, place the number diagonally so that it is larger. The size of the finished figure for the birthday will be 63 cm.
- Using a pencil and a ruler, draw a diagonal - this will be the axis of our eight.
- Estimate what size the product will be, and mark its beginning and end on the diagonal. Take a protractor and set aside 90 degrees from each mark - draw perpendiculars to the initial axis. Thus, we marked the boundaries of our figure.
- What's next? The number eight is two rings whose borders intersect. Put a mark on the axis by eye, which will divide our axis into two parts: belonging to the larger and smaller rings. Also set aside 90 degrees from the mark with a protractor, draw a perpendicular to the axis.
- Now it's up to the circle. Attach the size of each of the rings, open the compass to the desired radius, draw two intersecting circles. So we got the outline of the figure eight.
- Now, from the same centers, draw two smaller circles - these will be holes in the figure eight.
Important! Figures with a thin “canvas” do not look very nice. However, too small holes should not be made: the napkin decor can deviate towards the hole and “eat” the free space. Too small a hole can be completely covered with napkins.
- Shorten the lower part slightly - make an even cut so that the figure eight can stand, leaning against the wall, without falling on its side.
- Cut out the number. To do this, use a clerical knife or scissors. If you're more comfortable with a knife, don't forget to put a cutting mat under the cardboard.
- The figure is ready for decoration.
We decorate the figure with napkins
Now that you have learned how to make the number 8 from napkins, let's try to figure out how and with what to decorate it.
Important! I would like to note that for decoration you can use not only napkins, but any other thin paper - corrugated, cigarette, silence. Colors should be selected accordingly: for girls - gentle (blue, white, pink, lilac), for boys - brighter (light green, red, blue).
You can decorate the number in different ways:
- Flowers.
- In the technique of "cutting".
- Fringed.
- Make a figure.
Napkin decor
The most common decor for numbers is flowers. They are suitable for both girls and boys. Flowers should be fluffy, easy to assemble, because you will have to make more than one flower.
Important! To save time, choose the options for those flowers that are the most lush: roses or asters.
For a beautiful lush aster you will need:
- Scissors.
- 3 napkins.
- Threads.
Making a flower
- Fold the napkin with an accordion and wrap the middle with a thread - so that you get a bow.
- Spread the petals towards the center, moving towards the edges.
- In the middle, make a bud by squeezing the paper tightly.
- Spread the lower petals to make a platform for gluing.
Important! Combine colors using different color doilies for one bud. You can also draw a line along the edge of the napkin with a felt-tip pen.
To create a rose, we need the same materials:
- Fold the napkins in a pile and cut out the petals (several semicircles).
- Then unfold the rose, moving the petals and fasten the tip with a corner.
- At the end, fluff the flower.
Important! Try to make the edge of the flower wavy by making a zigzag with scissors. A flower with teeth along the edges looks a little more interesting.
Facing
The numbers, which are decorated using the facing technique, are beautiful and very fluffy. Best to take corrugated paper, although plain napkins also work well:
- Cut the paper into squares.
- Place a pencil in the middle of the sheet, crimp it with paper.
- Attach a stick with paper to the surface previously coated with glue.
- Thus, having filled the entire surface, straighten the decor with your hands.
- Cut off the excess with scissors.
You can also make flowers using the trimming technique, for this you will need:
- Several rectangular paper sheets.
- Plasticine.
- Trimming stick.
Let's get to work:
- Knead the plasticine with your hands.
- Wrap the stick with paper so that most of it remains free.
- Stick it into a small piece of plasticine.
- Create 3 petals in the same way.
- Fill the space between them with the same petals, but in a different color.
- Close the middle, where plasticine is visible, with a piece of crumpled paper.
Important! Styrofoam blanks are the most suitable for decoration using the trimming technique. No glue is needed here - the stick pierces the soft material, and the trimming remains in it.
Fringe
Fringe is the easiest way, which will take less time than all the others. But this option will require a long strip, so we take not napkins, but tissue paper, and start work:
- Fold the paper into a neat rectangle.
- Notch.
- Straighten and fluff the fringe.
- Glue the fringe with double-sided tape to the workpiece and wrap the number around.
Important! Fringe looks more interesting if glued in waves. It is desirable that the colors of the paper be contrasting - so the waves will be visible from afar. Combining different colors, you will get a very bright and original figure.
Who are the numbers for?
In conclusion, I would like to say that decorated with napkins numbers will appeal to any adult birthday. Not only for a birthday, but also for any other holiday, you can make a number from napkins.
Important! Number - does not have to be covered with the same flowers. Use different shades: on the front side - more delicate shades, on the sides - dark. Thus, the figure will look more voluminous.
Also make sure that the decor is held firmly, but you should not use skewers for these purposes if the child is supposed to play with the number, because the festive composition should not only be beautiful, but also safe.
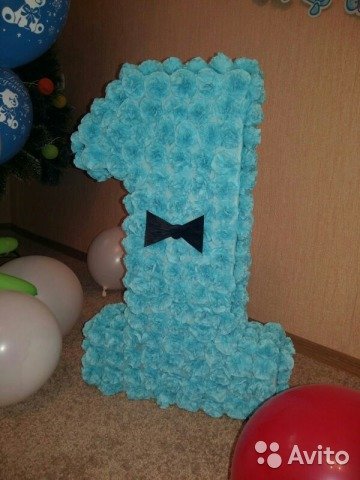
The first birthday of a baby is the most long-awaited event for his family. That is why parents begin to think about organizing a holiday for their child long before the onset of such a significant date.
Now in every city there are organizations that organize children's holidays. But the prices for their services are not affordable for everyone. Therefore, most parents prefer to manage on their own.
We invite you to prepare a voluminous one, which will become a real decoration of the first anniversary of your child.
To make it, you will need the following materials:
- 1. Cardboard box (boxes from any household appliances will do).
- 2. PVA glue.
- 3. White napkins - 1 pack.
- 4. Turquoise napkins - 2 pack.
- 5. Stapler.
- 6. Stationery knife.
- 7. Adhesive tape (regular or paint).
- 8. Marker or pencil.
So, in order to independently make a volume unit from cardboard and napkins, you must perform the following algorithm of actions:
1. First of all, you need to make the frame of our volumetric figures. We use cardboard boxes for this. With the help of a clerical knife, we will prepare two blanks for our future one. In this case, the height of the figure is 70 cm, width - 35 cm, depth - 12 cm. But you can make a number of any size.
2. We fasten these two blanks with tape. It is best to use masking tape. But if it is not there, the usual one will do.
3. Glue the remaining voids with cardboard. For these purposes, you can use cardboard of a lower density.
![]()
4. The frame of our three-dimensional figure must be pasted over with plain white paper. If this is not done, an ugly frame will be visible on the finished one. If you have the desire and opportunity, you can make the frame of your number in a different color, for example, green or blue. On the finished product, such a background looks quite interesting.
5. Let's decorate our three-dimensional figure. To do this, you need to make roses in white and turquoise. In this case, we need to make 170 turquoise and 100 white roses. Let's start with white flowers. Take a white napkin and fold it in half.
6. Then bend it in half again. We fasten the resulting square with a stapler as shown in the photo below.

7. Cut out a circle from our square with scissors.
8. Gently spread each petal of our rose with our fingers. Turquoise roses from napkins are made according to the same principle.
9. Finally, let's move on to the most interesting stage in the manufacture of our unit - assembly. First, glue turquoise roses around the perimeter of the frame. The remaining space will be filled with white flowers. Our volume unit of napkins is ready.

10. It should be noted that any number or letter can be made in this way. Moreover, this figure can be of any size and any colors. The main thing is your imagination and desire.