For the past couple of years, a leather skirt has been an integral part of the wardrobe of any fashionista. They come in a variety of colors, styles and will go with any outfit. Are you an office worker or a romantic coquette? Then this skirt is for you. It goes well with shirts and blouses, as well as T-shirts and T-shirts. There are also no restrictions on shoes: sneakers, classic pumps, boots with tractor soles. Today we will learn how to sew a leather skirt on our own.
How to sew a leather pencil skirt
Pencil skirt is one of the most elegant styles of skirt that looks unsurpassed on women of all ages. With a high waist, a pencil skirt looks very stylish, and it’s not worth inventing anything complicated for it. It is enough to limit yourself to the most ordinary plain shirt or blouse. Pencil skirts fit perfectly into office dress code and business style, and after work you can go on a date in it. She will emphasize the ideal figure in the best way.
What do you need:
- sewing machine
- leather 0.5 m
- lining fabric 0.5 m
- wide elastic band 0.7 m
- hidden zipper
- skin needles
- scissors
- chalk
Measurements based on: skirt length - 45 cm, waist - 67 cm, hips - 92 cm.

- We cut out all our details according to the pattern of leather and lining material. In order to do this, you must first pin the fabric with pins to a paper pattern, circle with chalk and cut along the lines, leaving 1-1.5 cm for allowances.
- We sweep the parts together (separately the lining and separately the main material).
- We sew on a sewing machine (we leave the middle seam of the back of the skirt not yet stitched).
- We iron the allowances of all seams well through cotton fabric, or tap with a hammer if the skin is very rough, spreading the seams in different directions.
- We sweep and grind the bottom of our leather skirt and the bottom of the lining.

- Next, sew a hidden zipper into the middle seam of the back of the skirt.
- We sweep and grind the middle seam of the skirt, aligning the cuts below the zipper.
- Since the skirt is connected to the lining along the bottom, we begin to grind from the top of the lining, stepping back a distance equal to the length of the zipper.

- It remains to grind the belt, which we will make from a decorative elastic band 4 cm wide. Sew everything on a typewriter.


- All is ready!

How to sew a leather skirt sun
The leather one looks very impressive, and therefore the top to it should be chosen more modestly so as not to look too defiant. Deep neckline, sequined blouses and leopard print - all this is taboo for a leather sun skirt. Tops and accessories should be neutral , concise and strict . But you can make yours if you wear baggy sweaters or denim shirts with such a skirt.
What do you need:
- sewing machine
- leather 1.5 m
- hidden zipper
- threads
- scissors
- chalk
- skin needles
- We make a drawing of a skirt and belt to calculate the fabric. The skirt will consist of two parts, plus a belt. We calculate the radius of the waist circumference (R): R \u003d Ot / 2P. The Pi number is 3.14. We add 0.5 cm to the assembly in the waist area.


- We cut the fabric.
- We gather the skirt. Evenly distribute the resulting folds around the waist.
- Sew one edge of the belt to the waistline.
- We sew a zipper.
- Attach the second edge of the belt.

- We hem the hem of the skirt.

- The skirt is ready!
How to sew a skirt from a leather coat, jacket or trousers
Do you have old leather things that have been gathering dust in the closet for half a century? It’s a pity to throw them away, and you can’t wear them anymore, because they are out of fashion. But you don't have to throw them away! Now it is very fashionable to give a second life to old things. Have you ever wondered how to make shorts, but how to sew a skirt from a leather coat, jacket or trousers? We will consider how to give new life old leather coat. When altering a raincoat with a straight cut, it is also better to choose a straight skirt model.
What do you need:
- old leather coat
- glue "Moment" transparent
- sewing machine
- scissors
- threads
- skin needles
- chalk
- hidden zipper
- Unzip and remove the lining of the raincoat.

- We cut out the details according to paper patterns made in advance according to your figure.

- We sew on the undercuts.
- Sew along the side seams. We glue the allowances and smooth (not with an iron!).
- We sew a zipper.
- We cut out the belt according to the volume of the waist.
- Sew on the belt.
- We process the hem of the skirt on sewing machine(pre-glue)
- The product is ready!


For sewing a mid-length sun skirt, two meters of leather cut is enough. In addition, you will need a zipper about 15 cm long, expendable materials, as well as a special silicone "foot" for a sewing machine. A product made of leather or leatherette does not require the use of a lining, but if you wish, you can buy satin or other lining fabric and sew a petticoat.
To build a pattern, prepare whatman paper or a roll of paper of a suitable size, markers, chalk or soap to transfer the drawing. "French" pins will not be superfluous: they will allow you to fix the paper sample on the fabric.
Sun skirt pattern
Cut a square out of paper to fit the piece of fabric and fold it in four. To build a pattern, you need only two parameters: waist circumference and the desired length of the skirt. You will have to remember the school geometry course to calculate the radius from the waist circumference. However, the calculation is simple and is carried out according to the formula: (Ob + 5cm) / 2 π (where π ≈ 3.14). Construct a circle with this radius centered on the corner of the pattern that is the center of the square.
Now that you have your waist circumference, set aside the desired length of the skirt from the edge of the circle and build another one with a larger radius. It remains only to cut the pattern and transfer it to the fabric. When transferring, add 5 mm seam allowances on each side.
It is not necessary to build a paper pattern in its entirety, 1/4 of a circle is enough, which can then be fixed on a piece of fabric folded in four to cut out a sun skirt.
If you decide to complement your new thing with a petticoat, it can be tailored either in the same way as the sun skirt itself, or following the model of a pencil skirt.
The belt can be made both elastic and hard. For a rigid belt, you will need a strip of fabric 5 cm wide and a length equal to the waist circumference with allowances for seams. For this style, you will also need to sew in a zipper, usually at the back.
If you want a fashionable cut baby doll sun skirt with an elastic belt, then, firstly, you will need more fabric, and secondly, not five, but twenty or even twenty-five centimeters will need to be added to the waist circumference.
Most fashionistas prefer a loose skirt - sun with lots of folds. The girl in this outfit looks very gentle and romantic. The free style and the average length of the skirt make this model very popular both for visiting work and for evening walks. The pattern of such a skirt is very simple, and you can easily sew it yourself. True fabrics on such skirt it will take quite a lot.
Instruction
A figure-hugging, tapered skirt never goes out of style. This style has no age restrictions, suits women with any type of figure, fits perfectly into both classic and romantic costume styles. It is also important that even a novice craftswoman who does not know how to build patterns can easily sew a pencil skirt.

How to choose material for a skinny skirt
Before sewing a pencil skirt, you need to pay due attention to the choice of fabric. Properly selected colors will help emphasize the advantages and veil the flaws of the figure. So, overweight women are advised to choose plain fabrics or with a small pattern; soft, well-draped light or shiny fabrics are suitable only for young and slender girls.
If a pencil skirt is intended for evening walks, going to restaurants, nightclubs or friendly parties, then denim, velvet or brocade fabrics, artificial or Genuine Leather. Beginning needlewomen are advised to pay attention to high-quality knitwear.
How to sew a simple pencil skirt without a pattern
To sew a stylish and elegant skirt with your own hands without building a pattern, you will need a piece of knitted fabric, a wide elastic band and any skirt that has a good fit.
The knitted fabric is folded in half, right side inward, a skirt is placed on it, serving as a pattern pattern. The skirt is outlined with chalk and cut out, leaving a small seam allowance. To make the model take the shape of a pencil, the skirt is slightly narrowed at the bottom so that the top and bottom sections of the fabric have almost the same width.
Fitting and completion
When trying on, you need to make sure that the skirt has a good fit, beautifully emphasizes the hips, but does not tightly fit the buttocks. In this case, it is recommended to make shallow darts on the back of the skirt. As a rule, tucks are located in the hollows of the back, located on both sides of the spine.
The only seam is swept and stitched on a typewriter, if necessary, processing the fabric with an overlock. A piece is measured from the elastic band, equal to the tight circumference of the waist, after which the edges of the segment are connected with a machine seam.
The elastic ring is combined with the top seam of the pencil skirt, fixed with a few tailor's pins, basted and sewn on a sewing machine using a zigzag seam. After that, the gum is turned to the wrong side and pinpointed in several places.
Related videos
Hi all:)
This is my first post in Yakt.ru diaries. From this day on, I will periodically post all kinds of materials about hand-made products, including master classes.
A little preface ... I have been fond of needlework for a long time, more precisely, from the age of 7-8. And still quite a baby at 3-4, I remember, she loved to cut the curtains in our children's room and tablecloths with scissors. I really liked the sound of cutting scissors and the sight of falling cut pieces of fabric. A slow-motion frame was captured in the memory of them falling, playing hide-and-seek with sunbeams. It seemed to me that it was very beautiful ... True, then, of course, it came to me from my parents :(. Mom still remembers how they hid all the scissors in the house from me: D. But at the age of five, PAPA taught me how to hold a needle, thread a thread into it and make loops at the end of the thread so that I sew the buttons on the coat myself (yes, yes, this is not a typo, it was my dad who taught me the first basics of sewing :) for which I am immensely grateful to him :)) and went to play outside. And after this event, it got worse… I don’t let go of the needle to this day. I do not have any special education in sewing and modeling clothes. Yes, I am an amateur, but many years of experience, logic, cold calculation and a little talent help me. I sew mostly for myself, my family and sometimes I take tailoring to order. That's all.
Hi all:)
This is my first post in Yakt.ru diaries. From now on, I will periodically post all kinds of materials about hand-made products, including master classes.
A little preface ... I have been fond of needlework for a long time, more precisely, from the age of 7-8. And still quite a baby at 3-4, I remember, she loved to cut the curtains in our children's room and tablecloths with scissors. I really liked the sound of cutting scissors and the sight of falling cut pieces of fabric. A slow-motion frame was captured in the memory of them falling, playing hide-and-seek with sunbeams. It seemed to me that it was very beautiful ... True, then, of course, it came to me from L's parents. Mom still remembers how they hid all the scissors in the house from me: D. But at the age of five, PAPA taught me how to hold a needle, thread a thread into it and make loops at the end of the thread so that I would sew buttons on my coat myself (yes, yes, this is not a typo, it was my father who taught me the first basics of sewing J for which I immeasurably grateful to J) and went outside to play. And after this event, it got worse… I don’t let go of the needle to this day. I do not have any special education in sewing and modeling clothes. Yes, I am an amateur, but many years of experience, logic, cold calculation and a little talent help me. I sew mostly for myself, my family and sometimes I take tailoring to order. That's all.
Today I want to show you the MK of sewing a pencil skirt that is relevant this year from faux leather. Fashionable in 2014, leather skirts have made themselves known in literally all modern styles. Even a conservative business could not resist the pressure of the trend. An ideal option that meets any dress code is the classic pencil style model. And of course, I wanted such a cute must-have in my wardrobe :).
Necessary materials:
· Artificial leather 0.5 m - 192.5 rubles.
Wide decorative elastic band for a belt 0.7 m - 80.5 rubles.
Lining fabric 0.5 m - 40 rubles.
Hidden zipper - 5 rub.
The total cost of materials for the skirt is 318 rubles.
In this MK, I will not show step-by-step pattern making, since I already have a time-tested skirt base pattern that I made a long time ago and, to be honest, I'm just too lazy to draw it again (sorry :)), but I will show step-by-step sewing of a skirt .
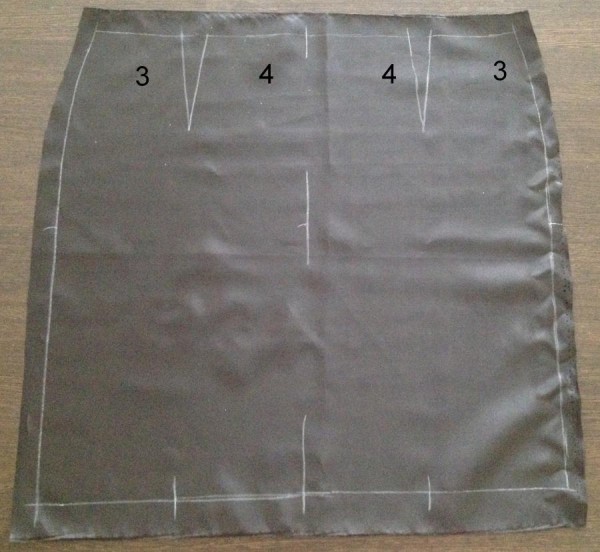
This is how it looks like - my pattern is the base and in order to transfer it to fabric, I reshoot it on a regular plastic film (the thing that covers greenhouses and all sorts of greenhouses, and not a film for food products:)). The measurements on the basis of which the pattern is built are the length of the skirt - 45 cm, waist circumference - 67 cm, hip circumference - 92 cm.
Since the skirt will have embossed seams, I cut out parts 1,2,3 of 2 pieces from artificial leather, item 4 - 1 piece with a fold in the middle.
From the lining fabric I combine parts 1.2 and cut out 2 pieces. Details 3.4 are also combined and cut out 1 piece with a fold in the middle.
Before stitching the details of the product on a sewing machine with a machine line, it is necessary to baste the details (that is, simply fasten the details to each other with a thread and a needle with a “needle forward” hand seam, but I sweep with pins because I am a lazy ass: ) and resort to basting threads in extremely difficult parts of tailoring). So, I sweep and grind relief seams on the yokes of the front and back of the skirt.
At the same time, I do not forget to take out the pins in the process of grinding, so that the sewing needle does not hit and break on the pin. I will tell you it is very traumatic and scary. Once a fragment of a needle flew into my forehead: D, I think I was lucky that it didn’t fly right into my eye O_o. Therefore, with chipped pins, jokes are bad :)
I leave the middle seam of the back of the skirt not yet stitched.
I carry out exactly the same manipulations with details from the lining fabric, leaving the middle seam of the back not stitched.
I iron the allowances of all the seams well, laying the seams in different directions. As my mother says, "haptachchy yotyukten biebin" :))) I iron through the iron, at the beginning I check the temperature and how the fabric behaves when ironing on an unnecessary patch.
This is how the seams look after ironing:
In the same way I iron the lining of the skirt.
I sweep and grind the bottom of the faux leather skirt and the bottom of the lining. At the same time, in places of ironed seams, where the foot of the machine comes into contact with artificial leather, I put a piece of paper under the foot, thus ensuring smooth advancement of the skin under the foot.
Next, I sew a hidden zipper into the middle seam of the back of the skirt. I open the zipper, put it with the front side on the allowances of the skirt. In this case, the teeth of the hidden zipper should coincide with the line of the middle of the back of the product.
I sweep in a hidden zipper, aligning the top of the zipper with the top of the skirt waistband.
I sweep the left and right sides of the hidden zipper, starting from the top.
I change the foot on the sewing machine to a special one for attaching a hidden zipper. I bend back the teeth of a secret lightning with a fingernail index finger so that the place of laying the seam (between the braid and the zipper teeth) is visible. I carry out a line on the left half of a secret lightning.
Similarly, I perform a line on the right half of a hidden zipper. I start both lines from the top.
It remains to stitch the open seam of the back of the skirt.
I sweep and grind the middle seam of the skirt, aligning the cuts, below the zipper. Since the skirt is connected to the lining along the bottom, I start to grind from the top of the lining, cutting off a distance equal to the length of the zipper.
I change the foot, as shown in the photo. I'm sewing up a seam. Ideally, the stitch should re-sew the stitching of the zipper and be located 1 mm to the left of it. When performing this operation, you need to hold the end of the hidden zipper or simply secure it with a pin.

Leather products look noble and expensive, so any fashionista must have at least a pair of leather items in her wardrobe (in addition to boots and gloves). Of course, you can always buy a leather item in a store, but those outfits that are sewn for yourself always look different, because they meet all the requirements of the owner and are exclusive.
Features of working with skin
Sewing things from leather is somewhat different from sewing from fabric. First of all, because leather is a delicate material that "does not forgive mistakes." Each puncture and scratch will leave its mark, and what was sewn and ripped apart can no longer be sewn again without compromising the appearance.
In addition, there are some difficulties in cutting. If we buy ordinary fabric by the meter, then genuine leather is sold in pieces (due to the peculiarities of production). This material is not cheap, so it is very important to buy exactly as much as you need. In this case, you need to buy the entire quantity from one batch, because. even the same production using a specific technology does not guarantee the absence of differences in shade and dressing.
Ideally, aim at leather skirt sewing better, already having sewing experience, since leather things are sewn without basting.
Sewing a leather skirt: preliminary preparationAny tailoring begins with the choice of a model and the creation of a pattern. If this is your first time planning sew a leather skirt, it is better to start with a simple straight skirt. This will give you the opportunity to gain some experience with this material.
You can take a pattern for a leather skirt from a magazine or contact an atelier where an experienced cutter will make a pattern according to your measurements. You can use already tested patterns, according to which you sewed a fabric skirt and you know for sure that the product fits you well.
Having made a pattern, we go to the store, where we apply it to the proposed pieces of leather. So you can buy the right amount of material. Do not forget to allow for seam allowances of at least 1-2 cm on each side.
How to sew a leather skirt: the necessary accessories and tools
Since leather work does not allow baits, the details are held together with safety pins. This is the first tool you will need. Also stock up on a hammer, with which you will subsequently tap the stitched seams. At leather skirt sewing It is very important that the sewing machine foot glides easily. This slip will provide vegetable oil that will not harm the material. Additionally, you will need glue for the skin, with which we will glue the allowances.
Steps for sewing a leather skirt
At the first stage, we transfer the pattern to the fabric. After cutting, we fasten the parts with safety pins. It is very important that the pins are attached only to the allowances (otherwise the puncture mark will be visible on the finished product), while the pins are placed perpendicular to the future seam.
Having stitched, straighten the allowances in different directions. Lay the product on a hard surface and tap with a hammer to press the material. Glue the allowances to the product so that they do not bend during wear. Leather is a thin material, so any irregularities will be visible.