The high performance of modern computers also has a downside: increased heat dissipation from chips installed on the motherboard, video adapter, and even in the power supply. That is why, almost every PC is equipped with a sufficiently powerful cooling system. The most inexpensive, simple and common option is to cool devices by means of heatsinks installed directly on the chips and cooling fans.
But three or more installed fans make quite a lot of noise. It is impossible to turn off the coolers, as the computer will overheat with all the ensuing troubles. But how then to deal with the noise, which over time becomes stronger due to the wear of the mechanical part of the fan and the production of lubricant? There is only one answer: take control of the computer fans into your own hands. About how to achieve this, and will be our publication.
Ways to solve the problem
Today, all motherboards, chipset, video adapter and central processing unit are equipped with temperature sensors, thanks to which it is possible to control the temperature of these elements using PC hardware or software. By reducing the speed of the coolers, preventing the processor and the system as a whole from overheating, you can effectively deal with the noise generated by the fans.
There are several more ways: replace the fans with quieter ones, or upgrade the entire PC cooling system by installing the existing Peltier elements. You can buy expensive liquid nitrogen cooling by investing a fairly large amount of hard-earned money in this enterprise. Next, we will talk about the simplest and cheapest way - controlling the speed of the processor cooler and other elements of your PC.
To control the fans of your PC, there are several options:
- Use special software.
- Adjust fan speed from BIOS.
- Apply the device, under the incomprehensible name "Reobas".
- Reduce the supply voltage of coolers artificially.
What fans can be adjusted
Before choosing a specific fan control method, you should know that you can control the rotation of devices with a 2-wire connection only by changing the power supply, but you cannot get information about its rotation speed.
Three pin coolers have feedback from the control board. But to solve this issue, it is necessary to turn on the device in order to obtain reliable data on the engine speed. Only some models of controllers can do this.
In 4-wire fans, in addition to power, feedback and ground wires, there is a PWM input that allows linear fan power control, which allows you to change the fan speed on the processor, setting up to 10% of the maximum.
Setting the fan speed from the BIOS
- Reboot your PC and by pressing the DEL key enter Bios.
- Find the item responsible for setting the fan parameters. On most motherboards, this is the Advanced Chipset item. The Always Fan feature must be active (Enabled).
- Select 50-70% for each available cooler and hit Esk.
- Save the settings by highlighting Save & Exit Setup and then press Ok.
- After a reboot, the noise from the coolers should be gone.
After changing the settings, monitor the temperature of the processor and motherboard.
Setting the fan rotation using third-party software
For all those who did not find the desired option in Bios, a huge amount of specialized software is dedicated. In this publication, I would like to consider a completely free Speed Fan utility. This computer fan control program allows you to very quickly reduce the speed of some coolers and is guaranteed to save you from annoying noise.

Important! This utility, like most similar ones, is useless for some motherboards. You should try another program.

PC fan control by mechanical means
As a mechanical control, you can use a device called Reobas, which was mentioned at the beginning of the article. This device is mounted in the front panel of the PC, in the CDRom bay. It has one or more manual controls on its panel that control the CPU cooler and other fan-equipped items. . 
This device can be connected directly to the PCI slot. An additional connection to the FAN connector of the motherboard will make it possible to control the rotational speed of the coolers of their operating system.
It should be understood that Reobas is quite an expensive toy, so before purchasing this device, try using software that is faster to install and is distributed among developers absolutely free of charge.
Instruction
Before you start increasing the speed of the cooler, you should make sure that your motherboard supports this option. This information must be in the manual for it. Almost all modern motherboards from various manufacturers have the function of adjusting the speed of the cooler.
Turn on your computer. Right after that, you need to press the Del key. In most cases, it is with this button that you can open the BIOS menu. If nothing happens after pressing this key, refer to the motherboard manual. There should be a button that is responsible for opening the BIOS menu.
After opening the BIOS, go to the POWER section. In this section, select HW Monitor configuration. There should be an option to control the speed of the coolers. Depending on the model of the motherboard, this option may be called differently, for example, CPU Q-Fan function or simply Fan control. You should focus on the word Fan. Select this option and press the Enter key. From the proposed options, select Enable, after which - the Profile line.
Several fan speed settings will appear. Select Performance mode. In it, the speed of the coolers will be maximum. But on some motherboards, Turbo mode may be available. If maximum cooling of computer components is extremely important to you, then if Turbo mode is available, it is best to choose it.
After selecting the desired mode, exit the BIOS. Be sure to save the changed settings beforehand. The computer will restart. The next time you run it, the speed of the coolers will increase.
Special fans are installed in modern stationary and mobile computers. Their main task is to provide high-quality cooling of all important PC elements. For the coolers to work properly, they need to be configured.
You will need
- Speed Fan program.
Instruction
First, try optimizing your coolers with standard motherboard features. Open the BIOS menu after restarting the computer. Find the menu responsible for fan settings. Activate the Always Fan option. This is especially true when working with mobile computers, because. often coolers are simply turned off to save battery power.
Set the speed rotation required coolers. Usually you need to enter a number that determines the percentage of the rated speed to its maximum value. Save the fan settings and restart your computer.
Quite often, the cooler settings function is not available in the BIOS menu. In such situations, it is necessary to use utilities that work with Windows operating systems. Install the program SpeedFan. Open this utility and go to the Clock tab. Expand the Motherboard menu and select the manufacturer of the motherboard you are using.
Go to the Readings menu and find the fields that display speed rotation coolers. Select speed rotations of each cooler. When set to 100%, the blades will rotate at maximum speed Yu.
If you downgraded speed coolers, make sure that the devices to which these fans are connected do not overheat. To do this, open the Charts tab and in the Analyze column select the Temperatures parameter. Select the checkboxes for the devices whose temperature changes you want to monitor.
After launching an application that actively uses PC resources, minimize it and look at the readings of the temperature graph. Make sure that during operation of all devices, their temperature does not exceed the permissible limits.
Sources:
- fan speed
If the system unit of your computer is very noisy, and after turning it off, silence in the room immediately becomes noticeable - this is not a normal situation. The noise from the computer should not exceed the permissible limits, and certainly should not disturb your sleep or hear what your neighbor says to you.
You will need
- - a computer
- - SpeedFan program.
Instruction
Perhaps your system unit is clogged with dust (this happens with almost all personal computers over time) - clean it gently with a vacuum cleaner. If it is clean, you may just need to adjust speed fan rotation. Launch the browser and in the search bar enter the name of the program - SpeedFan. Follow one of the first links and download the program to your hard drive. You can download the program on one of the software portals www.softportal.com. Install the program by running the setup file.
Run the program. You will need to wait a bit while the program performs an analysis of the operating system. If you find it difficult to navigate the inscriptions in English, click on the Configure button and change the language to Russian on the Options tab. Now you need to enable hardware support for fan speed control on the motherboard. Click on the "Configuration" button, then - the "Advanced" button. Change the value to Software contolled and click OK. If your motherboard was determined by the program, then this value will be set immediately.
Adjust the fan speeds in your computer by clicking on the control arrows. You should not greatly underestimate the performance, since the fans are installed in the computer system unit not for noise, but to provide cooling for spare parts. If the components overheat, it will damage the computer. Try to choose the most optimal parameter values in order to speed cooler was not low, but did not interfere with its sound to others.
The cooler is an important element of the cooling system of the system unit, preventing overheating of the main components. However, sometimes the fan runs too hard, making unnecessary noise. Let's see how to change the fan speed using the Speedfan software and the built-in BIOS tools to adjust the noise level.
Using SpeedFan
The SpeedFan cooler speed control program is the most well-known utility with which users control the operation of the fan. It is distributed under a free license, and it also has a Russian-language interface that can be enabled in the Options section.

Important! In order for you to control the cooler, it must be connected to the motherboard via a 3-pin connector. If you have several fans, and they are powered directly from the power supply, then you must switch them, otherwise you will not be able to increase the speed of the cooler or reduce it.

The utility provides many functions for managing computer components, but we will focus specifically on working with the cooler:
- Pay attention to the item " CPU 0Fan" - it reflects the rotation speed of the processor cooler.
- At the bottom you see several fields with percentages. You need to find the field that is responsible for the cooler. This is done like this: you alternately change the value of each of the fields to 50-70% and see when the number of revolutions begins to fall in the “CPU 0Fan” item.
- Using the found field, reduce the rotation speed so that the cooler starts to work quieter. Do not forget ; if the fan does not cool the chip enough, it will overheat.

Similarly, you can adjust the speed of all coolers connected to the motherboard. You can use a more flexible setting option and specify not a specific value, but a range of fan speed.


The speed of rotation of the blades should decrease, the noise from the cooler should decrease. Do not forget to monitor the processor temperature in the "CPU" line. If it exceeds 70 degrees, run the cooler at full capacity.
Using BIOS Tools
The fan speed can be adjusted without the use of special utilities. All the tools necessary to perform this action are in the basic I / O system; to use them, you just need to know how to set the speed of the cooler in BIOS.
This method may seem difficult for novice users who have never worked with the BIOS. Therefore, if you are not sure of your knowledge, it is better to opt for Speedfan.
Changing the cooler speed is done by activating certain functions in the BIOS and setting temperature thresholds, upon reaching which the fan starts or turns off (if possible).
The main disadvantage of this method is the need to activate several utilities, the name and number of which varies depending on the BIOS version, motherboard model and processor generation. For example, for an Intel Core chip, you need to enable the AI Quiet and Intel SpeedStep utilities, which automatically reduce the fan speed when the processor temperature is low.

The difficulty is that all the parameters have to be configured manually, plus sometimes it is necessary to change them on the fly if the operating conditions of the computer become different. You will have to re-adjust the settings each time, turning on / off the utilities, so to solve the question of how to adjust the speed of the cooler, it is better to choose the SpeedFan utility.
There are two main reasons for overclocking a fan. The first one is too high the temperature of the components inside the system unit, not related to dust contamination of the computer or a malfunction of the cooling systems. In this case it is logical pick up speed cooling fans within acceptable limits.
The second reason, on the contrary, requires decrease this very speed - increased noise. It is important to find a reasonable compromise in all this - the most quiet operation with sufficient cooling of the components. Therefore, there must be some way change fan speed. How to do this will be discussed next.
Initially, the speed of rotation is specified in the settings. BIOS, based on which the computer motherboard sets the specified parameters, in particular changing voltage supplied to the fans, thus controlling the number revolutions. However, this speed can be controlled not at all coolers, but only on three outputs, two-outputs will always work on greatest speed.
You can also adjust the speed of the fans installed on the video adapter and the central processor.


This can be done with BIOS(UEFI) or using third-party programs, and some manufacturers release their proprietary utilities to control laptop cooling systems.
Increase speed through bios
In order to initialization during system startup, press Del or F2
(or another option, depending on which bios). We find there an option related to the speed of the cooler, usually this is CPU Fan Speed and change the value. 
If there is no such item or it is impossible to make changes, then this can be done using special software.
In some BIOS there are options such as Smart CPU fan Temperature, CPU Smart fan control or noise control, the inclusion of which will allow you reduce noise when turned on auto adjustment revolutions during operation, that is, if the load is increased, then the revolutions increase, otherwise they decrease, up to a complete shutdown. 
That is, setting in this way consists in setting a limiting temperature or simply enabling this function in the BIOS.
Using speedfan
The most popular program for adjusting the speed of rotation of coolers is speedfan. An old and very famous utility, free and easy to use. Finding and downloading it will not be a problem.
The installation process is shown below. Everything is intuitive.


By setting the program will see the following window. 
The principle of operation of all versions is similar.
You can see the current processor load in the field CPU Usage. Check the box to enable automatic rotation adjustment. Automatic fan speed.
Below is a set of fan speeds and temperatures that you have installed, where:
- RPM- the number of revolutions per minute;
- Fan1- a cooler connected to the connector near the chipset;
- Fan2- the cooler on the processor is also called CPUFan,
- fan4 - the second processor fan, if any;
- Fan3- a propeller thrown to the AUX0 terminals;
- Fan5– AUX1;
- PWRFan- a cooler in the power supply;
- GPUFan- video card fan.
Below in percentage you can change range of smallest and largest revolutions adjusting them by pressing the arrows. This will immediately affect the volume of their work, which you will immediately feel. Just do not turn off the fans completely, there is a risk of burning any of the components.
Speed control with AMD OverDrive and Riva Tunes
Proprietary utility AMD OverDrive will allow you to change the settings of AMD platforms. 
Among many other features, you can also programmatically control speed coolers.
You can run this program only on chipsets supported by AMD 770, 780G, 785G, 790FX/790GX/790X, 890FX/890G//890GX, 970, 990FX/990X, A75, A85X. 
After starting the program, click the section fan control and select the required characteristics fan speeds.
Another interesting program with the function of regulating the speed of coolers is Riva tuner. First of all, owners of very hot video cards prefer to use it.
Download and install the program. In our case, this is version 2.21. 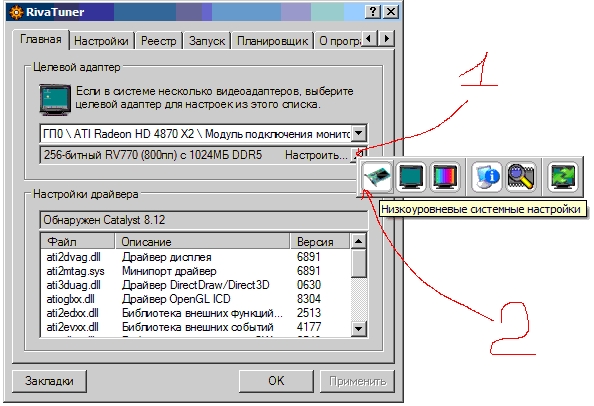
Running, we find low-level system settings, then open the bookmark cooler. The following window opens before us. 
Tick on Enable low-level management cooler. Create a preset fan speed, indicating the desired value as a percentage. Let's create some presets. 
Create a task depending on when you want to get the fan speed reduction, i.e. by setting timetable, range temperatures and others characteristics.


In this way it is possible to achieve fine settings speeds of coolers depending on the temperature change of the component of the system unit.
The operation of fans located inside or a laptop is one of the main guarantees for the operation of all devices without failures. The article will describe the program for managing coolers - SpeedFan, its main functions and settings.
Why regulate the speed of the fans
Many users do not understand why do manual configuration if the hardware manufacturers themselves control the devices. However, no algorithm can be perfect and satisfy all 100% of consumers.
If the CPU does not get very hot, but the propeller speed is always kept at the maximum level, this enhances what is created by the system unit.
If the medal has a reverse side. Very often, video card manufacturers block propeller speeds at the level of 40-50%, which leads to overheating in resource-intensive applications. Of course, this does not appear immediately. At first, when the graphics adapter is first purchased, it works like clockwork. But over time, the cooler wears out, respectively, its speed decreases, and 50% of the revolutions cannot provide optimal air flow.
speedfan
SpeedFan is a program to control the cooler of a laptop or computer. Feature rich and free. The download link is located on the official website of the developer. Fan rotation can be controlled automatically.

Installation is simple, even an inexperienced user can handle it. After the first launch, the main application window and an area with a small description will be displayed on the screen. To prevent it from appearing again, check the box next to "Don" t show again". After that, the utility will start reading the parameters of the motherboard chips. As a result, a list of active coolers and their speed (RPM or revolutions per minute) will appear in the main program window. In addition, the temperatures of all major PC components, the degree of workload and voltage data will be displayed.

The very first thing to do is click on the "Configure" button, then go to the "Options" tab, and set the "Language" field to "Russian". After that, the program for managing the coolers of the video card, processor and other devices will switch to Russian.
The main blocks of the utility
The first and main block is located on the left. It displays the fan speeds. All sensors are named the same - Fan. Only the index changes. In this case, the number of sensors in the list may exceed the number of fans installed in the system unit.
Many novice users are intimidated by the zero or negative numbers that the cooler management program gives out, but they simply do not need to be paid attention to.
- The second block is located on the right side of the window. It indicates the temperature of each element of the system:
- GPU - video card.
- HD0, 1, 2, 3 - hard drives.
- CPU, Core - central processing unit.
- MB - random access memory.
- Temp - devices that could not be determined.
The only and main drawback of the application is that often all elements have the name Temp. The only way to determine which string corresponds to what is by trial and error.
The third block is located at the bottom of the utility's main window. Just with the help of it, computer coolers are controlled. The program names the screws as Speed1, Speed2, and so on. Values are given as a percentage.
Fan Definition
The inscriptions near, as noted above, are not very informative. Therefore, to begin with, it is worth determining which line corresponds to which cooler. To do this, remove the left cover from the system unit and change each Speed value in turn from the maximum 100% to 85%, at the same time the numbers near the Fan lines will decrease. Which fan inside the computer slows down is the one you control at the moment. Memorize or write down which specific Speed controls and Fan sensors belong to which device.
Setting
The cooler speed control program allows you to change most of the names of its main window so that the user does not get confused in the future.

- Click the "Configuration" button.
- Go to the "Temperatures" tab.
- Find those names that refer to active coolers.
- Click on a line to highlight it. After a few seconds click on it again. A cursor will appear in the field, now you can independently set absolutely any name for the sensor in the program.
- Now pay attention to the bottom of the settings window. It sets the desired temperature of the device and the alarm temperature. The latter indicates how hot the component must be before turning on the maximum fan speed. Naturally, these values should also be different for different devices. To find out which ones will work best, you should visit the hardware manufacturer's website.
- After that, click on the "+" icon, this will expand the branch that sets the correspondence between the PC component and the cooler controller. It is enough to check the box next to the desired one.
- Clear all checkboxes next to those devices that you do not want to monitor in the main SpeedFan window.
Fans and speed
- Go to the "Fans" tab and rename all the lines you need here as well. This procedure is similar to changing sensor names. Also, after disabling those that you do not need to monitor, the cooler management program will stop displaying them in its main window. It is very easy to do this - just uncheck the boxes next to them.

- Open the "Speeds" tab. Select the line that is responsible for the required fan. Optionally, you can change the name of the strings here as well.
- Set two values "minimum" and "maximum". In both cases, the speed is set as a percentage of the maximum. The cooler will spin slower and faster than these levels only if the temperature taken from the sensor exceeds the "Alarm" value set earlier.
- In addition, check the box next to the "Autochange" line.
After completing the settings, click on "OK". Before you will again be located the main window of the program. In it, check the box "Auto speed". An inexperienced user is unlikely to be able to set the optimal configuration the first time, so you have to experiment. At the first sign of overheating, the best way out is to disable the application.
Extra options
The described program for controlling the processor cooler has a number of useful functions. You can read about all on the official website or in the user manual, which is opened by pressing the "F1" key. Below are the most useful ones.
Click on the "Configuration" button and go to the "Options" tab. Check the box next to "Run minimized". As the name suggests, the application will now start but not display the main window. If you do not check this item, after each boot of the operating system, the working area of the tool will be displayed on the desktop. It should be noted that if the program is not included with Windows, its shortcut must be moved to the C:\Users\Account_Name\AppData\Roaming\Microsoft\Windows\Start Menu\Programs\Startup directory.
The checkbox next to "Minimize on close" will save the user from accidentally terminating the SpeedFan process. In this case, after clicking on the button in the form of a cross, which is in the upper right corner of each window, the program for managing coolers will simply be minimized to tray.
A little about security
Checkbox "Full fan speed at exit" improves security. If the program is closed, the coolers will start to rotate at maximum speed.

When this option is not active, after the utility is turned off, the propeller speed will remain unchanged, but will not be adjusted automatically. With an increase in load, this can lead to overheating if the BIOS does not take control of the coolers in time.