 Hello everyone A hard drive is exactly the device where everything you have on your computer is where it all lies. That is, this is a device for storing data, everything is stored on it, well, exactly everything you have, these are programs, games, music, videos and other files. Therefore, if he is covered with a copper basin, then you will lose it all. All I'm saying is that a hard drive is a very important device and should be handled with care, not subjecting the computer to any kind of shaking, so to speak.
I'll tell you how to find out what kind of hard drive you have in your computer, and also tell you what reliable drives are and how to find out the temperature!
But in general, I started writing something about the wrong thing, I wanted to show you how to find out what kind of hard drive you have. I will show using Windows 10 as an example, but in other Windows everything will be the same. So, first you need to open the My Computer window, if in Windows 7 this is easy, well, there is such an item in Start, but in Windows 10 I no longer remember how to do this. I simply placed shortcuts to local drives in Start. But there is a trick, look, hold down Win + R and write the following command in the window:
explorer file://
And click OK. After this, the My Computer window will open, it works, I checked. Great, so here we have an open window, right-click on any disk there and select Properties:

A window will open, go to the Hardware tab and all the physical disks that you have will be listed there. For example, I have two here, these are WD & Hitachi:

The exact model of the disk is indicated here, exactly the model. If you need to find out how much space is on the disk, how much is free, then you need to hold down Win + R and enter the command in the window:
And click OK. A window will open, there is such an item as Disk Management, so select it:

And you will see this information:

I’ll say right away that there is nothing complicated here, it may just seem complicated to you. Look, down there it says Disk 0, Disk 1, these are just two disks and that’s what they are called in Windows. Opposite each disk you can see what partitions there are and what the physical volume of the entire disk is:

Well, it seems clear, I hope. Since I’m writing about the hard drive, I’ll answer two more questions that novice computer users often have
Which hard drive is the most reliable? A reliable drive is a relative concept; it just all depends on how it will be used. Nevertheless, the most reliable hard drives in the world are, of course, server hard drives, but they are noisy, expensive and often of medium capacity or less. They are not suitable for the home, but they can withstand a long load and nothing will happen to them. After this come home disks, they are also reliable, but my opinion is that the most reliable manufacturer is, of course, Western Digital (WD): no matter how many disks I have had from this manufacturer, they have never broken yet, despite the fact that I bought everything used . So my choice is WD
But recently I came across a disk at a good price, but the truth is that it is no longer WD, but Hitachi. For the third month now it has been working around the clock and everything seems to be ok. But still, the most reliable hard drives for me will remain under the WD brand, and the super-duper reliable ones are the WD VelociRaptor line of drives. These are not only the most reliable, but also super fast, by the way, really super fast! But their price is a little astronomical. Regarding regular drives, I recommend the WD Black series, these are high-speed drives, they even have two processors and the price is already normal...
By the way, this is what the VelociRaptor hard drive looks like:

As you can see, the disk here is actually small, 2.5 format, and everything else is a radiator that cools the disk. The whole trick of the disk is that it operates at high speeds, like server disks - at 10,000 rpm. But its price is too high...
Although the WD Blue line is also not bad, they are ordinary high-quality wheels and the price is not high. In general, see for yourself, but I think that many will agree with me that WD is most reliable..
What should the hard drive temperature be? But I don’t know about you, but this question is acute for me. Well, that is, this is important to me. The thing is that the hard drive does not like high temperatures. The maximum temperature for a hard drive is 40 degrees, and that’s not very good, the ideal is 30-35. Then it will work for a long time. It will work at 45, but believe me, it won’t be very good. It's still too hot for him
Regular PC users do not need to know the components, the main thing is that everything works. If problems start with the computer, data is lost or there is not enough space, then the question of what hard drive is in the computer becomes relevant. If this is your case or you just want to know how good your computer is, in this article we will look at how to find out the hard drive model in a computer or laptop.
Types of disks
At the moment, there are three main types of disk drives: HDD, SDD and external hard drives.
- They are common in almost every shop-assembled computer and cannot be confused with anything else.
- – a modern and good alternative to HDDs, since they do not have any mechanics. Silent, fast and, accordingly, expensive.
- are also common, they do not need to be placed inside the case, and are easy to connect to the computer.
How to learn everything about your hard drive
Let's look at several ways to find out information about your hard drive
Remove the hard drive from the case
For classic stationary desktops, it’s easiest to open the case and see what kind of drives you have installed. On laptops, depending on the model, only a screwdriver may be enough to get to the disk, but sometimes you need to disassemble the entire laptop case.
Important! If you use this method, be careful because it is very easy to damage the hard drive.
External drives are just a box and a hard drive inside. Therefore, despite the fact that external drives are produced by many more companies. For example, an external drive may be from Transcend, but inside there will be a .
As a result, if you managed to get a disk, then the hard disk itself always contains detailed information such as volume, model, manufacturer, etc.
For Windows OS users
Through "My Computer". This method is suitable for Windows OS. This is the easiest method and does not require the presence or removal of the hard drive itself. It is enough to do the following:
- right-click on the “My Computer” shortcut;
- click on the “Management” item;
- go to the “Storage Devices” tab – “Disk Management”;
- also in the “Device Manager” tab, select “Disk devices”, there you will see the disk model.

The procedure may vary slightly depending on the version of Windows. In any case, in the Device Manager, in the “Disk Devices” section, you will see all the SSD and HDD models that your operating system sees. If you know for sure that you have a hard drive and valuable data on it, then this is a reason to turn to specialists.
For Linux OS users
Via hdparm. This way. This program is automatically installed in every modern version of Linux.
To access, you need to open a terminal and run hdparm in the console with the –i /dev/hda parameter. You will see the main parameters of your hard drive

Using programs
Everything will show which device you have installed. This function is also available in all applications for testing and analyzing computer configuration. For example, in EVERSET you just need to select the “Data Storage” tab and you will see every characteristic of your Hard Drive.

Don't be surprised if you see the total volume less than stated, it is always lower than stated due to the characteristics of manufacturers. The difference is always ~7%, so for a disk with a declared capacity of 500 GB we will get 465 GB of free space. If every gigabyte is important to you, always choose one with a larger capacity.
A laptop can have either a hard drive (HDD) or a solid-state drive (SSD). These are two devices with fundamentally different approaches to storing information, so if you, for example, decide to upgrade a laptop, then you need to find out what type of disk is currently in use. For convenience, we will simply call both types of media disks.
Physical examination
If the hard drive has failed and you want to remove it or are simply not afraid to disassemble the laptop, then you can find out the type of media as a result of a physical inspection. But first you need to get to the disk:
The hard drive is mounted inside the laptop on a special slide. Unscrew them and carefully remove the device from the case. Now you can find out the model, volume, speed and other important parameters.
Using Monitoring Utilities
There are two serious disadvantages to physically examining a hard drive:
- You have to disassemble the laptop just to find out which drive is installed and see its model.
- The disk casing may not contain the necessary information.
To resolve these shortcomings, use the software method of viewing hard drive information. It consists of using Windows tools or special utilities to monitor your computer. For example, to find out the size of your hard drive, just go to “My Computer” and add together the volumes of partitions C and D. You can also find out the full size using the “Disk Management” utility.

If you want to find out the exact model of the drive, then in the same “Management” window, go to the “Device Manager” tab. Open the “Disk devices” section and you will see the names of the connected media. 
If you want to find out all the technical parameters of the disk, including the number of heads, file system and firmware version, then use computer monitoring utilities - Speccy or AIDA64. 
In Speccy (a free program), the necessary information is located on the “Data Storage” tab. Among other things, it shows the current temperature of the disk and its general condition. 
A comparable amount of disk data can be found in the Data Storage section of AIDA64. By selecting the subsection with the name of the interface that is used to connect the media, you will receive a complete specification of the disk.
What types of discs are there?
When you find information about the disk, you will have to interpret it somehow, because for an unprepared person all these meanings and terms do not make any sense. Therefore, let's first figure out what types of drives for laptops there are:
- SSD (solid state drive) is a new type of storage device that uses memory chips, which makes it look like a regular flash drive. Does not make noise, does not heat up, does not vibrate, consumes little energy, and demonstrates high read and write speeds.
- HDD (hard disk, hard disk) is an outdated type of media that uses an electronic-mechanical operating principle. It is equipped with a head that reads data from magnetic disks, so the read and write speed is significantly lower than that of an SSD.
HDD is noisy, hot, vibrates and consumes more power than SSD. The only advantage is the low cost compared to a solid-state drive. But SSD is gradually pushing HDD out of the market, so soon no one will remember about hard drives. 
In addition to types and capacity, you need to know a few more important information about disks. For example, operating mode:
- SATA 150 - practically not used in modern laptops, bandwidth does not exceed 1.5 Gb/s.
- SATA 300 – operating mode with a bandwidth of 300 Gb/s.
- SATA 600 – operating mode with a bandwidth of 600 Gb/s.
It is preferable to buy drives that support SATA III mode (SATA 600). The difference in performance between SATA II and SATA III can reach 1.5-2 times, this is noticeable to the naked eye when loading the system and performing other tasks.
But if the laptop motherboard only supports the SATA II interface, then there is no point in installing an SSD with SATA III, because it will not be more than 300 Gb/s anyway. It's important to keep hardware compatibility in mind, otherwise you could end up wasting money on a device that has limited functionality.
If the HDD makes strange sounds or there are problems with writing and reading information, you should use one of the programs to check the hard drive for errors. Depending on the task (checking the disk surface for damage, searching for bad sectors, correcting errors, etc.), different software may be useful.
You can quickly check the disk for errors using standard system tools, but to restore the hard drive you will need special third-party programs. Having learned how to check the health of a hard drive using various utilities, a user of any level will be able to cope with any problems that may arise.
CheckDisk System Service is the simplest hard drive diagnostic program that can't find complex errors or fix bad sectors, but is useful for fixing basic problems. It is available on all versions of Windows OS and can be used to check drives of any type. All users need to know how to check a hard drive for errors with this tool.
The graphical interface version of the utility is most convenient for novice users. You can launch it through the disk management menu, which can be accessed in two ways:
- in Windows XP/Vista/7 - select “Manage” in the context menu of “My Computer”, then go to the desired menu;
- in Windows 8/10 - press the Win+X combination and select the appropriate item.
In the window that opens, select the device that needs analysis, right-click on it and select “Properties” from the drop-down menu. By going to the “Service” tab, you need to run the hard drive diagnostic program.
The system will check and automatically correct errors if the disk is not currently busy with read or write processes. Otherwise, the program will offer to test after rebooting the PC. If necessary, in the scan results window you can see detailed information about the status of the HDD.
The GUI version does not always help, since checking the status of the hard drive is sometimes required from safe mode or without starting the operating system at all. In such cases, the console comes to the rescue; you can launch it before the system starts using a boot disk.
Once you open the recovery console, you need to run the chkdsk /f command, which will check all connected drives. In some cases, this will help fix the error. However, in most situations, if a HDD failure has made it impossible to start the system, a more in-depth check of the hard drive’s condition will be required.
To use the console command from inside the system you need to:
- launch the command line (via Win+X or by entering cmd in the “Run” window);
- enter the chkdsk command indicating the letter of the partition being checked and additional flags;
- Confirm the operation by pressing Y.
Checking the HDD via the command line will be a little faster than when using the GUI version of the program; the results will be shown here in the console.
The Linux system also has standard tools - hdparm and smartctl, launched from the console.
Simple programs for quickly checking HDD
If standard utilities are not suitable, hard drive diagnostics can be carried out using simple third-party programs. They allow you to obtain more information about the health status of the HDD, but in case of serious problems they will not be suitable, since they cannot be used to fix the damage.
HDDScan is a free program that performs analysis in two modes:
- according to S.M.A.R.T. indicators;
- linear processing.
The tool evaluates the read and write speed of various sectors, marking the “slow” cells. During the analysis, the program ensures that the tested hard drives do not overheat; at the end of processing, the user is presented with a full report.
HDDScan good versatility. The utility allows you to check disks for errors regardless of the type of device: it can either check an external hard drive or analyze a RAID array, SSD drive or memory card.
Crystal Disk Mark has only one function - it evaluates the read and write speed. Despite this, it is often used, since it is still possible to check the hard drive for serviceability using just two indicators.
The test uses different algorithms, one of which is sequential recording mode. The program gradually fills all the space on the drive with blocks of a size specified by the user, after which it cleans the HDD. The same technique is used by hard drive manufacturers to check product quality. Its disadvantage is that it accelerates the wear of SSD drives.
CrystalDiskInfo And DiskCheckup They are similar in their set of functions, differing only in the interface. They check the status of the hard drive using S.M.A.R.T. algorithms and compile a history of checks, which allows you to track the dynamics of changes. CrystalDiskInfo has more options for visualizing history. For example, you can create a graph, not just get a written report.
Another feature of these programs is a convenient notification system. In-depth hard drive tests usually take a long time. If the user needs to step away from the computer, he can enable notifications of critical HDD errors via E-Mail.
Programs from hard drive manufacturers
Some HDD manufacturers have developed their own utilities for analyzing the status of the hard drive. They are intended for use with devices of the same name; diagnosing a hard drive from another company is possible with their help, but this must be done carefully. Unlike simpler programs, these utilities have versions in different languages, including Russian. Which program is better to analyze the HDD status?
The proprietary program from Seagate exists in two versions: a standard version for running under Windows and a DOS version in ISO image format, from which you can make a bootable USB flash drive. It is recommended to use the second option, since the check in this case will be more accurate and efficient.
SeaTools uses part of the S.M.A.R.T indicators. to test the hard drive without giving away details about each item. Three tests can be performed:
- short self-test of HDD;
- short rapid test;
- a long-term check in which all sectors are read sequentially.
As the scan progresses, the program automatically corrects any errors found.
Owners of hard drives from WD should know how to check the performance of hard drives using proprietary software from this manufacturer. The range of its capabilities is similar to that of the program from Seagate, but is somewhat expanded and allows for more in-depth work with the affected device.
There are two additional functions:
- deep disk formatting - the program writes zeros to all sectors, permanently destroying information;
- blocking access to bad sectors - the program marks bad blocks, preventing the writing of new information to them.
Unlike SeaTools, this HDD diagnostic program can be freely used with devices from any manufacturer to check the hard drive for errors - no problems were identified with this.
Deep testing software
If you need not only checking the hard drive for errors, but also correcting bad sectors, you cannot do without sophisticated software that carries out the most in-depth analysis of the HDD state.
Victoria HDD
According to many users, Victoria HDD is the best software for detecting hard drive problems. The program gained this reputation due to its wide range of functions.
Victoria exists in two versions:
- with a graphical shell for use from inside Windows;
- with a DOS shell to create a boot disk.
It's better to use the second version. Diagnostics of the HDD outside the system allows you to achieve better results, so it is always recommended to follow the principle “if possible, test the disk from the boot disk.” As a last resort, you can use a LiveCD of another OS, for example, a Linux distribution like Ubuntu.
Victoria HDD has a variety of functions:
- quick and complete disk scan;
- reassignment of bad sectors and their restoration;
- checking the status of contacts in the IDE or SATA cable;
- equipment performance analysis;
- viewing S.M.A.R.T. indicators.
When checking, you need to pay attention to the access time to sectors. It should not exceed 200-600 ms. You can also view the temperature of the disk during operation, but this is not so important.
HDD Regenerator
HDD Regenerator is a program for professional hard drive recovery. It not only marks bad sectors as unused, but also tries to revive them. For this, not the standard deep formatting method is used, but a proprietary algorithm based on transmitting signals of different levels to the sector. Despite its professional level, inexperienced users can also use this software, since testing a hard drive with its help is not difficult thanks to its convenient Russian-language interface.
Program features:
- ensuring data safety - it works only in read mode;
- support for different file systems;
- the ability to scan the disk surface;
- real-time monitoring.
The program is not suitable for everyone, since you can check your hard drive for functionality for free, but you will have to pay $90 for the sector recovery function.
If you don't want to pay, you can use TestDisk, a free program that can restore the partition table, boot sectors and MFT. It also detects bad sectors, can recover deleted information and fix file system errors. The only drawback is the lack of a graphical interface; you have to work from the console.
If, after checking the HDD and correcting all problems, the computer does not stop working incorrectly, it is worth checking the registry. Perhaps the failures are caused not by hardware failure, but by internal system errors.
Good day!
How many things could be corrected if we knew in advance what awaits us...
And if in life it is almost impossible to predict some events, then in the case of a hard drive, some of the problems can still be predicted and foreseen!
For this, there are special utilities that can find out and analyze the SMART* readings of a disk (show them to you, if necessary), and based on this data, assess the health of your disk, simultaneously calculating how many years it can still serve.
The information is extremely useful, in addition, such utilities can monitor your disk online, and as soon as the first signs of unstable operation appear, they will immediately notify you. Accordingly, you will have time to make a backup in time and take action (although backups should always be done, even when everything is fine ☺).
And so, in this article I will consider several methods (and several utilities) for analyzing the status of HDDs and SSDs.
*Note:
S.M.A.R.T. (Self-Monitoring, Analysis and Reporting Technology) - a special technology for assessing the condition of a hard drive with an integrated hardware self-diagnosis/self-monitoring system. The main task is to determine the likelihood of device failure, preventing data loss.
Perhaps this is one of the most popular questions asked by all users who are encountering problems with their hard drive for the first time (or who are thinking about the safety of storing their data). Everyone is interested in the time it takes for the disk to work until it completely stops. Let's try to predict...
Therefore, in the first part of the article, I decided to show a couple of utilities that can receive all the readings from the disk and analyze them independently, and give you only the finished result (in the second part of the article, I will provide utilities for viewing SMART readings for independent analysis).
Method No. 1 - using Hard Disk Sentinel
One of the best utilities for monitoring the status of computer disks (both hard drives (HDD) and “newfangled” SSDs). What is most captivating about the program is that it will independently analyze all the data received about the state of the disk and show you the finished result (very convenient for novice users).
In order not to be unfounded, I will immediately show the main window of the program, which appears after the first launch (the disk analysis will be done immediately automatically). The health and performance of the disk are assessed as 100% (ideally, this is how it should be), the time that the disk will still work in normal mode is estimated by the program at approximately 1000 days (~3 years).
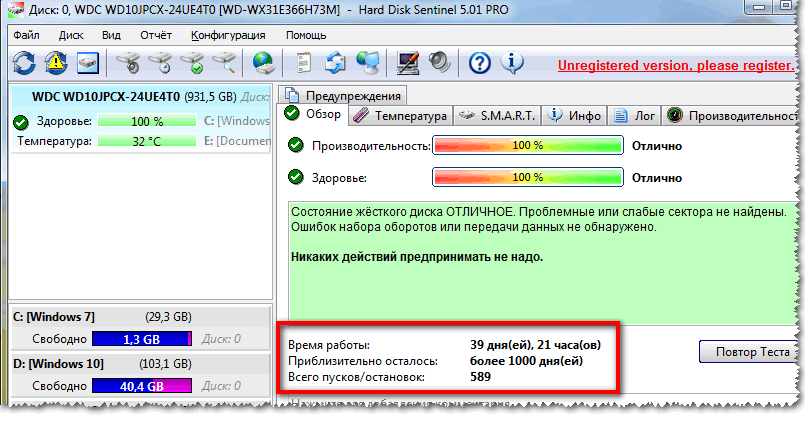
What's wrong with the disk according to Hard Disk Sentinel
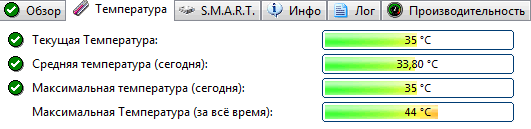
In addition, the program allows you to monitor the temperature: both current, average and maximum during the day, week, month. If the temperature goes beyond the “normal” limits, the program will warn you about this (which is also very convenient).
Hard Disk Sentinel also allows you to view SMART readings (though to evaluate them, you need to have a good understanding of disks), get complete information about the hard drive (model, serial number, manufacturer, etc.), see what the hard drive is loaded with (i.e. .get performance information).
In general, in my humble opinion, Hard Disk Sentinel is one of the best utilities for monitoring the status of disks in the system. It is worth adding that there are several versions of the programs: professional and standard (for the professional version with extended functionality, there is a portable version of the program that does not require installation (for example, it can even be run from a flash drive)).
Hard Disk Sentinel works in all popular Windows (7, 8, 10 - 32|64 bits), supports the Russian language in full.
Method number 2 - using HDDlife
This program is similar to the first one; it also clearly shows the current state of the disk: its health and performance (in percentage terms), its temperature, the amount of time worked (in months). At the top of the window, based on all this data, HDDlife shows a summary of your disk, for example, in my case, “ALL RIGHT” (which means that everything is fine with the disk).
By the way, the program can work online, monitoring the state of your disk, and if something goes wrong (when the first signs of problems appear) it will immediately notify you about it.

As an example, the screenshot below shows an SSD disk has received a warning: its condition is still within acceptable limits, but reliability and performance are below average. In this case, you should not trust the disk with any important data, and if possible, you should prepare to replace it.

By the way, in the main window of the program, next to the amount of disk time worked, there is a link "Disk settings" (allows you to change some necessary parameters). By opening it, you can control the balance between noise/performance (very useful with drives that make a lot of noise), and adjust power consumption settings (relevant for laptops that quickly run out of battery).

Addition: HDDlife works on both PCs and laptops. Supports HDD and SSD drives. Portable versions of the program are available that do not require installation. You can configure the program to run alongside your Windows. HDDlife works on Windows: XP, 7, 8, 10 (32|64 bits).
How to view SMART readings
If previous utilities independently assessed the condition of the disk based on SMART data, then the utilities below will give you more freedom and data for independent analysis. In the reports you will be able to find a fairly large set of parameters, on the basis of which it will be possible to roughly assess the condition of the disk and make a forecast for its further operation.
Method No. 1 - using CrystalDiskInfo
СrystalDiskInfo
An excellent free utility for viewing the status and SMART readings of a hard drive (SSD drives are also supported). What’s so attractive about the utility is that it provides you with complete information about the temperature, technical condition of the disk, its characteristics, etc., and some of the data comes with notes (i.e., the utility is relevant for experienced users who themselves know “what-is- what" and for beginners who need a hint).
For example, if there is something wrong with the temperature, you will see a red indicator on it, i.e. СrystalDiskInfo will inform you about this.

The main window of the program can be roughly divided into 4 zones (see screenshot above):
- "1" - all your physical disks installed in your computer (laptop) are listed here. Next to each one is shown its temperature, technical condition, and the number of sections on it (for example, “C: D: E: F:”);
- "2" - the current temperature of the disk and its technical condition are shown here (the program performs an analysis based on all data received from the disk);
- "3" - disk data: serial number, manufacturer, interface, rotation speed, etc.;
- "4" - SMART readings. By the way, what’s so attractive about the program is that you don’t have to know what this or that parameter means - if something is wrong with any item, the program will mark it in yellow or red and notify you about it.
As an example to the above, I will give a screenshot that shows two disks: on the left - with which everything is fine, on the right - with which there are problems with reassigned sectors (technical condition - alarm!).

As a reference (about reassigned sectors):
when the hard drive detects, for example, a write error, it transfers the data to a specially designated spare area (and this sector will be considered “reassigned”). Therefore, on modern hard drives you cannot see bad blocks - they are hidden in reassigned sectors. This process is called remapping, and the reassigned sector is remap.
The higher the value of reassigned sectors, the worse the condition of the disk surface. Field "raw value" contains the total number of remapped sectors.
By the way, for many disk manufacturers, even one reassigned sector is already a warranty case!
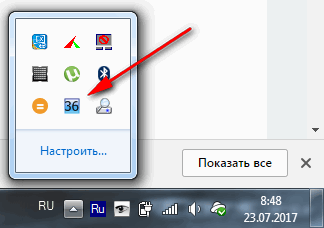
To utility CrystalDiskInfo monitored the status of your hard drive online - in the "Service" menu, check two boxes: "Agent launch" and "Autostart"(see screenshot below).

Then you will see the temperature program icon next to the clock in the tray. In general, you can now be more confident about the condition of the disk ☺...
Method number 2 - using Victoria
Victoria- one of the most famous programs for working with hard drives. The main purpose of the program is to assess the technical condition of the drive and replace damaged sectors with spare working ones.
The utility is free and allows you to work both under Windows and under DOS (which in many cases shows much more accurate data about the state of the disk).
Of the minuses: working with Victoria is quite difficult; at least, I highly do not recommend pressing buttons on it at random (you can easily destroy all the data on the disk). I have one fairly large article on my blog that explains in detail how to check a disk using Victoria (including finding out the SMART readings - an example in the screenshot below (in which Victoria pointed out a possible problem with the temperature)).
Instructions for working with Victoria:
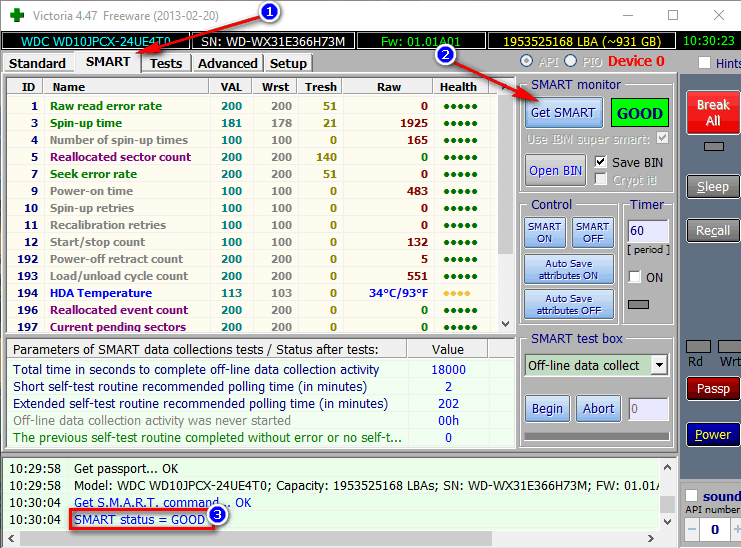
SMART Tab || Victoria utility
I'll call it a day, good luck to everyone!
Additions on the topic are welcome ☺